Fig. 4.1
Axillary incision
Maintaining the skin in tension, we make a subcutaneous dissection corresponding to the hairy area (if present) of about 5 cm long, preserving a thickness of about 1 cm (Fig. 4.2).
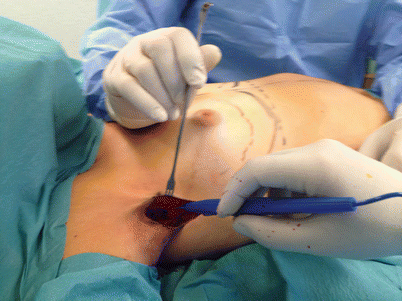
Fig. 4.2
Subcutaneous dissection corresponding to the hairy area (if present) of about 5 cm
We perform the dissection this close to the surface so as not to affect the lymphatic drainage of the breast towards the armpit or damage the intercostobrachial nerve. After careful hemostasis, we mobilize the skin over the outer edge of the pectoral muscle (Fig. 4.3).
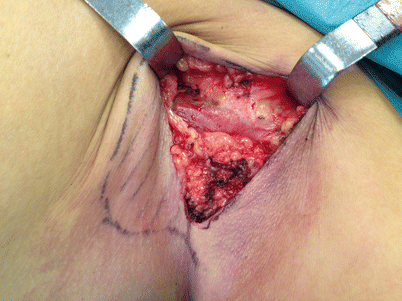
Fig. 4.3
Mobilization of the skin over the outer edge of the pectoral muscle
4.1.2.2 AREA II
With Metzenbaum scissors we open the plane between the pectoralis major and minor muscles (Fig. 4.4). It is important to follow the edge of the pectoralis major and to avoid going below the pectoralis minor; because of the pectoralis minor muscle’s significant insertions in the third, fourth and fifth ribs, the bleeding will be much greater if this limit is surpassed.
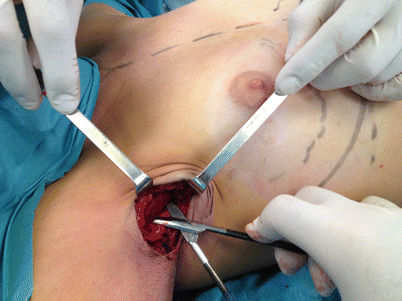
Fig. 4.4
Opening of the plane between the pectoralis major and minor muscles
4.1.2.3 AREA III
Next, we introduce the index finger beneath the pectoralis major muscle and make a blunt dissection, feeling the pectoralis major muscle above and the pectoralis minor below. If it is difficult to introduce the index finger, this means that we are below the pectoralis minor and we must start again.
We continue the digital blunt dissection towards the fourth rib, stopping when the muscle attachment is palpable (Fig. 4.5).
Fig. 4.5
Blunt dissection towards the fourth rib
We never perform muscle detachment in a blunt manner. We then place gauzes with warm saline solution, and create the same submuscular pocket on the contralateral side.
4.1.2.4 AREA IV
We insert the Serra-Renom [4] endoscopic retractor (Snowden-Pencer; Tucker, GA, USA) with a 10-mm 0° telescope, and we use the coagulation and suction endoscalpel to detach the pectoralis major muscle at the fourth, fifth, and sixth ribs (Fig. 4.6).
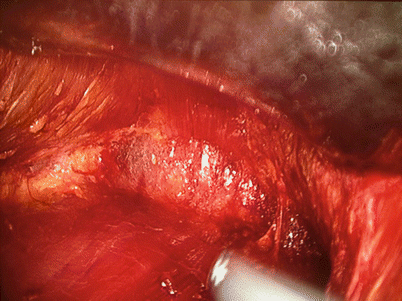
Fig. 4.6
Endoscopic dissection as far as the costal insertions of the pectoralis major
When we reach the sixth rib, the muscle fibers are tense because we maintain the retractor angled upwards (Fig. 4.7).
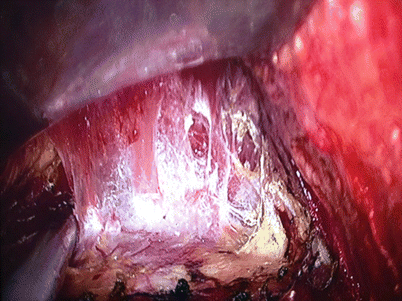
Fig. 4.7
Detachment of the pectoral muscle from its costal insertions
We are therefore able to section them confidently. We stop when we see the fat, so as not to injure the skin (Fig. 4.8).
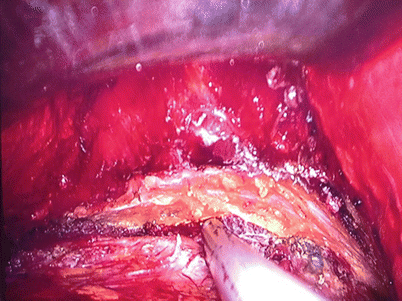
Fig. 4.8
Finalization of dissection on observing the subcutaneous fat, so as not to damage the skin
This section of the muscle fibers of the pectoralis major muscle at the sixth rib runs from the axillary line to within 1.5 cm from the sternal border. At the level of the medial insertions of the pectoralis major muscle, we never dissect above the fourth rib, so as not to section the perforating branches of the internal mammary artery and to avoid the risk of symmastia.
4.1.2.5 AREA V
In practically all breast augmentations, it is necessary to move the inframammary fold downward. We do this using blunt dissection with the Digman dissector under endoscopic view. As this area may bleed, we then perform hemostasis using the endoscopic scalpel if necessary.
4.1.2.6 AREA VI
This area extends from the lateral edge of the pectoralis major muscle to the anterior axillary line and the outer lower quadrant. It is very important not to perform dissection with electrocautery, because this process may damage the sensory nerves that innervate the nipple areola complex; therefore, blunt dissection is performed using the Digman dissector under direct and endoscopic vision (Fig. 4.9). We then perform rigorous hemostasis.
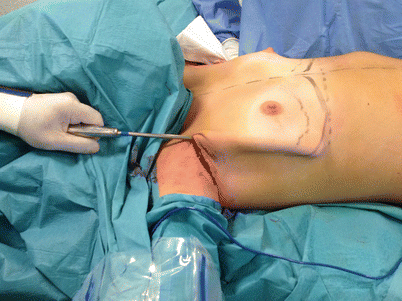
Fig. 4.9
Downward displacement of the inframammary fold and lateral extension of the pocket with the Digman dissector
After creating the pocket as described above, we now insert the sizers. The sizers tell us whether the expectations of the patient can be met, which prosthesis is the best for the particular patient, and whether the two pockets are the same or if some minor retouches are required to achieve symmetry before inserting the final implant. The sizer on one side corresponds to the width of the patient; on the other, the dimensions of the sizer we insert depend on the patient’s expectations, as discussed during the preoperative interview.
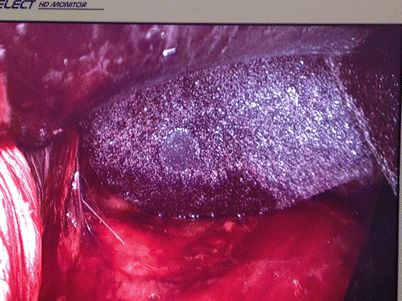
We then insert the definitive implant and check that it is correctly positioned by endoscopic visualization of landmarks in the posterior part of the prosthesis (Figs. 4.10 and 4.11).
 Endoscopic Harvest of the Fascia Lata for Facial Reanimation
 Video-Assisted Thoracoscopic Sympathicotomies for the Treatment of Palmar and Axillary Hyperhidrosis
 Endoscopic Diastasis Recti Repair
 Endoscope-Assisted Brow Lift
 Transaxillary Endoscopic Subfascial Breast Augmentation
 Endoscopic Flap Design and Harvesting


Fig. 4.10
Endoscopic visualization of landmarks in the posterior part of the prosthesis
Related posts:
Endoscopic Harvest of the Fascia Lata for Facial Reanimation
Video-Assisted Thoracoscopic Sympathicotomies for the Treatment of Palmar and Axillary Hyperhidrosis
Endoscopic Diastasis Recti Repair
Endoscope-Assisted Brow Lift
Transaxillary Endoscopic Subfascial Breast Augmentation
Endoscopic Flap Design and Harvesting
Stay updated, free articles. Join our Telegram channel
Full access? Get Clinical Tree
