22. Lower Eyelid Blepharoplasty
22.1 Introduction
In patients who exhibit involutional changes of the lower lids, including dermatochalasis of skin, lower eyelid laxity, and fatty prolapse of mild to moderate extent, the standard transcutaneous lower blepharoplasty addresses these issues quite adequately.
22.2 Steps Involved in a Standard Lower Blepharoplasty
Marking of the infraciliary incision line and placement of the traction suture.
Incision and elevation of the skin flap.
Transition into skin-muscle flap.
Exposure of fat pads of the lower lid.
Lateral canthal tightening by canthopexy or canthoplasty
Identification of lateral fat pad.
Resection of skin-muscle flap and canthal fixation.
Wound closure.
22.2.1 Step 1: Marking the Crease and Placing the Traction Suture
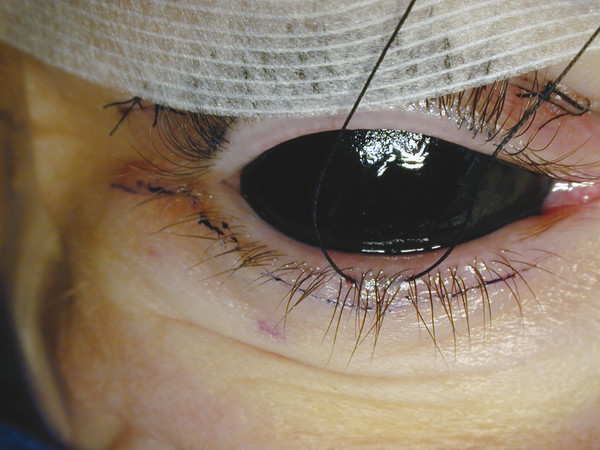
A rigid black eye shield is applied to protect the globe. Methylene blue is used to draw a line immediately below the lower eyelashes from the medial end to the lateral canthus and then slanting inferolaterally for 7 to 8 mm from the lateral canthus. A 4–0 silk with tapered needle is applied below the lid margin at the midpoint of the eyelid margin (Fig. 22.1).
22.2.2 Step 2: Incision and Elevation of the Skin Flap
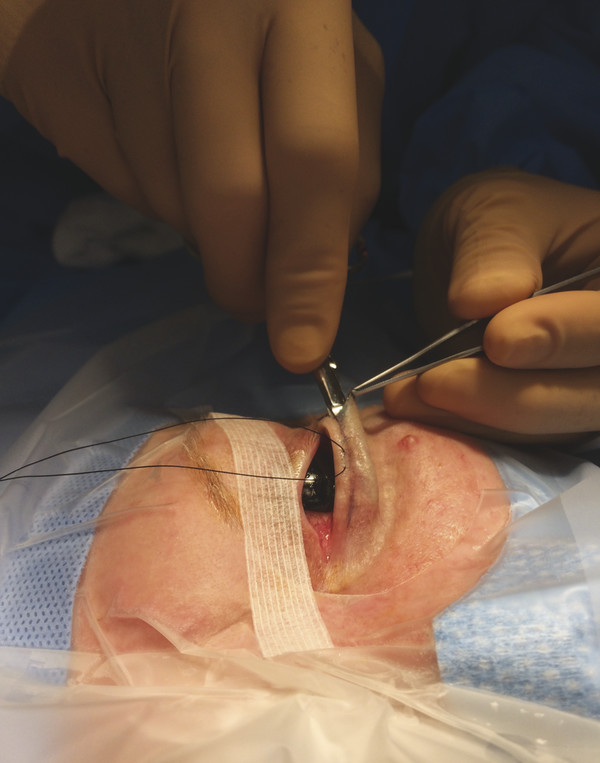
A no.15 Bard-Parker blade is used to make a laterally located infraciliary incision covering 25 to 30% of the lid margin and then extending into the inferolateral marking. The inferolateral skin incision is further deepened using a Bovie cautery on cutting mode. Bipolar cautery is used for control of capillary bleeding. A retractor is applied laterally over the lateral end of the inferior tarsus, and a straight scissor is used to initiate a subcutaneous dissection over the pretarsal space. This is done to preserve the pretarsal orbicularis oculi and the tone of the lower eyelid closure mechanism. This step is completed toward the medial end. After this, this same scissors can be used to make the full-thickness infraciliary skin cut, taking care not to sever any eyelashes and avoiding embedding any cut remnants of eyelashes within the wound (Fig. 22.2).
22.2.3 Step 3: Transition into Skin–Muscle Flap
I use the same scissors to start a second plane of dissection, this time coming from the lateral end of the wound in a suborbicularis level at least 2 mm below the inferior tarsus, to avoid disruption of the inferior tarsal arcade. This dissection is completed toward the medial end. The traction suture is used to elevate the lid margin. A Bovie cautery on the lowest cutting setting is used to transect through the preseptal orbicularis oculi approximately 2 mm below the lower border of the inferior tarsus. This effectively enters the postseptal space where the inferior orbital fat is located. Bipolar cautery is used to control any bleeding from the muscle cut (Fig. 22.3).

22.2.4 Step 4: Exposure of Fat Pads of the Lower Lid
The fat pads can be seen easily even without any pressure on the globe and still may be bound by fibrous capsule or partial remnants of the inferior orbital septum. These flimsy barriers can be easily opened using a dull-tipped Westcott scissors or even the cuttingb ovie cautery tip in a superficial level. The central fat pad or pads are identified and teased out. Any vessels on the fat pad are cauterized using bipolar cautery with a jeweler’s forceps tip. It can then be carefully excised using scissors or combination of cutting cautery. Any bleeding vessel seen on cutting the fat pad needs to be controlled using bipolar cautery. This is repeated if the nasal fat pad is prominent. (The lateral fat usually is not prominent at this stage and is best handled by observation after the step involving lateral canthal tightening.)
22.2.5 Step 5: Lateral Canthal Tightening by Canthopexy or by Canthoplasty
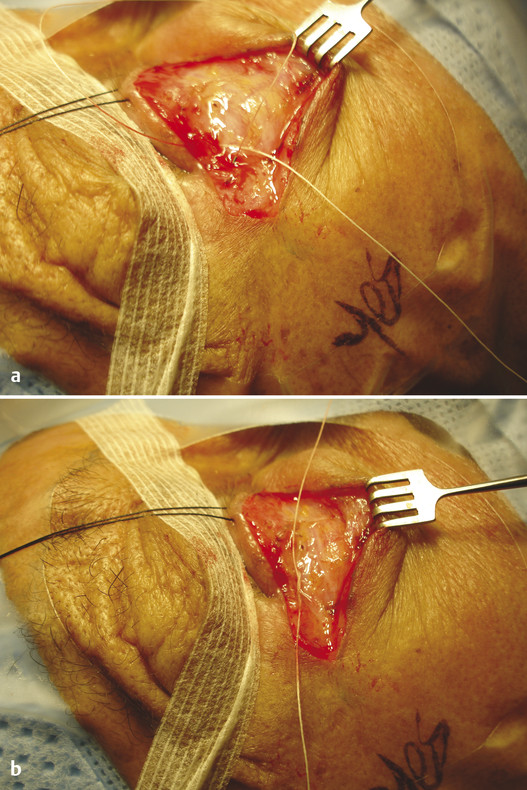
Horizontal laxity may be present preoperatively and confirmed after the skin–muscle flap is raised. Often the cause is lengthening and thinning of the inferior limb of the lateral canthal tendon with aging (Fig. 22.4 a). Correction by canthopexy: If there is mild horizontal laxity, which may be problematic later, I favor application of a 5–0 Vicryl suture (with S-14 needle) to plicate that portion of the lateral canthal tendon (Fig. 22.4a). The needle is applied either to a partial layer of the lateral pretarsal orbicularis, to the lateral end of the inferior tarsus, or to fibrous strands of the lateral canthal tendon. This is then anchored to the inner periorbita at a point level with the lateral orbital tubercle, from within the lateral orbital rim. When tied, it results in a restoration of tension of the lower lid margin and may appear slightly uplifted on the surgical table. (Fig. 22.4b) Correction by canthoplasty: Often the horizontal laxity is obvious and shows redundancy that can be easily confirmed when the lid margin can be lifted off the surface of the protective black eye shield, or may have been noted in previous office examination using the traction test. The lower lid then needs to be shortened through the following steps: An inferior cantholysis (release) is performed using a pair of scissors or cutting cautery. Bipolar cautery is used to control bleeding from the lid margin, the inferior tarsal arcade, or the inferior orbicularis affected by the canthal release. One to three millimeters of the inferior tarsus can be excised, bearing in mind that the shortening effect is much more than the measured amount thus excised (Fig. 22.5).
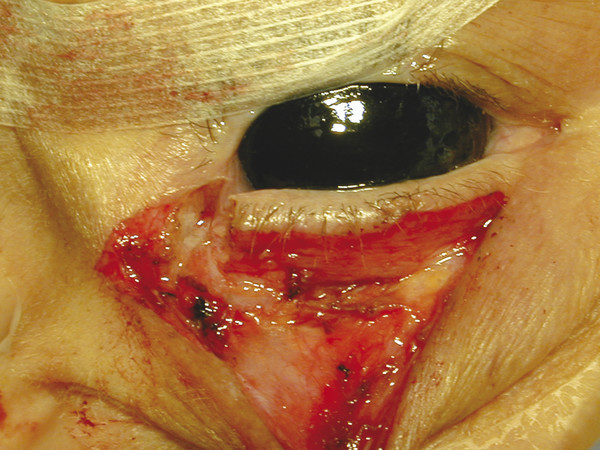
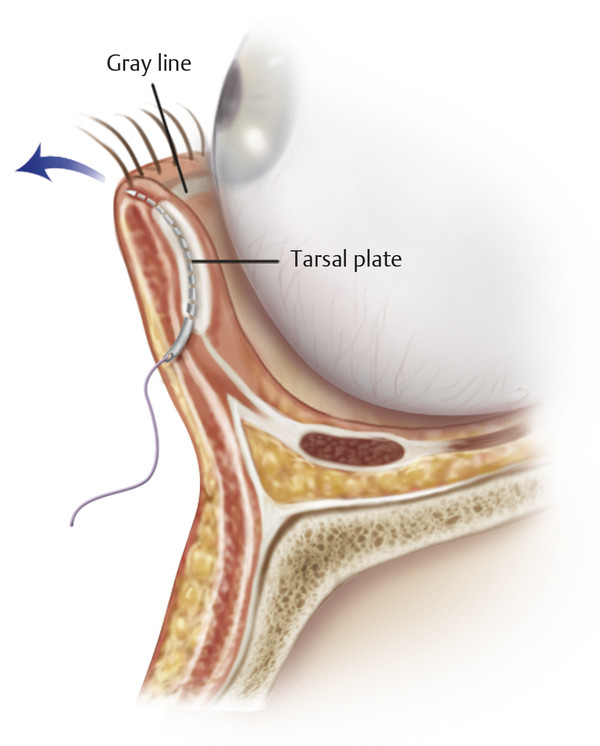
I favor the use of a 5–0 Vicryl for the tarsal plate, passing it from the inferior corner of the lower tarsus in an intratarsal fashion, then exiting the needle close to the lid margin but still within it, without contact with the tarsal conjunctiva or skin (Fig. 22.6). Reanchoring is directed to a point within the inner periorbita just above the lateral orbital tubercle and brought from inside the lateral orbital rim outward. When the suture is tied, there should be mild resistance to lifting off the tarsal plate from the protective eye shield or globe surface.
Related posts:
 6. Facial Sculpting and Facial Slimming with Neurotoxins
 20. Comparison of Midface Rejuvenation Techniques
 17. Secondary Facelifting
 5. Energy-Based Treatments for Facial Aging
 9. Male versus Female Facelift Surgery. Is There a Difference?
 12. Primary Superficial Musculoaponeurotic System (SMAS) Facelift and Neck Lift
Stay updated, free articles. Join our Telegram channel

Full access? Get Clinical Tree


