17 Unilateral Nasal Floor and Inferior Meatus Flap
Summary
The unilateral nasal floor and inferior meatus flap is a simple surgical option for small- to medium-sided nasal septal perforations (NSPs) situated in the anterior and medial part of the septum. Through three incisions, the mucosa of the nasal floor and inferior meatus is freed and rotated medially to fully cover the perforation. This flap has a series of advantages: It utilizes local mucosa, can be used in patients with poor cartilaginous septal support, there is no need for a second surgical time, and the donor surface of the flap heals by secondary intention.
17.1 Anatomy
The floor of the nose is a horizontal structure placed on a slightly lower level than the anterior nares. It is composed of the premaxilla bone and palatine bone in the anterior and middle third and posteriorly by the soft palate.
The nasal floor is a region that receives blood supply from different arteries. The posterior part is fed by the posterior septal artery, also known as nasal septal artery, which divides into two branches before reaching the nasal septum. The inferior branch runs toward the nasal floor and is the main artery of this flap. Laterally, this artery anastomoses with branches of the posterior lateral nasal artery, another main branch of the sphenopalatine artery 1 , 2 (Fig. 17‑1). There is also some vascular contribution in the anterior part of the nasal floor and septum from the superior labial branch of the facial artery, which forms the “little area” or “Kiesselbach’s plexus” together with the anterior ethmoidal artery and terminal branches of the posterior septal artery.
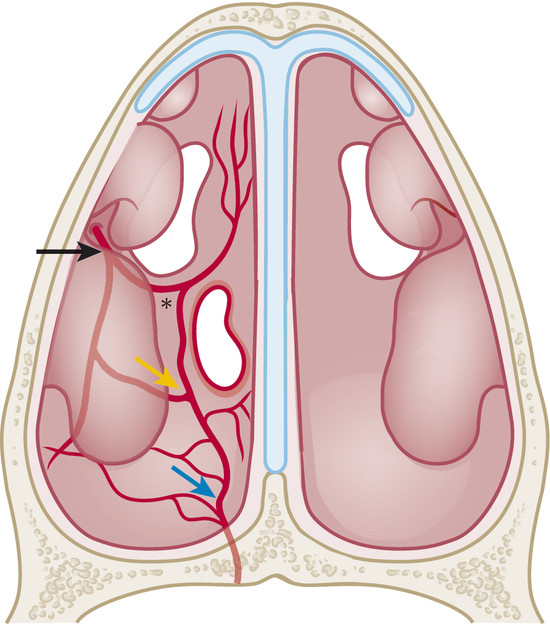
We measured the dimensions of the nasal floor and nasal floor flap in four fresh cadavers (n = 8). The medium length of the nasal floor is 6.03 cm in our samples. The usable area of the nasal floor (between the piriform aperture and the beginning of the soft palate) defines the maximum length of the flap, which is around 4 cm. The medium width is about 2.2 cm with a square area of 8.8 cm2 approximately. The width of the flap is modifiable, depending on the size of the perforation, by locating the lateral incision higher in the inferior turbinate or lower in the inferior part of the inferior meatus.
17.2 Indications
NSPs are situated in the anterior and medial parts of the septum and in the inferior half so the flap can cover the defect completely.
Perforations in the previously described location of small or moderate size. The vertical dimensions of the defect should not exceed half the height of the septum at that level, because flaps will be mobilized cranially and caudally to the perforation and perforations larger in their sagittal perspective and smaller in their vertical one would be inoperable. 3
17.3 Surgical Steps
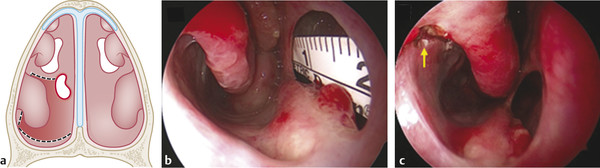
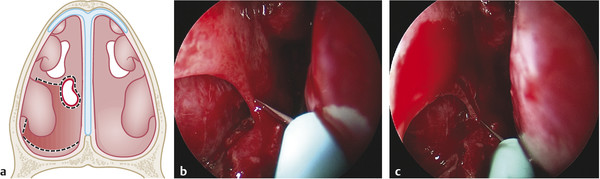
Start measuring the size of the NSP to set the extension of the flap. To improve exposure, it can be useful to outfracture the inferior turbinate (Fig. 17‑2a).
With the 0-degree endoscope, proceed to infiltrate the anterior septum and the floor of the nose with a solution of bupivacaine (0.25%) containing epinephrine (1:100,000) to achieve correct homeostasis and facilitate the subperiosteal and subperichondrial dissection.
Incisions (Fig. 17‑2b):
Two parallel incisions are made through the floor of the nose; the first should be located at least 5 mm anterior to the anterior border of the septal perforation, and the second incision at least 5 mm posterior to the posterior border of the perforation.
Anterior incision usually starts in the inferior meatus, at the level of the piriform aperture and it is extended medially along the nasal floor until the premaxilla.
Posterior incision runs parallel to the anterior incision but begins at the junction between the soft and hard palate and, if needed, can be extended laterally to the posterior insertion of the inferior turbinate.
Lateral incision connects the two previous cuts (anterior and posterior) along the inferior meatus. For large perforations, the extended version of this flap including the mucosa of the inferior turbinate can be achieved by placing the lateral incision higher in the lateral wall. 4 , 5
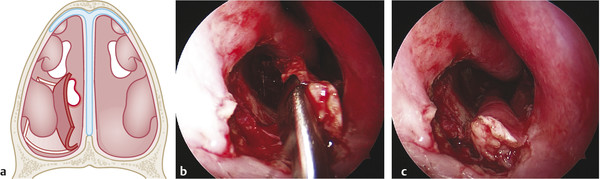
Those incisions can be made with an electric scalpel or a cold instrument, depending on the surgeon’s preference. It might be necessary to use sharp scissors to free the flap from the deep fibers at the level of the anterior nasal spine.
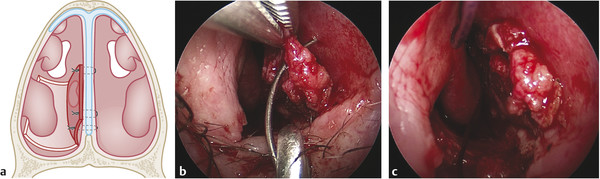
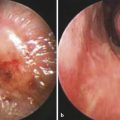
Avoid mucosal tearing during harvesting of the flap. Verify that the flap is pedunculated at the caudal part of the septal mucosa to guarantee the blood supply (Fig. 17‑3).
Rotation and elevation of the flap. Verify the full coverage of the perforation with safety margins (at least 3 mm) to avoid septal reperforation in case of retraction of the flap. (Fig. 17‑3, Fig. 17‑4).
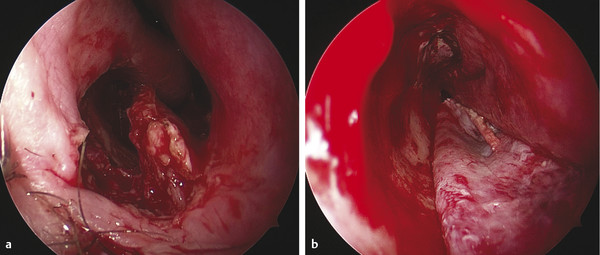
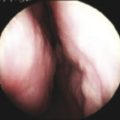
Rim and refresh the septal perforation edges with a knife until obtaining bleeding mucosal margins (Fig. 17‑5).
Suturing of the flap. Sutures (synthetic absorbable polyglycolic acid suture; 4–0) should be placed in the superior border of the flap (anteriorly and posteriorly) avoiding tension of the tissue (Fig. 17‑6).
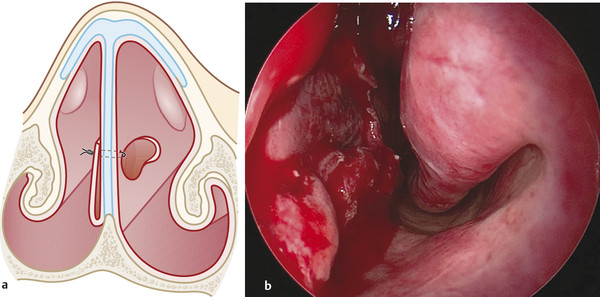
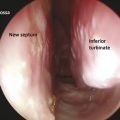
Verify the total coverage of the septal perforation from the other nasal cavity (Fig. 17‑7).
Place Silastic sheets in both sides to prevent adhesions and add support while taking care to put them medial to the middle turbinate and without pressuring on the medial attachment of the flap to avoid necrosis.
Bilateral nasal packing.
A video showing all the surgical steps has been provided (Video 17.1).
Related posts:
Stay updated, free articles. Join our Telegram channel

Full access? Get Clinical Tree


