Operative Technique
Introduction
The structure of this chapter is intended to guide the reader stepwise through the day of the operation, beginning with meeting the patient prior to the procedure to confirm and outline the aesthetic objectives, selection of an appropriate donor site for harvesting the fat, and the sequential description of the operative technique. The emphasis of the preliminary section on preoperative assessment will be placed on selection of donor site based on gender, anesthesia considerations, and individual anatomy. Determination of which facial areas to augment and to what extent has already been covered in detail in Chapter 2 and will not be reiterated herein.
The operative technique is divided sequentially into donor-site anesthesia, recipient-site anesthesia, fat harvesting, fat processing, and fat injection. To create a simplified “recipe” for the novice surgeon embarking on fat transfer, we have divided facial fat infiltration into three distinct levels: volumetric foundation, refinements, and advanced techniques. Volumetric foundation describes a reliable and consistent method of facial fat enhancement that would benefit the majority of patients with facial volume loss and which can serve as a foundation upon which further individual tailoring with supplemental fat (refinement) can be added. Volumetric foundation is based on an empiric enhancement of the face rather than artistic judgment. Refinements describe the second pass that the surgeon undertakes in adding more fat based on the patient’s particular aesthetic deficits after the surgeon has completed the volumetric foundation, or first pass.1 Finally, advanced techniques describe further refinements associated with a higher risk-to-benefit ratio and/or patient morbidity profile and should be undertaken only in more experienced hands. By following the proposed algorithm, surgeons can benefit from a deliberate, safe, and consistent treatment plan for facial fat enhancement.
In keeping with the concept of this book that fat transfer will often be used in a complementary fashion with traditional rejuvenative procedures, an outline is presented for how to incorporate these other procedures into the surgical plan. A superficial musculoaponeurotic system (SMAS) or deep-plane facelift can be safely and easily combined with facial fat transfer as long as fat is not infiltrated into the undermined skin—which could predispose toward fat migration and/or compromise longevity of the fat. Facelifting techniques lie beyond the scope of this text. However, the chronological order for facelifting, that is, when a facelift should be performed in conjunction with facial fat transfer, will be stressed. Similarly, the timing of blepharoplasty in relationship to facial
fat transfer will also be elaborated. Whether or not the prospective surgeon should decide to integrate facial-lifting procedures with fat enhancement, this chapter will provide the blueprint for undertaking facial fat enhancement as a stand-alone technique or as a complement to other traditional surgical enhancement methods.
fat transfer will also be elaborated. Whether or not the prospective surgeon should decide to integrate facial-lifting procedures with fat enhancement, this chapter will provide the blueprint for undertaking facial fat enhancement as a stand-alone technique or as a complement to other traditional surgical enhancement methods.
Beyond the text, the accompanying DVD videos are intended to be a direct corollary to this chapter as both visual reinforcement and elaboration of method. This book was conceived as much as a video tutorial as a written guide, and the reader is encouraged to read this chapter, watch the videos, and return to the text again until the material becomes lucidly revealed. The second (bonus) DVD contains some content not discussed within the text and is meant as a supplement to the material presented herein.
Preoperative Assessment
On the day of surgery, the first step for the surgeon is to review in his or her own mind and with the patient the precise plan for the operative procedure. The two principal components of the preoperative plan involve determination of which facial zones to augment, how much fat to use, and selection of an appropriate donor site for harvesting.
Marking the Face
With the patient seated in an upright position, the surgeon can re-evaluate the dependent tissues that would benefit from lifting and the facial zones that need volume restored via fat transfer (Fig. 3-1). Detailed notes prepared during the initial cosmetic consultation and preoperative visit facilitate this process. The standardized operative planning sheet (Fig. 3-2), which enumerates the quantities and distribution for facial fat enhancement, can serve as a concrete
outline for the surgeon. With that in mind, the surgeon can then mark out the face with a surgical marking pen to indicate areas for facial fat transfer as well as the incisions for facelifting, browlifting, blepharoplasty, and so on, if ancillary procedures are to be combined.
outline for the surgeon. With that in mind, the surgeon can then mark out the face with a surgical marking pen to indicate areas for facial fat transfer as well as the incisions for facelifting, browlifting, blepharoplasty, and so on, if ancillary procedures are to be combined.
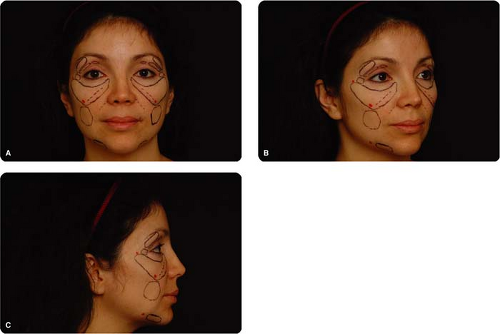 Figure 3-1A, B, C: This model demonstrates the preoperative markings for fat transfer (solid black lines). Outlined are the foundation areas, including the inferior orbital rim, nasojugal groove, lateral brow, lateral canthal region, lateral and anterior cheek, buccal, and prejowl sulcus. Also marked out in this patient are the locations for the more advanced injections into the upper eyelid below the superior orbital rim in both the central and lateral aspects. The dotted line running obliquely across the anterior cheek represents the malar depression/ malar septum. The red marks indicate the primary cannula entry sites. |
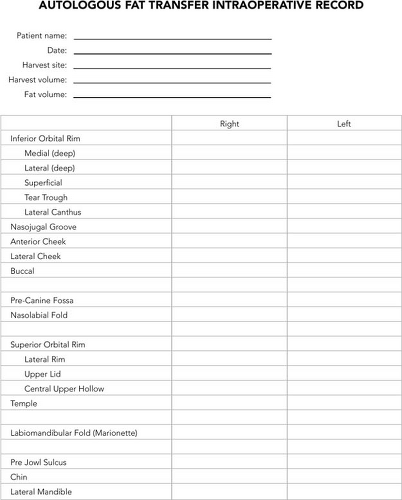 Figure 3-2: This intraoperative record facilitates easy and accurate recording of volumes of fat transferred during a procedure. |
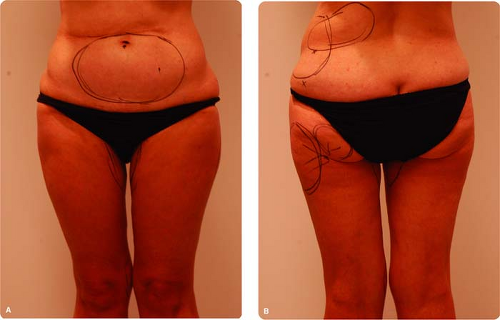 Figure 3-3A: Anterior view showing the markings for donor harvesting: the lower abdomen, inner thigh, and inner knee. B: Posterior view showing additional sites for harvesting: the lateral thigh, lateral buttock, hip (lateral waist), and waistroll (lower lateral back). Proposed entry sites for harvesting in the marked adjacent areas are indicated with an “X.” |
Selection of Donor Site
Selection of an appropriate donor site can be performed the day of the procedure or already planned in advance (Fig. 3-3). For the less experienced surgeon, evaluation of the donor site prior to the date of surgery can prove to be helpful to facilitate a well thought out plan. However, for the experienced surgeon, judgment as to the ideal harvesting site can be quickly and easily made just prior to surgery. Clearly, not having to undress the patient on a separate day prior to surgery can be less intrusive for the patient and less time consuming for the surgeon. For a beginning surgeon, it may be worth the extra effort to determine in advance, with the patient, the ideal donor site. Even for the veteran, advance planning can help in special circumstances. For instance, a thin, athletic individual should be evaluated for the presence of adequate donor fat. If on examination limited donor fat is found to be available, the patient may need to be prepared for the possible use of alloplastic implants to obtain the desired result.
Patients who have undergone extensive body lipocontouring may have limited fat deposits from which to harvest, and it is always easier to harvest from virgin territories that have not been subjected to prior body liposuctioning. For those who have had liposuctioning in the past, overlooked areas that can prove to be an excellent source
for harvesting is the waistroll that descends along the lower back, the triceps, and the inner knee (Fig. 3-3). Although fat can be harvested from areas of prior liposuctioning, the amount may be more limited and the area generally more fibrotic. Advance preoperative evaluation can help to establish which region would be preferred.
for harvesting is the waistroll that descends along the lower back, the triceps, and the inner knee (Fig. 3-3). Although fat can be harvested from areas of prior liposuctioning, the amount may be more limited and the area generally more fibrotic. Advance preoperative evaluation can help to establish which region would be preferred.
TABLE 3.1 Selection of Donor Site in Women | ||||
|---|---|---|---|---|
|
TABLE 3.2 Selection of Donor Site in Men | ||||
|---|---|---|---|---|
|
Patients who have undergone abdominal surgery should always be carefully evaluated for the type of incisions they have and the presence of any obvious or occult ventral hernias that would obviate safe abdominal fat harvesting. If the surgeon plans to harvest from the abdomen, especially in a patient with prior abdominal surgery, the patient should be placed in a supine position and asked to valsalva. Effectiveness of the valsalva can be improved by having the patient raise his or her head off of the bed during abdominal contraction. During valsalva, the surgeon should palpate along and around the incision line as well as the entire abdominal cavity, including the umbilicus, to determine whether any ventral or umbilical hernia is present. Repeated valsalva and relaxation should be undertaken to ensure that the surgeon has thoroughly evaluated for this possibility. A vertical midline scar may not be as problematic as other abdominal incisions, since more fibrotic fat exists in the midline and conventional lower abdominal harvesting typically avoids the midline region.2
Gender distribution of fat is another important variable that can be instructive to the beginning surgeon. Women tend to accumulate adipose tissue as they age in the setting of facial fat loss. Conversely, men, young or old, who tend to gain excessive body fat, oftentimes have commensurately fuller faces that do not benefit as much from facial fat enhancement. Typically, men who are thin, athletic, or emaciated from disease profit from facial fat transfer but tend to have much less available body fat. (Tables 3-1 and 3-2 elaborate on the rank order based on gender for donor supply of fat.)
Women accrue fat principally along the inner and outer thighs, hips, and lower abdomen. Asking the patient where she thinks she has the greatest fat stores or has the
most difficulty losing fat is a very straightforward and beneficial method to help in determining the best potential donor site. The lower abdomen and inner thigh are favored sites for harvesting, as they do not require intraoperative repositioning (Table 3-3). Albeit an uncommon source for harvesting, the anterior thigh can also provide an excellent source for fat harvesting in individuals that have a disproportionately large fat distribution in this area. Like the lower abdomen and inner thigh, the patient does not need to be repositioned for fat harvesting. For patients who are under conscious sedation, body repositioning for fat harvesting is easier due to patient assistance in moving his or her own body.
most difficulty losing fat is a very straightforward and beneficial method to help in determining the best potential donor site. The lower abdomen and inner thigh are favored sites for harvesting, as they do not require intraoperative repositioning (Table 3-3). Albeit an uncommon source for harvesting, the anterior thigh can also provide an excellent source for fat harvesting in individuals that have a disproportionately large fat distribution in this area. Like the lower abdomen and inner thigh, the patient does not need to be repositioned for fat harvesting. For patients who are under conscious sedation, body repositioning for fat harvesting is easier due to patient assistance in moving his or her own body.
TABLE 3.3 Body Positioning for Donor-site Harvesting | ||||||||||
|---|---|---|---|---|---|---|---|---|---|---|
|
Some practical matters about evaluation of donor site should be mentioned herein for the sake of completeness. The semiclothed female patient who is undergoing evaluation for donor site should always be accompanied by a female chaperone from the surgical staff in order to avoid any medicolegal ramifications. Most styles of underwear are amenable for fat harvesting. Standard bikini-style female underwear is acceptable for women; and a boxer or brief is appropriate for men.
Operative Technique
General Principles of Anesthesia
Fat transplantation can be undertaken with any level of anesthesia, from straight local infiltration to general anesthesia. Local anesthesia can be somewhat uncomfortable for the patient given the extent of local-anesthesia infiltration. General anesthesia is typically unwarranted. Our preference is level II conscious (also known as moderate) sedation that provides adequate patient comfort and cooperation if body repositioning is needed for fat harvesting.3 If a combined procedure (with facelifting, etc.) is planned, and the surgeon is accustomed to general anesthesia, then general anesthesia is perfectly acceptable. Like all procedures, patient comfort, surgeon preference, and anesthesiologist/anesthetist experience will dictate what type of anesthesia is most suitable (Fig. 3-4).
Donor-site Anesthesia
Infiltration of local anesthesia begins with addressing the points of entry for fat harvesting. A small bleb of local anesthetic consisting of 1% lidocaine with 1:100,000 epinephrine is injected into the location through which the local anesthetic will be infiltrated and later where the harvesting cannula will be inserted: The reader is referred to the site-specific sections that follow on fat harvesting for details about where each incision site should reside.
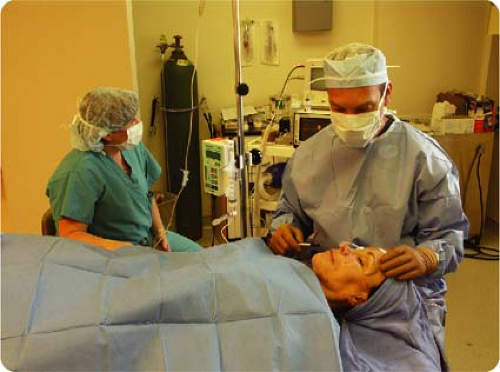 Figure 3-4: Any kind of anesthesia from local to general can be used for autologous fat transfer. We have found that an intravenous mixture of remifentanil and midazalom has worked as our preferred method of anesthetic delivery. |
Next, the local anesthetic is infiltrated into the donor site through the anesthetized bleb of skin. The mixture and amount of local anesthetic differs depending on whether the patient is under intravenous sedation or general anesthesia versus oral sedative or no sedation at all (Table 3-4). If the patient is under intravenous sedation or general anesthesia, a 20-cc Luer-Lok syringe with a mixture of 15 cc of normal saline and 5 cc of 1% lidocaine with 1:100,000 epinephrine is infiltrated into the donor site using a 7″ 22-gauge spinal needle in a fanlike distribution. Approximately 20 cc total of this mixture is injected into the donor site (per side of the patient) with half of the mixture placed along the deep aspect of the fat pad and half in the immediate subcutaneous plane.4 By infiltrating principally into the deeper and superficial layers of the fat pad, the middle level remains relatively free of anesthetic for cleaner harvesting. The superficial portion, which is most sensitive, is injected first by stretching the skin taut with the nondominant hand. In this plane, the skin can appear to be distorted from the
superficial injection, which is appropriate and should not raise alarm. The surgeon then grasps the fat pad with his or her nondominant hand to facilitate injection of the anesthetic into the deeper portion of the fat pad. If the surgery is being performed with oral sedation or just local anesthetic, a higher percentage of lidocaine is used. The 20-cc Luer-Lok syringe is filled with equal parts saline and lidocaine: 10 cc of normal saline and 10 cc of 1% lidocaine with 1:100,000 epinephrine. The same injection technique described above applies.
superficial injection, which is appropriate and should not raise alarm. The surgeon then grasps the fat pad with his or her nondominant hand to facilitate injection of the anesthetic into the deeper portion of the fat pad. If the surgery is being performed with oral sedation or just local anesthetic, a higher percentage of lidocaine is used. The 20-cc Luer-Lok syringe is filled with equal parts saline and lidocaine: 10 cc of normal saline and 10 cc of 1% lidocaine with 1:100,000 epinephrine. The same injection technique described above applies.
TABLE 3.4 Local Anesthesia Preparations | |||||||||
|---|---|---|---|---|---|---|---|---|---|
|
Recipient-site Anesthesia
Recipient-site anesthesia is divided into two distinct phases: (a) injection of discrete points and areas with a sharp needle, and (b) injection of broad areas with a blunt infiltrating cannula. The latter is carried out to avoid ecchymosis and hematoma formation that may arise from piercing vascular structures with a sharp needle.
Recipient-site Anesthesia Phase 1: Injection with a Sharp Needle
Injection of distinct points along the face that correlate with sensitive neurovascular structures should be undertaken first to decrease discomfort associated with broad injection of anesthesia (Fig. 3-5). The first seven points in Figure 3-5 are infiltrated percutaneously with a short ½″ 30-gauge needle attached to a 5-cc syringe using 1% lidocaine with 1:100,000 epinephrine. The last two areas are injected in a fanning technique with a 1-¼″ 27-gauge needle attached to a 5-cc syringe using the same mixture of 1% lidocaine with 1:100,000 epinephrine. Approximately 5 cc of local anesthesia should be required per side of the face. Phase 1 is carried out on one side of the face, followed by the same technique on the contralateral side before repeating this sequence for Phase 2. To expedite this process, it may be easier to inject the first seven points using the short 30-gauge needle on both sides of the face first before returning to inject the last two points using the longer 27-gauge needle on each side. As an acupressure technique, the surgeon can gently pinch the site of injection immediately prior to infiltration to minimize discomfort if the patient is under lighter sedation. The chronologic order of injection is not important, but the sequence has been shown for ease of recall and to encourage a systematic approach. The first point of injection corresponds with anesthesia of the zygomaticofacial nerve of the maxillary branch of the trigeminal nerve, located along the inferolateral orbital rim (Fig. 3-5, Point 1). The second point corresponds with fat infiltration entry site B and is located 2 to 3 cm lateral to the lateral canthus (Fig. 3-5, Point 2). Next, the zygomaticotemporal branch of the maxillary division of the trigeminal nerve, located along the superolateral aspect of the orbital rim, is anesthetized (Fig. 3-5, Point 3). Continuing medially, the supraorbital bundle of the ophthalmic branch of the trigeminal nerve is infiltrated (Fig. 3-5, Point 4). The fifth injection site is situated along the lateral nasal wall midway along its length in order to minimize the discomfort associated with fat infiltration in this sensitive area (Fig. 3-5, Point 5). The sixth point corresponds to fat infiltration entry site A:5 It is located inferolateral to the malar depression along a horizontal axis extending from the base of the nasal ala (Fig. 3-5, Point 6). The seventh point lies 2 cm behind the prejowl sulcus that typically falls about midway along the length of the mandibular body and corresponds with the fat infiltration entry site C (Fig. 3-5, Point 7). At this point, the contralateral side of the face can be injected with the same syringe outfitted with the 30-gauge needle before returning to the same side of the face to complete the last two injection sites using the longer 27-gauge needle.
The eighth injection site corresponds to the infraorbital nerve on the maxillary face (Fig. 3-5, Point 8). To anesthetize the nerve properly, the nerve is injected with the
1-¼″ 27-gauge needle from an entry site at the precanine fossa directing the needle toward the bony face of the maxilla superolaterally. Finally, the marionette line and labiomental sulcus are infiltrated in the subcutaneous plane from what will be entry site D for fat infiltration (Fig. 3-5, Point 9). The same 1-¼″ 27-gauge needle is used to anesthetize this area in a broad, fanning method. (Alternatively, all sites can be infiltrated using a blunt cannula described below.)
1-¼″ 27-gauge needle from an entry site at the precanine fossa directing the needle toward the bony face of the maxilla superolaterally. Finally, the marionette line and labiomental sulcus are infiltrated in the subcutaneous plane from what will be entry site D for fat infiltration (Fig. 3-5, Point 9). The same 1-¼″ 27-gauge needle is used to anesthetize this area in a broad, fanning method. (Alternatively, all sites can be infiltrated using a blunt cannula described below.)
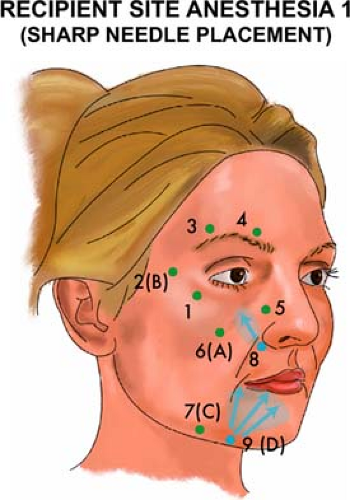 Figure 3-5: The illustration shows the first phase of recipient-site anesthesia administration. The numbers indicate where a small bleb of local anesthesia consisting of 1% lidocaine with 1:100,000 epinephrine using a 5-cc syringe outfitted with a ½″ 30-gauge needle is delivered as regional nerve blocks. The numbers with a parenthetical letter following correlate with entry sites where the infiltration cannula will be inserted. The blue arrows indicate infiltration of the adjacent soft tissue with local anesthesia using a 1-¼″ 27-gauge needle. The first point of injection corresponds with anesthesia of the zygomaticofacial nerve of the maxillary branch of the trigeminal nerve, located along the inferolateral orbital rim (Point 1). The second point corresponds with fat infiltration entry site B and is located 2 to 3 cm lateral to the lateral canthus (Point 2). Next, the zygomaticotemporal branch of the maxillary division of the trigeminal nerve, located along the superolateral aspect of the orbital rim, is anesthetized (Point 3). Continuing medially, the supraorbital bundle of the ophthalmic branch of the trigeminal nerve is infiltrated (Point 4). The fifth injection site is situated along the lateral nasal wall midway along its length in order to minimize the discomfort associated with fat infiltration in this sensitive area (Point 5). The sixth point corresponds to fat infiltration entry site A: It is located inferolateral to the malar depression along a horizontal axis extending from the base of the nasal ala (Point 6). The seventh point lies 2 cm behind the prejowl sulcus, which typically falls about midway along the length of the mandibular body and corresponds with the fat infiltration entry site C (Point 7). At this time, the contralateral side of the face can be injected with the same syringe outfitted with the 30-gauge needle before returning to the same side of the face to complete the last two injection sites using a longer 27-gauge needle. The eighth injection site corresponds to the injection site to anesthetize the infraorbital nerve on the maxillary face (Point 8). To anesthetize the nerve properly, the nerve is injected with the 1-¼″ 27-gauge needle from an entry site at the precanine fossa, directing the needle toward the bony face of the maxilla superolaterally (arrow with Point 8). Finally, the marionette line and labiomental sulcus are infiltrated in the subcutaneous plane from what will be entry site D for fat infiltration (Point 9). The same 1-¼″ 27-gauge needle is used to anesthetize this area in a broad, fanning method (arrows with Point 9). |
Recipient-site Anesthesia Phase 2: Injection with a Blunt Cannula
Injection of broad areas with the same blunt infiltrating cannula that will be used for fat infiltration minimizes the occurrence of ecchymosis that could in turn adversely contribute to the outcome: prolonged patient recovery and morbidity, difficulty for the surgeon to accurately evaluate fat volumes and contours, and perhaps reduced fat-cell viability. Injection is undertaken using 1% lidocaine with 1:100,000 epinephrine in a 10-cc syringe outfitted with the 1.2 mm or 0.9 mm blunt, spoon-tip cannula (Tulip Medical Inc., San Diego, CA) (Fig. 3-6). This infiltration cannula will be used for all blunt-cannula anesthesia infiltration. A standard 18-gauge needle is
used to puncture the skin at the designated sites (A, B, C, and D) for cannula entry. Each site should have already been anesthetized during the Phase 1 of recipient-site anesthesia, as described. The surgeon can look for the tiny blanched or raised wheal that arises after local-anesthetic infiltration to guide placement of the entry sites. Of note, the puncture site remains readily apparent in most cases as a small blood-tinged spot throughout the case, and no need for surgical marking is required to relocate the site.
used to puncture the skin at the designated sites (A, B, C, and D) for cannula entry. Each site should have already been anesthetized during the Phase 1 of recipient-site anesthesia, as described. The surgeon can look for the tiny blanched or raised wheal that arises after local-anesthetic infiltration to guide placement of the entry sites. Of note, the puncture site remains readily apparent in most cases as a small blood-tinged spot throughout the case, and no need for surgical marking is required to relocate the site.
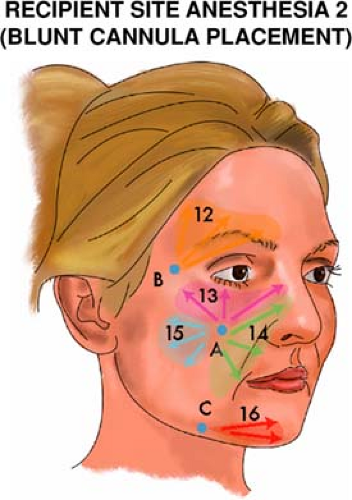 Figure 3-6: After the initial regional nerve blocks have been completed, the recipient sites where fat will be injected are anesthetized with the same blunt infiltrating cannula used for fat infiltration in order to minimize traumatic hematoma formation from sharp needle infiltration. As with Phase 1, the chronologic order in which anesthesia infiltration is undertaken for Phase 2 is irrelevant and is only listed in the proposed numeric order for ease of recall and communicative value. Starting superiorly, the temple and brow are infiltrated with local anesthesia in a fanning fashion, with placement in a subcutaneous plane in the temple and in a deep supraperiosteal plane in the lateral superior orbital rim that correspond with fat placement (Region 12). Fat infiltration into the temple and below the superior orbital rim are advanced techniques and thus may not be needed for all patients. Next, the entire inferior orbital rim is anesthetized from entry site A (Region 13). It should be understood that anesthesia is distributed evenly all the way from the entry site to the targeted site for fat placement (in this case, the inferior orbital rim), anesthetizing the entire passage that the infiltration cannula will traverse, as indicated by the shaded area. Local anesthesia is placed in the supraperiosteal plane along the inferior orbital rim, corresponding with the level at which fat will be infiltrated. The nasojugal groove, nasal sidewall, precanine fossa, and the entire length of the nasolabial fold are anesthetized using the blunt infiltration cannula (Region 14). The bony nasojugal groove is infiltrated supraperiosteally. The buccal area is infiltrated in the deep subcutaneous plane in a fanning motion from entry site A (Region 15). The buccal area tends to be somewhat sensitive for the patient, and anesthetic delivery should be slow and deliberate to minimize discomfort. The prejowl region is infiltrated from point C, covering both the anterior and inferior borders of the mandible where the fat will be distributed. Generally speaking, an intermediate plane of local infiltration will provide adequate anesthesia for the multiple levels of fat infiltration in this area (Region 16). If the lateral mandible is intended for fat infiltration, then anesthesia is delivered in a similar manner as the prejowl area from the same entry point C. |
As with Phase 1, the chronologic order in which anesthesia infiltration is undertaken for Phase 2 is irrelevant and is only listed in the proposed numeric order for ease of recall and communicative value. Starting superiorly, the temple and brow are infiltrated with local anesthesia in a fanning fashion with placement in a subcutaneous plane in the temple and in a deep supraperiosteal plane in the lateral superior orbital rim that correspond with fat placement (Fig. 3-6, Point 12). Fat infiltration into the temple and below the superior orbital rim constitutes an advanced technique and thus may not be needed for all patients (as discussed in a following section of this chapter). Next, the entire inferior orbital rim is anesthetized from entry site A (Fig. 3-6, Point 13). It should be understood that anesthesia is distributed evenly all the way from the entry site to the targeted site for fat placement (in this case, the inferior orbital rim), anesthetizing the entire passage that the infiltration cannula will traverse: These anesthetic territories are indicated by the shaded color areas in Figure 3-6. Local anesthesia is placed in the supraperiosteal plane along the inferior orbital rim corresponding with the level at which fat will be infiltrated. Approximately 2 cc for the entire inferior orbital rim should suffice.
The nasojugal groove, nasal sidewall, precanine fossa, and the entire length of the nasolabial fold are anesthetized using the blunt infiltration cannula (Fig. 3-6, Point 14). The bony nasojugal groove is infiltrated supraperiosteally. The buccal area is infiltrated in the deep subcutaneous plane in a fanning motion from entry site A (Fig. 3-6, Point 15). The buccal area tends to be somewhat sensitive for the patient, and anesthetic delivery should be slow and deliberate to minimize discomfort. The prejowl region is infiltrated from point C, covering both the anterior and inferior borders of the mandible where the fat will be distributed. Generally speaking, an intermediate plane of local infiltration will provide adequate anesthesia for the multiple levels of fat infiltration in this area (Fig. 3-6, Point 16). If the lateral mandible is intended for fat infiltration, then anesthesia is delivered in a similar manner as the prejowl region from the same entry point C.
Harvesting the Fat
Instrumentation
Refer to Table 3-5 throughout this section’s discussion. A 10-cc Luer-Lok syringe outfitted with a 3-mm bullet-tip harvesting cannula (Tulip Medical Inc. or Miller Medical Inc., Mesa, AZ) is recommended for fat harvesting. Alternatively, Tulip manufactures a thinner 2.1-mm multiport harvesting cannula, which we will sometimes use in women who are extremely concerned with any incision (Fig. 3-7). One cc of 25% Albumin (Baxter, Deerfield, IL) is drawn into each syringe before the harvesting cannula is attached. Albumin helps to maintain equalized oncotic pressure, thereby reducing the incidence of lipolysis during harvesting (Fig. 3-8). We believe that addition of albumin is helpful, but many fat-transfer surgeons do not use it and still attain wonderful aesthetic and durable results. A 16-gauge Nokor needle (or No. 11 Bard-Parker blade) is used to create the stab incision through which the harvesting cannula is inserted.
General Considerations
There are key points that should be kept in mind to perform reliable and consistent fat harvesting, which are universally applicable irrespective of donor site. (For the surgeon
well versed in liposuction techniques, these points may be intuitive, but for those with less liposuction experience, these principles will ease the learning curve for fat harvesting):
well versed in liposuction techniques, these points may be intuitive, but for those with less liposuction experience, these principles will ease the learning curve for fat harvesting):
TABLE 3.5 Equipment and Instrumentation | ||||||||||||||
|---|---|---|---|---|---|---|---|---|---|---|---|---|---|---|
| ||||||||||||||
Only 1 to 2 cc of negative pressure should be applied to the syringe during harvesting to avoid the risk that undue pressure will cause lysis of adipocytes (Fig. 3-9).
The nondominant hand is used to stabilize the fat pad by gentle traction on the skin surface or with a gentle pinch. Squeezing the fat pad forcefully with the nondominant hand will increase the chance of contour irregularities in the donor site and limit the ability to fan across the entire donor site in a uniform fashion (Fig. 3-10).
The cannula should be placed into the central depth of the fat pad for maximal harvesting yield that will lead to a uniform result. Tenting and tethering of the skin with the cannula implies too superficial a passage of the instrument, which can lead to contour irregularities. This problem is particularly likely in the region of the inner thigh, where the surgeon must pass through a superficial fascial layer to enter the correct plane (see the following section on harvesting from the inner thigh for more details).
After three to four passes with the cannula through the fat, the cannula should be brought almost out to the point of the entry site before turning and reorienting the tip in another direction. A common error for the neophyte surgeon after completing
three to four passes is to simply turn his or her hand to realign the cannula without pulling almost all the way out to the entry site. Failure to withdraw the cannula sufficiently before changing directions will give the appearance of harvesting from a new area when in fact the same localized spot is being worked on (as demonstrated in the accompanying DVD) (Fig. 3-11). This error will lead to overzealous removal of fat in only one discrete area that may also reduce the quantity of fat harvested and more importantly can lead to donor-site contour irregularity.
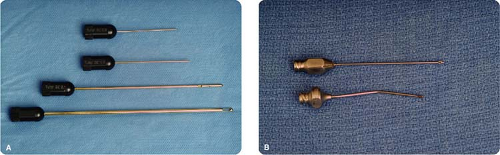
Figure 3-7A: The Glasgold set of fat-transfer instruments (Tulip Medical Inc.) (top to bottom). The 0.9-mm injecting cannula (4-cm length) is particularly useful for periorbital superficial placement in the tear trough and inferior orbital rim as well as for the very fibrous recipient sites at the lateral inferior orbital rim and lateral canthal region. The 1.2-mm injecting cannula (6-cm length) is an all-purpose cannula that can be used for all other injections. The 2.1-mm multiport harvesting cannula (12-cm length is an alternative). The 3.0-mm bullet-tip harvesting cannula (15-cm length) is an all-purpose harvesting cannula. B: Alternatively, the Coleman-Donofrio infiltration cannula (top) (Byron Medical Inc.) is an all-purpose infiltration cannula. The Amar #7 cannula (bottom) (Miller Medical Inc.) is helpful for placement of fat into the curved superior orbital rim from lateral entry point B and can also be beneficial for placement of fat in the downturned lip and labiomandibular fold.
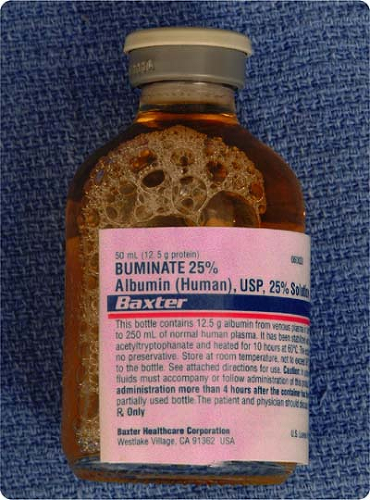
Figure 3-8: Placement of 1 cc of 25% albumin (Baxter) into each harvesting syringe may minimize fat-cell trauma during harvesting by maintaining an equalized oncotic pressure.
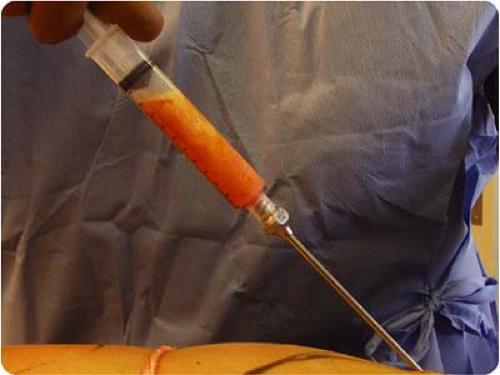
Figure 3-9: The photograph shows proper fat harvesting technique in which manual extraction is performed with only 1 to 2 cc of negative pressure exerted on the syringe plunger.
The surgeon should always be conscious of where the tip of the cannula is situated within the donor site. If not mindful of the cannula position, the tip may be unintentionally passed beyond the anesthetized donor site area, leading to additional soft-tissue trauma and related pain. The first few times that a new surgeon begins to harvest fat from the donor site, he or she should progress very slowly and with each
pass feel the tip of the cannula to ensure that it has not gone beyond the planned harvest site. Although this problem may seem infrequent, it is actually a common mistake for the beginner.
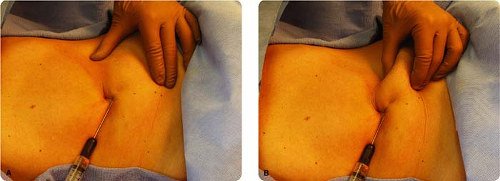
Figure 3-10A: Fat harvesting should be undertaken with the nondominant hand, applying only gentle and even traction to stabilize the fat pad. B: This photograph demonstrates improper technique in which the nondominant hand forcibly pinches the fat pad, which can lead to uneven harvesting and potential for contour irregularities in the donor area.

Figure 3-11A, B, C: When harvesting, it is important not simply to turn the cannula to another area for harvesting but instead to withdraw the cannula almost all the way to the entry site before redirecting the cannula tip. Doing so ensures that the cannula tip advances to the adjacent area rather than remaining inadvertently in the same area.
If the cannula appears to become clogged or if suction is lost, the entire cannula should be removed from the entry site and the tip cleared. The plunger can be drawn back until the fat is cleared from the cannula. Any air that was drawn into the syringe should be expelled before continuing. If the surgeon notices that no additional fat is entering the syringe, the most likely cause of this problem is a clogged cannula usually due to entrapment of fibrous tissue.
When calculating the total volume of fat that needs to be harvested, keep in mind that lidocaine, blood, albumin, and lysed fat cells will account for approximately half of the volume in the syringe. Accordingly, if a total plan for 50 cc of fat is desired, then approximately 100 cc (10 full syringes) should be harvested. If a greater amount of blood is encountered in each syringe than typical, a proportionately increased number of syringes may be needed to achieve the same desired amount of fat and vice versa. If the surgeon has difficulty calculating the amount of viable fat harvested in each syringe, he or she can centrifuge the first two to three syringes to determine the yield and calculate the remaining harvest on that initial yield.
There is usually no need to close the donor-site stab incision after harvesting.
Patients are often concerned with donor-site asymmetry. Due to the relatively low volumes of fat typically harvested, iatrogenic asymmetries are uncommon. The rare exception is in the thin patient, where these relatively smaller harvested volumes may actually translate into an asymmetry. Preoperatively, the surgeon should make the patient aware of any pre-existing asymmetries at the intended harvesting site and that such body asymmetry is normal. To further reduce patient anxiety regarding asymmetry, it is recommended to harvest from both sides of the body, even though unilateral harvesting will unlikely lead to any significant asymmetry.
Site-specific Technique
Lower Abdomen
For the lower abdomen, the reader is reminded about the careful preoperative assessment of ventral scars and/or hernias that would limit or obviate harvesting in this region, respectively. Perhaps the greatest fear for the aesthetic surgeon unfamiliar with body surgery is fear of inadvertent and catastrophic entry into the visceral cavity—an apprehension that, for the most part, is unwarranted. Passage of the cannula through the thick rectus muscle is quite difficult because the resistance encountered is considerable. Furthermore, passage of the cannula on or near the rectus fascia will elicit significant discomfort, warning the surgeon that the cannula position is unnecessarily deep: Obviously, patient reaction would only be elicited under lighter sedation. To avoid discomfort or deep abdominal injury, the cannula should always be passed in a relatively parallel orientation to the skin surface.
The stab incision is made in the inferior aspect of the umbilicus (Fig. 3-12). The cannula is inserted and passed lateral to the midline, as the midline is very fibrous and also a region that tends to be more sensitive for the patient (Fig. 3-13). The midline should only be approached if the patient is under adequate sedation and if additional fat is required after depleting both lower lateral quadrants. Care should be taken to pass the cannula in a uniform fashion across each quadrant, with symmetrical removal of fat from each side. Although the risk of contour deformity with uneven fat removal is low, it is still preferred to harvest in a symmetrical fashion to further reduce that hazard.
Inner Thigh
While the patient remains supine, the contralateral leg is placed into a frog-leg position, with the knee flexed and externally rotated so that it lies flat on the table
(Fig. 3-14). This positioning permits easy access to the straight leg for harvesting. The side that is frog-legged should not be harvested, as divoting is more likely to occur if harvesting from the frog-legged side. A stab incision on the extended leg is made in a skin fold along the inguinal line with a 16-gauge Nokor needle (or No. 11 Bard-Parker blade). Of note, this tiny incision can remain hyperpigmented for up to a year, and the patient should be cognizant of this possibility. The cannula is inserted through the stab incision and is passed inferiorly in the described fanning technique. Care must be taken
to pass through the superficial fascia, as evidenced by a give in resistance when the cannula passes through this layer and by the lack of perceived skin tethering when the cannula is in the proper deeper plane. Fat can generally be easily and safely harvested from one side of the body without risk of donor-site asymmetry. However, patient concerns that postoperative asymmetry will arise should compel the surgeon to harvest bilaterally. To harvest the contralateral side, the leg positions should be reversed, straightening the contralateral leg, and frog legging the previously harvested leg.
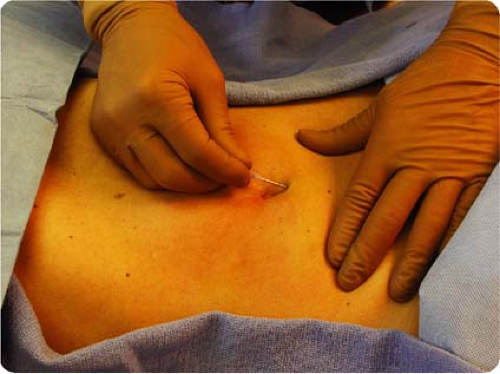 Figure 3-12: The stab incision for entry of the harvesting cannula into the lower abdomen (or for any donor area for that matter) is made with either a 16-gauge Nokor needle (shown) or the tip of a No. 11 Bard-Parker blade. |
 Figure 3-13: The harvesting cannula is shown inserted through the stab incision made with the 16-gauge Nokor needle. Bilateral lower lateral quadrants are harvested, as these regions of the abdomen carry the most adipose reserves. The central lower abdomen is more fibrous and usually is devoid of significant adiposity. The midline can be approached when harvesting yields are low and additional fat is required. The reader is referred to the main text for details of harvesting safely and effectively in the lower abdomen.
Related posts:Stay updated, free articles. Join our Telegram channel
Full access? Get Clinical Tree
 Get Clinical Tree app for offline access

|


