Chapter 47 Comprehensive rehabilitation of the burn patient
![]() IN THIS CHAPTER
IN THIS CHAPTER ![]() Video Content Online • PowerPoint Presentation Online
Video Content Online • PowerPoint Presentation Online
![]() Access the complete reference list online at http://www.expertconsult.com
Access the complete reference list online at http://www.expertconsult.com
Positioning and splinting of the burn patient
Anti-deformity positioning can be achieved through multiple means: splinting, mechanical traction, cut-out foam troughs and mattresses, pillows, strapping mechanisms, serial casting and in some cases, through surgical application of pins. The burn therapist needs to be aware of physician-specific protocols and work closely with the entire burn team to design the most effective positioning program. Orthotics and splinting devices are vital in burn rehabilitation as they are utilized extensively to obtain appropriate positioning of the entire body and to counteract the contractile forces that lead to deformity. No matter how the burn therapist approaches splinting (material choice, design, and application schedules) the goal is to achieve the best functional outcome at the completion of rehabilitation. When fabricating a splint or an orthosis the burn therapist must be aware of the anatomy and kinesiology of the body surface to be splinted. Also, the therapist should be well aware of all mechanical principles of splinting as they relate to pressure, mechanical advantage, torque, rotational forces, first-class levers, friction, reciprocal parallel forces and material strength.1
Positioning and splinting must be designed in a way to:
• Support, protect and immobilize joints
• Maintain and/or increase range of motion
• Remodel joint and tendon adhesions
• Protect newly operated sites (grafts/flaps)
• Stabilize and/or position one or more joints, enabling other joints to function correctly
• Assist weak muscles to counteract the effects of gravity and assist in functional activity
• Strengthen weak muscles by exercising against springs or rubber bands.1
• Be designed with function in mind
• Be lightweight and low profile
• Be constructed out of appropriate materials
• Allow for ventilation in preventing skin/wound maceration.1
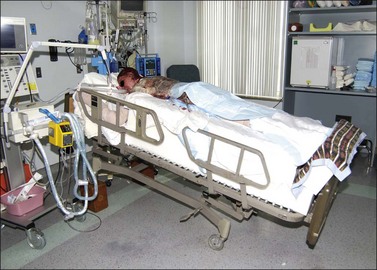
Prone positioning systems are usually the position of last resort (Fig. 47.1). They are reserved for patients who are not successfully being managed in supine or side-lying. There may be non-healing grafts or wounds in the rectal region that increase the risk of sepsis due to the introduction of fecal matter. Other common candidates for this protocol include those with sacral pressure ulcers or posterior trunk grafts that are not healing.
Head
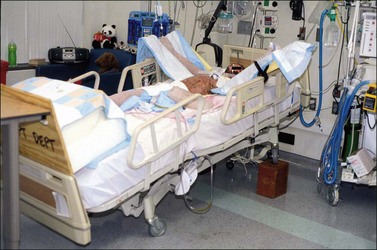
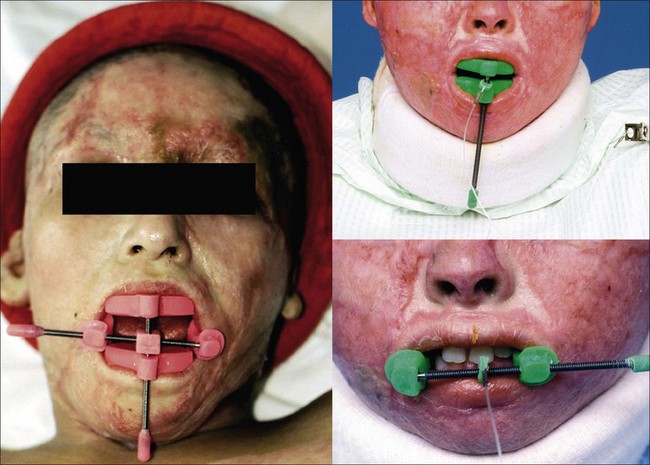
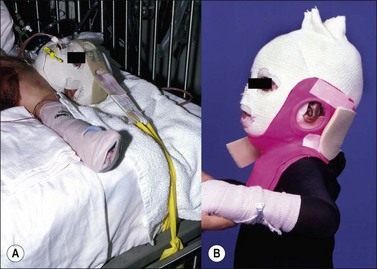
Acutely, in aiding with facial edema reduction, the head should be positioned by placing in midline and elevating the head of the bed at 30–45° if the patient’s hips are not involved. In cases where the hips are burned, the entire bed may be elevated at the head of the bed with the use of shock blocks (wooden blocks 12–16 inches high with recessed slots for bed legs). This will avoid positioning the hips in the flexion contracture position (Fig. 47.2). In the cases where the ears are burned they may be protected by strapping ear cups made of thermoplastic materials or foam.2 An ear conformer may be constructed to prevent the rim of the ear from contracting toward the head. Internal ear canal splints may also be fabricated and serially adjusted as the circumference of the canal increases. In addition, if the ear is affected, a soft circular foam can be positioned posteriorly to the head to elevate the ears of the surface of the bed. A nasal obturator may be required to maintain the nostrils open. These obturators may be serially adjusted as the circumference of the nostril increases. Mouth splints are utilized for the prevention of oral microstomia. These devices are custom-made by the therapist or they may be obtained commercially. Mouth splints may be fabricated static or dynamic for the horizontal or vertical opening of the mouth.3–6 In cases of severe microstomia where compliance is an issue, an orthodontic commissure appliance which attaches to the teeth may be fabricated by an orthodontist.7 The use of stacked tongue blades is an acceptable technique to aid in reversing oral microstomia. Ongoing research looks at the development of a microstomia device that circumferentially opens the mouth according to its anatomy (Fig. 47.3). Facial scar hypertrophy may require fabricating a high thermoplastic transparent mask such as the Uvex™ and W-clear™ masks or a silicone elastomer facemask.8–10 A semi-rigid low thermoplastic opaque mask may also be fabricated depending on the state of scar maturation.
Neck
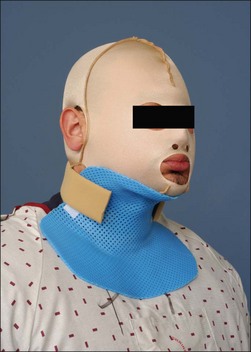
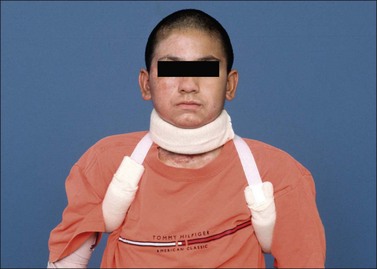
The neck is positioned in neutral or in slight extension of approximately 15° without any rotation. The amount of neck extension must not be so great that traction on the chin causes the mouth to open. Positioning may be achieved with a short mattress supine, a rolled towel or foam cushion placed behind the upper back on the scapular line. Pillows should be avoided in the cases of anterior neck burns as they may lead to flexion contractures. In the case of anterior neck burns a conforming custom thermoplastic collar may be fabricated (Fig. 47.4).11 For long-term needs, a soft neck collar or a Watusi-type collar may also be fabricated as the patient’s wounds heal and contractures or scars develop. The Watusi-type collar allows for isolated, direct pressure to a thicker scar band.10,12,13 It has been observed that in some cases, acute patients rotate or laterally flex their neck on one side, which may lead to a lateral neck contracture (torticollis). If the patient is to remain in bed for a while, a dynamic head strap mechanism may be fabricated to counteract the lateral neck contractile forces and bring the neck in the neutral position. For the prevention of torticollis the therapist may fabricate a lateral neck splint which conforms to the head of the patient, the lateral neck and anterior/posterior shoulder (Fig. 47.5).
Spine
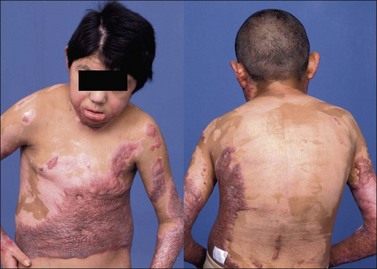
Contracture resulting from unilateral or asymmetric burns of the neck, axilla, trunk and groin will cause lateral curvature of the spine (scoliosis). The level and amplitude of curvature will vary with the site and severity of the contracture. In addition, pelvic obliquity accompanying asymmetric hip or knee flexion contracture will impose a lateral lumbar curve. As long as the patient is recumbent, lateral curvature can be prevented by maintaining straight alignment of the trunk and neck (Fig. 47.6). However, the curve is often insidious in onset and will not be recognized until the patient begins to walk. Trunk list observed early in the ambulation period can be simply a transient accommodation to pain and wound tightness, but a persistent list may herald the development of scoliosis. Other subtle signs of spinal curvature are asymmetry of shoulder levels, scapular asymmetry, asymmetry of dependent upper extremity alignment to the trunk and asymmetry of pelvic rim levels. A spinal mobilization exercise program is established with a patient once a curvature is identified, however once there is an established asymmetric contracture it is difficult by therapeutic means to stretch it out, so it is probably better to deal surgically with a deforming scar early than to permit even minor scoliosis to persist.
Shoulder girdle/axilla
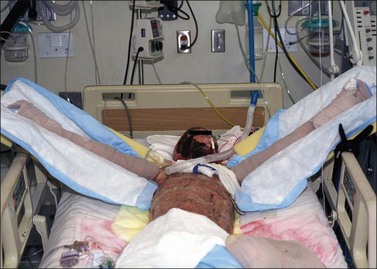
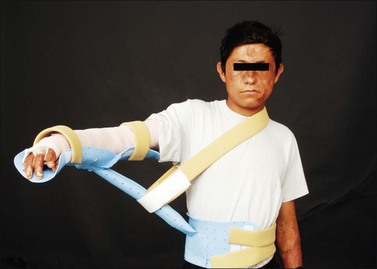
Positioning of the shoulder may be achieved with splints, silicone-filled pillows, bedside tables, foam arm troughs, metal abduction troughs, and thermoplastic slings suspended from a trapeze mechanism (Fig. 47.7). Splinting of the shoulder joint becomes more intensive as scar maturation heightens the risk of contracture development. Airplane splints are used for the resolution of axillary contractures and post-operatively to protect reconstructive procedures. To accommodate wound dressings and promote healing, a three-piece airplane splint may be fabricated (Fig. 47.8). Other adaptations may be required in the presence of amputations. Pre-fabricated airplane splints come equipped with mechanisms that allow for adjustments depending upon available shoulder range of motion.10,11,13 A figure-of-eight axillary wrap may be utilized in conjunction with an airplane splint to provide compression for axillary contour and elongation of skin surfaces (Fig. 47.9). For successful contracture management to the shoulder, the positioning program must be supplemented by exercise routines for range of motion and strengthening.
Elbow/forearm
Radial head rotation for pronation and supination is less often affected by the burn injury than flexion and extension. The pronators and supinators are frequently injured in electrical accidents where bone, being a poor conductor, heats destroying the muscles closest to it. Forearm rotation is essential for accurate hand placement and the rehabilitative program must seriously address that function. Depending on the location and severity of the injury the forearm may be positioned in neutral or in slight supination. Static elbow splints may be soft or custom-fabricated of thermoplastic materials. An anterior elbow conformer may be fabricated over the burn dressing. Dynamic elbow extension or flexion splints may be utilized to provide prolonged gentle sustained stretch and aid in the correction of contractures.14 Forearm dynamic pronation/supination splints may be custom-fabricated or obtained commercially for the correction of contractures.10,11,13
Wrist/hand
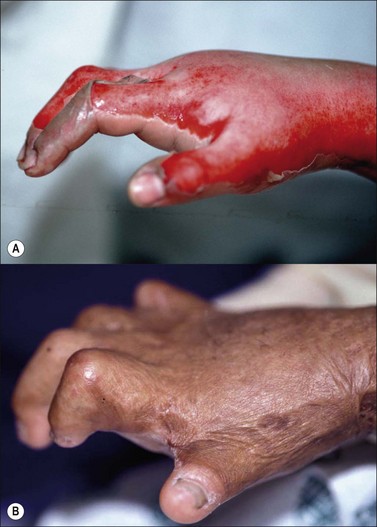
Treating therapists must have a thorough understanding of the effects of thermal injury on the anatomical structures of the wrist and hand. The presence of dorsal hand edema leads to intrinsic muscle ischemia and a resultant ‘intrinsic-minus’ posture. The unsupported burned hand postures in wrist flexion, metacarpophalangeal (MCP) hyperextension, interphalangeal (IP) flexion, thumb adduction, and thumb IP flexion. The overall appearance is that of a claw deformity (Fig. 47.10a) Edema following a full-thickness burn to the dorsal hand imposes MCP hyperextension and IP flexion (Fig. 47.10b). Persistence of this position results in a claw deformity). The claw hand posture is primarily due to post burn edema, but may persist throughout the course of treatment due to scar contracture. Among the digits, the second and fifth most easily drift into MCP hyperextension because each has a proper extensor tendon.
While superficial burns result in minor, transient edema, full thickness injuries exhibit more severe and prolonged postburn edema. Superficial hand burns should not be splinted in order to allow for frequent movement and the freedom to function independently. In cases of severe thermal injury it is important to monitor for signs and symptoms of vascular insufficiency or compartment syndrome. In treating the edematous, burned hand, it is important to position the hand above the level of the heart at all times, without compromising the neurovascular supply to the hand.10,11,13
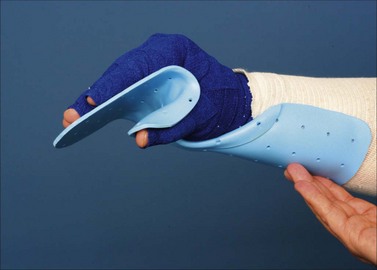
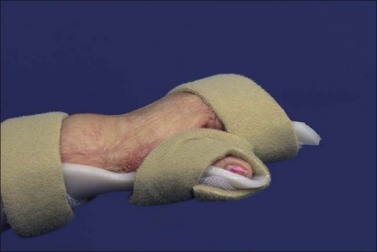
The burned wrist and hand should be positioned to oppose impending wound contracture. The optimal position for the burned hand is wrist 0–30° extension, 70–80° MCP flexion and IP joints in full extension (although some burn centers may advocate a slight amount of IP flexion deeming the position to be ‘safe.’). The thumb should be positioned in a combination of palmar and radial abduction with the MCP/IP joints slightly flexed. This position resembles the ‘intrinsic-plus’ position and is achieved through fabrication/fitting of a burn hand splint by a rehabilitation therapist (Fig. 47.11; The burn hand splint positions the hand appropriately to minimize soft tissue contractures and preserve functional mobility). Involvement of the extensor tendon apparatus should be assumed and protected until viability of the system is known.15 Continuous splinting is recommended to manage edema, exposed tendons, peripheral neuropathies, and uncooperative/unresponsive patients.
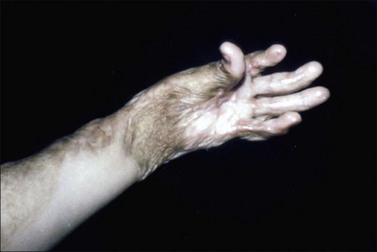
In the intermediate phase, positioning and splinting is used to prevent/correct deformities and protection of surgical reconstructed sites. Splints may be fabricated dorsal, volar or on the medial/lateral aspects. Contractures are a major complication of hand burns as they affect one’s ability to perform activities of daily living. Dorsal hand burns are prone to contract into MCP hyperextension, IP flexion, and thumb adduction and should be splinted into MCP flexion, IP extension, and thumb palmar abduction. The most common post-burn upper extremity contractures are: wrist flexion, index finger MCP hyperextension, index finger proximal IP flexion, and small finger MCP hyperextension/proximal IP flexion.16 The claw hand deformity is functionally detrimental because it makes it impossible to smoothly reach around objects (Fig. 47.12).
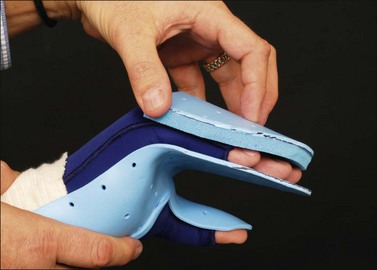
In the case of circumferential hand burns, a palmar extension splint is fabricated to prevent flexion contractures and a cupping deformity of the palm (Fig. 47.13). The burn hand splint and an extension splint may be alternated. A ‘sandwich’ splint may be fabricated which includes a burn hand splint with a dorsal shell over the IP joints to prevent flexion of the digits. All splints may be secured with elastic bandage or with Velcro® strapping components (Fig. 47.14).17 Individual gutter splints are used to prevent flexion contractures, to restrict boutonnière and mallet finger deformities, and for protection of exposed extensor tendons until wound closure C-bar splints are used to prevent adduction contracture of the first web space. Figure-of-eight splints are fit to correct or restrict swan neck deformities.
Dynamic splints are utilized to provide low-load prolonged stretch to counteract contractile forces. Dynamic splinting of the hand will focus on MCP extension/flexion splints, IP flexion/extension splints, thumb abduction, and may include pre-fabricated or spring-loaded splints (Fig. 47.15). Patients may require dynamic splinting to assist muscles weakened by peripheral neuropathy. The therapist monitors dynamic splinting closely and makes frequent adjustments in order to provide effective tissue mobilization. Additionally, the fit of dynamic splints is checked frequently to insure that the anatomical structures remain properly aligned.
Hip
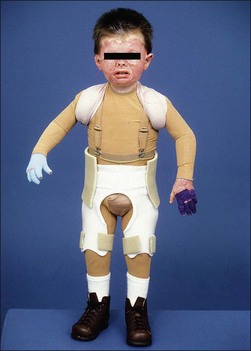
When anterior burns extend from the abdomen to the thigh, hip flexion is the position of comfort. If the hip is fixed in any degree of flexion, posture will be modified. Bilateral symmetric contractures impose increased lumbar lordosis or knee flexion or both. Asymmetric contracture will cause pelvic obliquity and scoliosis. In adults and older children thighs are more likely to be held in adduction than in abduction, whereas in pre-ambulatory infants the secondary component of the contracture is abduction. Thus, for the hips the preventive position is full extension, 0° rotation and symmetric abduction of 15–20°. If elevation of the upper body is needed for edema reduction then the entire frame of the bed is elevated with the use of wooden shock blocks placed at the head of the bed. Soft mattresses should be avoided as they may promote hip flexion. Hip positioning is accomplished with the use of abduction pillows and other strapping mechanisms eliminating hip rotation. If the patient wears bilateral foot splints then connector bars may be utilized on the splints to bring about the desired bilateral hip positioning stated above. Hip flexion contractures may be serially corrected with an anterior hip spica or with a 3-point hip extension splint (Fig. 47.16).10,11,13 Subtle hip flexion contractures can be easily overlooked when the patient stands, there being only a slight increase in lumbar lordosis or forward or lateral shift of the trunk. If established hip flexion contractures are not surgically corrected, body posture is likely to be permanently altered with scoliosis or exaggerated lordosis.
Foot/ankle
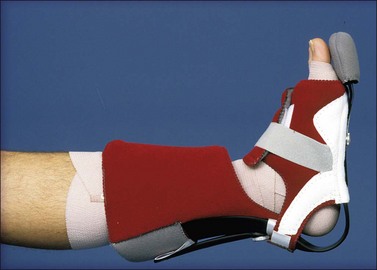
Minor established equinus deformity can be corrected with a standing and walking program. At the outset graduated heel lifts may be used to accommodate to the deformity. If the patient must be bed-confined, skeletal traction through the calcaneus may be the quickest and most efficient way to correct the deformity. Traction is effective even if scar contracture contributes to the deformity. Serial corrective casts or posterior splints alone are useful mainly for minor contractures. For the treatment of circumferential foot/ankle burns anterior foot splints are also fabricated and their application is alternated with the posterior foot splints in preventing plantar or dorsal foot contractures.10,11,13 The Multi Podus® System foot splints may be utilized for the positioning of the burn foot/ankle as they relieve heel pressure in preventing pressure ulcers (Fig. 47.17). For fixed, unyielding deformity, scar release combined with tendo-Achillis lengthening with or without posterior capsulotomy is a standard surgical procedure that yields inconsistent results. The correction achieved is often just to neutral or to slight dorsiflexion. The Ilizarov technique has been used with generally satisfactory immediate results in severe cases.18 No matter how correction is achieved, if there are no dorsiflexion motors and if the range of ankle motion is only a few degrees, ankle fusion may in the end yield the best functional result.
When there is both anterior and posterior scar contracture, the talus will remain aligned with the calcaneus in a relatively plantar flexed position as the midfoot and forefoot are pulled into dorsiflexion. The result is so-called rocker bottom foot with the head of the talus being the principal weight-bearing feature. This deformity once established defies correction by usual surgical means because of the shortage of soft tissue and because vessels and nerves cannot be stretched to accommodate to the corrected position. The Ilizarov technique may offer a partial solution to the problem. Removal of the head of the talus may give a reasonable weight-bearing surface. With chronic painful ulceration, amputation is the best treatment.18
Orthotic treatment of the lower extremity
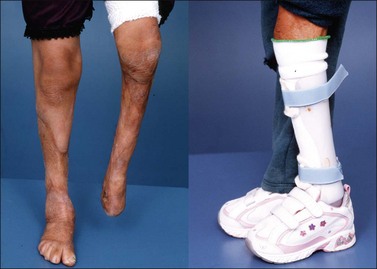
Leg length discrepancies are seen frequently in the cases of severe lower extremity burn injuries and they should be addressed with a shoe lift. The ankle–foot complex is difficult to address, especially in the case of a severe thermal injury. In most cases, the resultant deformity is the equinovarus foot. Both conventional and thermoplastic systems may be designed to treat the equinovarus or equinovalgus foot. Such systems may include a metal ankle–foot orthosis (AFO), polypropylene plastic posterior AFO (solid ankle or with an articulation), an AFO with stirrup attachment, an AFO with stirrups and patellar tendon support. A dorsiflexion spring assist may be incorporated in the AFO to aid weak ankle motion. Different straps such as a valgus correction strap may be attached to the AFO for the correction of specific problems. Interface materials, such as silicone, Plastizote® and Aliplast®, can be incorporated into an AFO to provide protection of the soft tissue, provide for total surface weight-bearing, and to accommodate any anatomical anomalies that may be present (Fig. 47.18). In the event that a return of range of motion is anticipated, an AFO could be fabricated that can be modified as the patient progresses. The ankle joints can be incorporated into the AFO, however, left solid and articulated at a later date.
During more complicated cases, and depending on the anatomy and function of the lower extremities, a knee–ankle–foot orthosis, hip–knee–ankle–foot orthosis or a trunk–knee–ankle–foot orthosis may also be designed for the best functional outcome.19
Serial casting
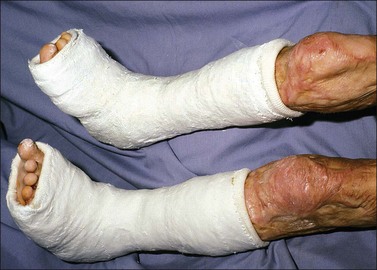
Casting has been used in patients with burns for postoperative immobilization to promote graft adherence and to minimize scar contracture during the remodeling phase of healing.20 Circumferential casting after skin grafting to the lower extremity is an effective means of providing protection to the grafted area.21 Serial casting has been used successfully on outpatients with burns when active range of motion is limited due to scar tissue formation.22 The goal of serial casting is gradual realignment of the collagen in a parallel and lengthened state by constant circumferential pressure.23 Prolonged gentle sustained stretch provided by the cast aids in tissue elongation for the correction of contractures (Fig. 47.19). Burn scar under constant traction shows collagen formation in parallel alignment along the forces of stress.24 Low intensity force with prolonged duration for stretching can be applied to connective tissue whether it is scarred, contracted or surgically shortened.25 Casting is a relatively simple, fast and painless intervention and provides an alternative to dynamic splinting but is not feasible when patient compliance is an issue (e.g. pediatrics).
Patients may require premedication and may also benefit from soft tissue preconditioning (heating) for stretch prior to cast application. Precautions should be taken to ensure proper and evenly applied padding, including extra layers at the proximal and distal ends of the cast. The casting material should be rolled out and handled with an open hand as much as possible. Aggressive molding or over tight applications are to be avoided and can lead to compression neuropathies or vascular compromise. When cast materials harden an exothermic reaction occurs, causing the temperature within and beneath the cast material to rise, which leads to elevated temperatures and burns. The greatest risk of thermal injury occurs when a thick cast using warm dip water is allowed to mature while resting on a pillow.26 A variety of materials are available for the fabrication of casts. The most widely known would probably be Plaster-of-Paris. Plaster is fast setting when reacting with lukewarm water. Plaster casts are inexpensive, stronger, and easy to fabricate. However, they require longer drying times (24–48 h), are prone to indentations and skin irritations, and are heavier. Other disadvantages of this technique include a decreased water resistance and breakage if not constructed strongly enough. Plaster casts may be removed with a cast saw or moistened and removed with scissors.
Recently, non-latex polyester materials such as Delta-Cast™ are utilized as alternatives to plaster and fiberglass. These materials, which resemble fiberglass, are very lightweight, flexible, and because of their elastic properties conform very well. These casts may be cut in a bivalve fashion so that they can be removed and reapplied after wound care, hygiene, and exercise.27
After cast fabrication is complete, the clinician should check the following: firmness of the cast, neurovascular status of the extremity, sharpness of cast edges, and any signs of the cast rubbing adjacent structures. When casting is completed, the patient should feel a gentle, but not painful stretch. The first cast should be removed at approximately 24 h and thereafter, depending on the patient’s tolerance, it could be applied for up to 1 week at a time. In cases of casting over open wounds, the cast should be removed every 1–2 days in order to avoid complications in wound healing.21,23 The use of insert material for scar management under casts has been documented and found to be useful.23 Serial casting is terminated when either normal range of motion has been restored or no further functional gains are achieved.
Skeletal suspension and traction
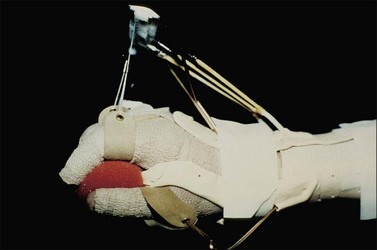
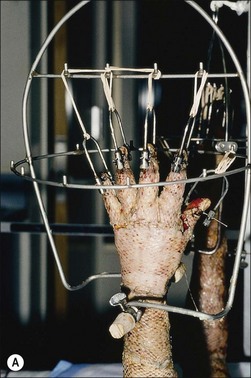
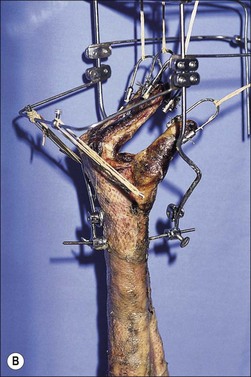
Skeletal suspension and traction systems have been used to a limited extent in burn management for a number of years. The early reports of Larson28 and Evans29–31 described the use of skeletal suspension for positioning and for extremity elevation for open wound management and of skeletal traction for prevention and correction of contractures. The later reports of Harnar32 and Youel33 deal mainly with the management of hand burns with the skeletally anchored digital traction splints bearing the names banjo, halo, and hay rake (Fig. 47.20).
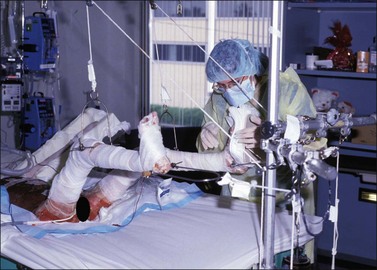
The adaptation of skeletal suspension and traction systems to burn management grew out of earlier experience with traction to correct the elbow and knee contractures of patients with rheumatoid disease, and out of traction and suspension as definitive means for treating certain extremity fractures. In its earliest application to burn management, skeletal suspension was used for extremity elevation only to facilitate wound care. From this experience evolved better-defined traction systems, including those expressly designed for hands and feet. Rehabilitation therapists may remove the patient from the traction apparatus as indicated for exercises and ambulation and reapply the traction at the completion of treatment. Positioning within the traction is often changed by nurses and therapists by altering the amount of the traction weights, thus preventing the affected joints from being locked into one position over time (Fig. 47.21).
Prosthetic interventions
A prosthesis is a device used to replicate the function and appearance of a missing limb. Amputations among the burn patient population most often occur as a result of electrical insults, but can also result from more severe thermal injuries as well. Prosthetics are designed, fabricated, and fit by a certified prosthetist. Each device is individualized based upon the needs of the patient. But, in general, the prosthesis should be comfortable to wear, easy to don/doff, lightweight, of durable construction, and be cosmetically appealing. The prosthetist and rehabilitation professional will consider the following when designing the prosthesis and its components: level of amputation, shape and contour of the residual limb, functional expectations, cognitive abilities, vocational requirements, hobbies/leisure pursuits, and financial resources. Standard prosthetic texts are useful in providing broad basic information and explanation of the many components available and their use.34,35
Different types of upper extremity prostheses are available along a continuum from mostly passive or cosmetic to primarily functional. Most devices fall somewhere in the middle range between cosmesis and function. Cosmetic prostheses are difficult to keep clean, expensive, and ultimately sacrifice function for appearance. Functional prostheses fall into two categories. They can be designed to be body-powered (using cables) or externally powered (myoelectric or switch control). Body-powered prostheses are moderate in cost and weight, more durable, and offer higher sensory feedback. However, they require more gross limb movement and can be less cosmetically appealing. Externally powered prosthetic devices allow for more proximal function, greater strength for grasp/prehension, and improved cosmesis. Additionally, they may be heavy and expensive, offer less sensory feedback, and require more regular maintenance. Regardless of the type of prosthesis planned for, fitting of an upper extremity body powered prosthesis within 7–30 days correlates with higher acceptance and success rates.36 Body-powered prostheses are most commonly used in burn rehabilitation and Table 47.1 describes the components of upper extremity prosthetic devices.37,38
Table 47.1 Prosthetic components
| Upper extremity | Functions | Lower extremity |
|---|---|---|
| Socket | Interface between prosthesis and residual limb | Socket |
| Selective loading/pressure relief | ||
| Suspension | Holds prosthesis to residual limb | Suspension |
| Force transmission for function | ||
| Control system – Usually movement of the shoulder or chest | Links movement of a body part to the prosthesis | Control system – usually movement of the hip or knee |
| Interposed elbow joint | Performance of hand to midline | Interposed knee joint |
| Provides support during stance phase, smooth swing phase and motion for sitting and kneeling | ||
| Interposed wrist joint | Attaches socket to terminal device; orients terminal device in space | Shank (pylon) |
| Terminal device | Restores cosmetic appearance | Prosthetic foot |
| Replicates anatomic joints | ||
| Replaces hand/ankle function | ||
| Stable, weight bearing surface | ||
| Shock absorption |
The rehabilitation upper extremity prosthetic goals should include: stability of shoulder girdle to allow prehension, overall ease of movement of the entire limb, energy efficient use of the device, and the appearance of a normal upper extremity. Table 47.2 describes upper extremity amputations by level and identifies the appropriate prosthetic device to address the patient’s functional needs.37,38
Table 47.2 Types of amputations and prosthetic needs
| Types of amputations | Prosthetic needs | |
|---|---|---|
| Upper extremity | Transphalangeal | Passive for cosmesis |
| Transmetacarpal | Oppositional devices | |
| Transcarpal | Body-powered hand or hook | |
| Wrist disarticulation Transradial | Forearm socket, wrist component, and terminal device | |
| Elbow disarticulation Transhumeral | Proximal arm socket, elbow hinge (passive, active, or externally powered), forearm lever arm, wrist component, and terminal device | |
| Shoulder disarticulation | Harness system and transhumeral components | |
| Interscapulothoracic disarticulation | Harness system, shoulder socket and transhumeral components | |
| Lower extremity | Transphalangeal Toe disarticulation Ray amputation Transmetatarsal Transtarsal | Toe-filler Foot plate Partial foot to tibial height prosthesis |
| Syme | Socket to knee, low-profile foot | |
| Transtibial Knee disarticulation | Socket with foot and ankle | |
| Transfemoral | Socket, knee joint, and ankle/foot complex | |
| Hip disarticulation Hemipelvectomy | Socket is total contact shell, hip/knee joints, and ankle/foot complex | |
The rehabilitation program for successful use of lower extremity prosthetics begins with donning/doffing of the device, transfer skills, activities to build wearing tolerance, practice to reinforce balance reactions, and pre-ambulation skills. Preparatory weight-bearing treatment for use of a lower extremity prosthesis usually begins on a tilt table, progressing to standing and then ambulation in the parallel bars. The rehabilitation goals should address stability, ease of movement, energy efficiency, and the appearance of natural gait.39 Table 47.1 outlines the common components of lower extremity prostheses and their functions.
Lower limb prosthetics require the following minimum requirements for successful use: upright trunk control, sufficient upper body strength, adequate lower body stability and control, static and dynamic balance skills, and good postural alignment. Lower extremity prosthetic fitting begins when the patient’s wounds are well-healed and will tolerate pressure and weight-bearing. Lower limb devices may be either preparatory or definitive. Table 47.2 details types of lower extremity amputations by level and identifies the appropriate prosthetic and components.37,38
The overall process of prosthetic evaluation and fitting is described in Figure 47.22. Satisfactory use of a prosthetic device in burn rehabilitation requires continuous dialogue between the patient, therapist, prosthetist, and surgeon. Return clinic visits should include consistent prosthetic re-evaluation. However, ultimately, the use of a prosthetic device depends largely upon patient motivation.37
Stay updated, free articles. Join our Telegram channel

Full access? Get Clinical Tree


