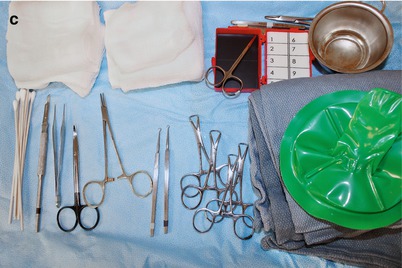
Fig. 2.1
Photos of tray setups for common office-based procedures. (Stock bottle and punch trephine wrapper are shown for clarity but should not actually be on the tray). (a) Shave removal. (b) Punch biopsy. (c) Excision
Solution 2
Anticipate special needs of the surgery that call for instruments not routinely placed on the tray (e.g., chalazion clamp for a lip procedure). Have these available on the tray before starting the procedure.
Solution 3
Have pre-arranged packages that contain all of the instruments necessary to perform a particular procedure (i.e., ‘punch biopsy bag’). An identifying label can be placed on the outside of this package to assist with accuracy.
Solution 4
If a surgeon only performs a limited range of procedures, having one generic tray will help with consistency and avoid the confusion of setting up several specialized trays.
Solution 5
Instruments should be catalogued properly when being stored. Individual sterile surgical instruments should be placed in designated bins.
Accidents Happen When
The surgical tray is too far from the surgical field.
Solution
Position the tray within arms’ reach between the surgeon and assistant.
Accidents Happen When
When non-sterile instruments are unknowingly placed on a surgical tray.
Solution
Verify the sterility of all instruments being used (Fig. 2.2).
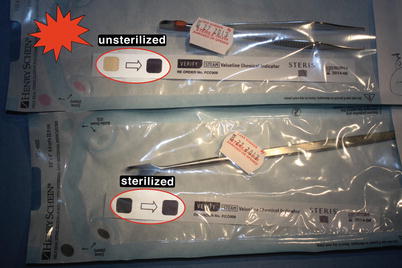
Fig. 2.2
Instruments should be sterilized before use. Blackening of the box on the indicator strip signifies sterility
Accidents Happen When
Instruments are removed carelessly from packaging. If a sharp instrument (e.g., toothed forceps or skin hook) is removed by tearing through the autoclaved pouch, the tips can puncture the skin (Fig. 2.3). Additionally, instruments can fall from the tray and puncture the foot.
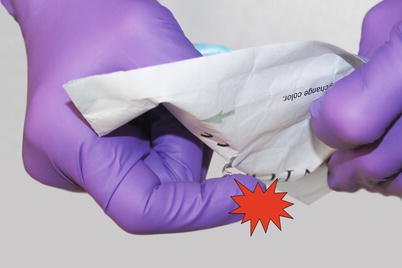
Fig. 2.3
Puncture injury due to opening sharp instrument (here, a skin hook) through a pouch
Solution
Peel the plastic envelopes open like a banana so that the instrument can be gently dropped onto the tray.
Accidents Happen When
Trays are not set up consistently, especially when instruments are placed haphazardly on the tray.
Solution 1
Be consistent and organized in tray setup. All instruments should to be clearly visualized, easily retrieved, and placed safely back to their designated area. Consistency is important so that the team comes to recognize where sharps are kept.
Solution 2
Orient all instruments in a horizontal line with the sharp portion of the instrument facing away from the surgeon.
Solution 3
Place plastic organizing bins on the tray so that each instrument can lie neatly in its own respective column.
Common Safety Pitfalls of the Intraoperative Tray
Accidents Happen When
Reaching for an instrument in a messy tray. During a long or bloody procedure, gauze pads, suture packets, and other items obscure sharp instruments.
Solution 1
Maintain a neat tray. Dispose of all materials (i.e., sharps, bloody gauze, and empty suture packets) that are not being used in their appropriate receptacle in real-time.
Solution 2
Designate a section of the tray for soiled materials, keeping the sharps in clear view.
Accidents Happen When
Suture needles are not stabilized on the tray. Loose suture needles can unknowingly ‘hitchhike’ on another instrument.
Solution
Suture needles can be secured by inserting them with a needle driver on an object that is readily visible and that will not be unintentionally grasped (i.e., Telfa®, Styrofoam sponge, suture needle counter box, or magnet) (Fig. 2.4). The sponge can be glued to the tray (Fig. 2.4b). The box provides easy suture count and allows sutures to be organized by their caliber (e.g., 4-0 suture is placed in the #4 slot, 5-0 suture is placed in the #5 slot) (Fig. 2.4c).
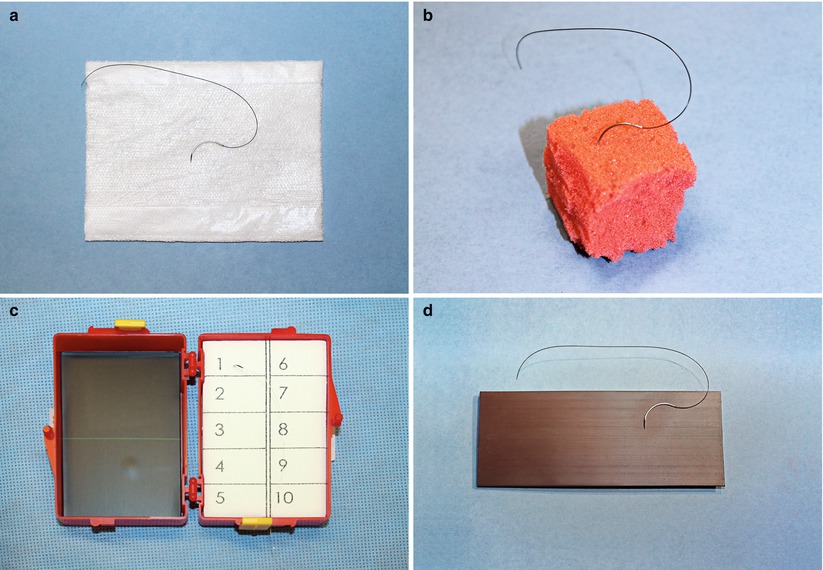
Fig. 2.4
Sharps are secured to a safe, visible object. (a) Telfa. (b) Styrofoam sponge. (c) Suture needle counter box. (d) Magnet
Accidents Happen When
Live needles of a syringe or blades are placed unsecured or unprotected on the tray.
Solution 1
Be aware of the device’s safety mechanism. If the mechanism is reversible, activate it before setting it down on the tray (Fig. 2.5). If it cannot be deactivated (e.g., accordion device) then dispose of the needle and obtain a new one.
Solution 2
These instruments can be secured in the plastic containers noted above.
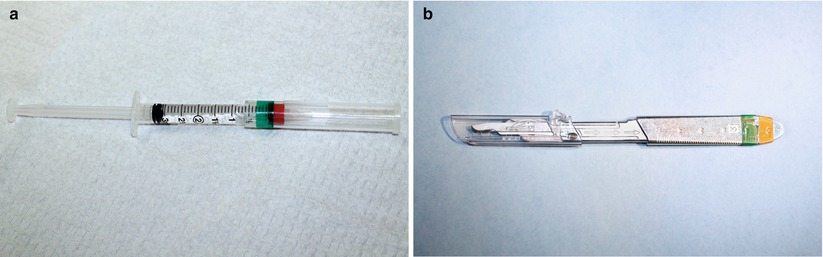
Fig. 2.5
Sheath safety mechanisms protect the sharps on the tray. (a) Syringe needle. (b) Scalpel
Accidents Happen When
Instruments are passed between surgeon and assistant.
Solution 1
Do Not Pass Instruments! The surgical team should be positioned so that both surgeon and assistant can reach for instruments on the surgical tray. When possible, position the surgical tray between assistant and surgeon.
Solution 2
Create a neutral zone whereby an instrument is placed down on a secure mat before another member of the team picks it up.
Common Safety Pitfalls When Cleaning Up a Tray
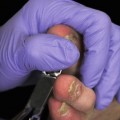
Accidents Happen When
A tray is not kept orderly during a surgical procedure and sharps become hidden under gauze pads or other objects, leading to sticks (Fig. 2.6).
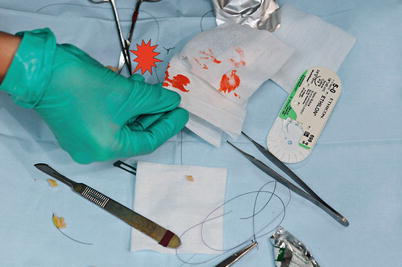
Fig. 2.6
Inappropriately using fingers for tray cleanup
Solution 1
The neater the tray during the procedure, the more uneventful the cleanup.
Solution 2
Use a forceps or hemostat to sift through the tray to identify all sharps (Fig. 2.7). Grab needles with forceps or a hemostat (not a needle driver, to preserve jaw fidelity) and dispose of them without touching the sharp with your fingers.
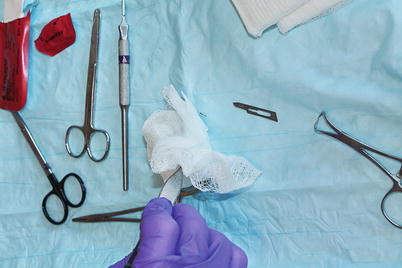
Fig. 2.7
Proper tray cleanup safely sifting with forceps
Accidents Happen When
A standard protocol for the person who disposes of sharps is not formalized.
Solution
Responsibility of sharps removal from the tray should fall on a pre-specified person (i.e., surgeon or assistant). Safety is enhanced when the tray is neatly organized prior to cleanup and all parties are aware of their responsibilities.
Accidents Happen When
The scalpel blade is removed from the blade holder with bare hands (Fig. 2.8).
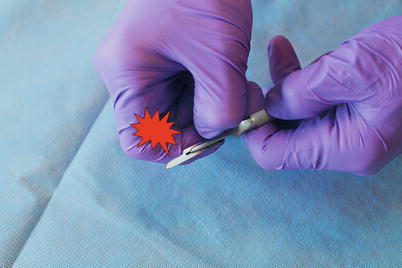
Fig. 2.8
Unsafely removing blade with hands from scalpel handle results in a laceration
Solution 1
Use a blade remover (Fig. 2.9).
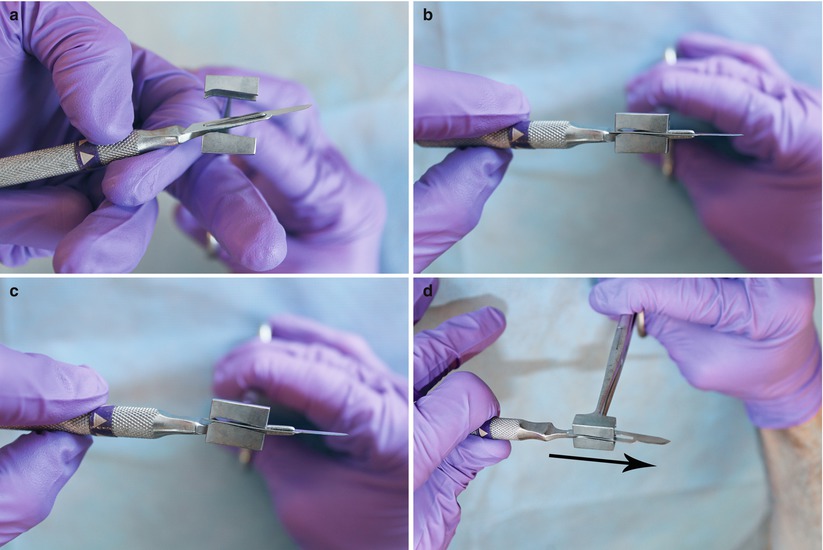
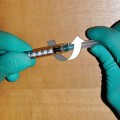
Fig. 2.9
Blade remover device. (a) Position blade between jaws of device. (b) Close jaws. (c) Gently twist. (d) Remove blade from handle, demonstrated by the arrow. Resistance may be encountered at this stage
Solution 2
Use a hemostat to remove the blade (Fig. 2.10).
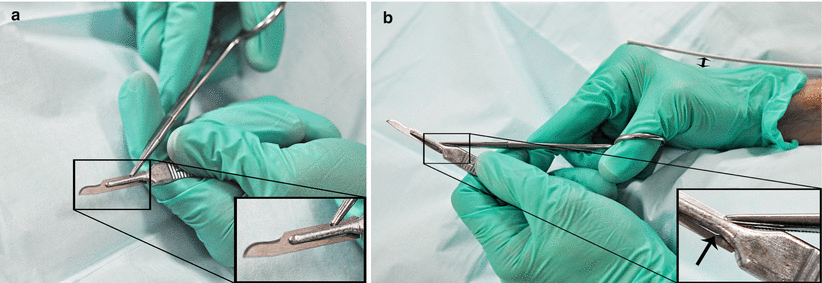
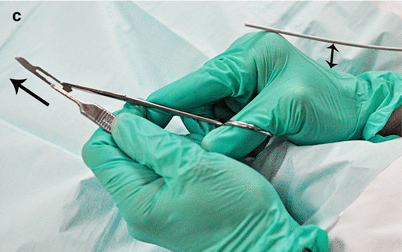
Fig. 2.10
Removing a blade with hemostat. (a) Grip base of blade on the belly side (inset shows position). (b) Pull base of blade 90° away from scalpel holder (inset demonstrates the position). (c) Slide blade off scalpel holder with small displacement of the wrist, without moving elbows, keeping fingers connected (highlighted by wooden stick and double-headed arrows in b vs. c)
Accidents Happen When
Sharps disposal boxes are not placed close to the surgical area. Recapping of instruments and needle sticks are more likely if sharps disposal boxes are not placed in conveniently located areas of a procedure room [1].
Solution 1
Place sharps containers adjacent to the surgical field. The surgeon or assistant should not need to walk across the room for sharps disposal.
Solution 2
Multiple sharps containers hanging from the wall of a procedure room (i.e., one near the door, one near the bed) limit the distance to travel for sharps disposal.
Accidents Happen When
Disposing of sharps in overfilled disposal boxes. Avoid the temptation to force a sharp into the overflowing container.
Solution 1
Sharps containers must be emptied by the appropriate parties well before they reach capacity.
Solution 2
If a sharps container is at capacity, sharps must be disposed of in a sufficiently empty container, even if it requires leaving the room to do so (a non-ideal situation).
Reference
Fig. 2.1
Photos of tray setups for common office-based procedures. (Stock bottle and punch trephine wrapper are shown for clarity but should not actually be on the tray). (a) Shave removal. (b) Punch biopsy. (c) Excision
Solution 2
Anticipate special needs of the surgery that call for instruments not routinely placed on the tray (e.g., chalazion clamp for a lip procedure). Have these available on the tray before starting the procedure.
Solution 3
Have pre-arranged packages that contain all of the instruments necessary to perform a particular procedure (i.e., ‘punch biopsy bag’). An identifying label can be placed on the outside of this package to assist with accuracy.
Solution 4
If a surgeon only performs a limited range of procedures, having one generic tray will help with consistency and avoid the confusion of setting up several specialized trays.
Solution 5
Instruments should be catalogued properly when being stored. Individual sterile surgical instruments should be placed in designated bins.
Accidents Happen When
The surgical tray is too far from the surgical field.
Solution
Position the tray within arms’ reach between the surgeon and assistant.
Accidents Happen When
When non-sterile instruments are unknowingly placed on a surgical tray.
Solution
Verify the sterility of all instruments being used (Fig. 2.2).
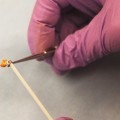
Fig. 2.2
Instruments should be sterilized before use. Blackening of the box on the indicator strip signifies sterility
Accidents Happen When
Instruments are removed carelessly from packaging. If a sharp instrument (e.g., toothed forceps or skin hook) is removed by tearing through the autoclaved pouch, the tips can puncture the skin (Fig. 2.3). Additionally, instruments can fall from the tray and puncture the foot.
Fig. 2.3
Puncture injury due to opening sharp instrument (here, a skin hook) through a pouch
Solution
Peel the plastic envelopes open like a banana so that the instrument can be gently dropped onto the tray.
Accidents Happen When
Trays are not set up consistently, especially when instruments are placed haphazardly on the tray.
Solution 1
Be consistent and organized in tray setup. All instruments should to be clearly visualized, easily retrieved, and placed safely back to their designated area. Consistency is important so that the team comes to recognize where sharps are kept.
Solution 2
Orient all instruments in a horizontal line with the sharp portion of the instrument facing away from the surgeon.
Solution 3
Place plastic organizing bins on the tray so that each instrument can lie neatly in its own respective column.
Common Safety Pitfalls of the Intraoperative Tray
Accidents Happen When
Reaching for an instrument in a messy tray. During a long or bloody procedure, gauze pads, suture packets, and other items obscure sharp instruments.
Solution 1
Related posts:
Stay updated, free articles. Join our Telegram channel

Full access? Get Clinical Tree


