CHAPTER 35 Subtalar Arthrodesis
OVERVIEW: APPROACH AND INCISIONS
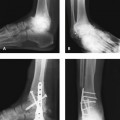
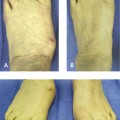
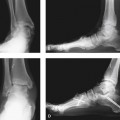
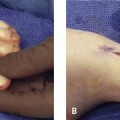
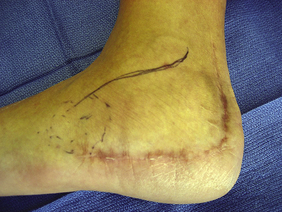
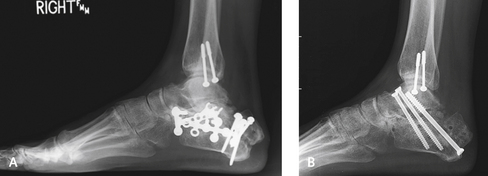
The surgical approach that I use for the subtalar arthrodesis depends to some extent on the underlying pathology. Many of these procedures are performed for posttraumatic arthritis secondary to a calcaneus fracture. I generally use a standard incision across the sinus tarsi. In some cases, the patient has undergone multiple surgeries, and the incision is prone to dehiscence unless care is taken with the approach (Figure 35-1). If previous surgery has been performed, I prefer not to reopen the original incision for the open reduction with internal fixation (ORIF) procedure. Although use of the original incision is an option, considerable scarring will be encountered over the lateral calcaneus and peroneal tendons, and it is not as easy to reach the sinus tarsi and the more medial aspect of the subtalar joint through this route (Figure 35-2). The more limited incision over the sinus tarsi heals well, with no risk for compromise of the intervening skin bridge between the sinus tarsi incision and the original more extensile lateral incision (Figure 35-3).
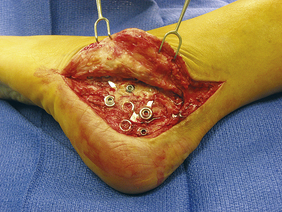

Complete exposure of the peroneal tendons and adequate subfibular decompression in patients with subtalar arthrodesis after calcaneus fracture are essential. Impingement in the subfibular recess is common, and the bone must always be removed regardless of the type of arthrodesis performed (Figure 35-4). The easiest way to determine that an adequate decompression has been performed is to make sure that the lateral wall of the calcaneus is slightly medial to the undersurface of the overhanging talus. After completion of the procedure, I palpate the subfibular recess percutaneously to detect any persistent bone underneath the tip of the fibula.
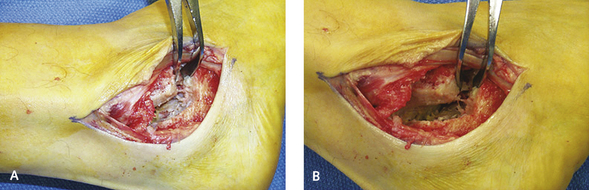
Figure 35-4 A and B, A laminar spreader is used to expose the posterior facet of the subtalar joint.
The retinaculum of the undersurface of the peroneal tendon sheath is stripped and elevated off the lateral wall of the calcaneus. Depending on the nature of the underlying disease, the peroneal tendons may be left in position or completely retracted if the lateral calcaneus has widened. After a calcaneus fracture, bone builds up laterally and squeezes the peroneal tendons into the fibula. To address this problem, the lateral wall of the calcaneus is completely exposed proximally toward and then posterior to the fibula, until the impingement against the lateral wall of the calcaneus is visible. A retractor is inserted into the soft tissue to pull the peroneal tendon sheath inferiorly and expose the entire lateral wall of the calcaneus.
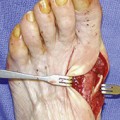
For the lateral wall ostectomy, I use a 2-cm curved osteotome to remove a generous amount of bone to achieve complete exposure of the lateral aspect of the posterior facet of the subtalar joint and also remove the lateral impingement under the tip of the fibula. Slight irregularities often are present in the lateral wall of the calcaneus after this ostectomy, and the surface should be palpated through the skin to identify residual bone, which may be the source of pain. After completion of the ostectomy, the lateral margin of the posterior facet of the calcaneus should be slightly medial to the undersurface of the lateral margin of the talus. I preserve the resected bone and cut it up with a bone cutter into 5-mm fragments for later use as graft material (Figure 35-5).
The contents of the sinus tarsi are elevated off the floor of the sinus tarsi until the anterior aspect of the posterior facet of the subtalar joint is well visualized. A rongeur can be inserted directly into the posterior facet of the subtalar joint and then twisted around to loosen up the joint. The rongeur can then be pushed more medially to first open up and then debride the interosseous scar, opening up the middle facet. Once the debridement has been performed with the rongeur, a toothed laminar spreader is inserted into the sinus tarsi. With the spreader placed on stretch, the remnant of the interosseous ligament is visualized and is debrided to gain access to the posterior aspect of the subtalar joint and the middle facet. I use a flexible chisel to denude the articular surface of the posterior facet, but minimal bone is removed. The posterior facet is debrided down to bleeding healthy subchondral bone. All of the chondral fragments are removed with the rongeur. Final debridement using a flexible chisel is performed again on the more medial aspect of the subtalar joint, with entry into the middle facet and complete denudation of the articular surface and the undersurface of the talus, as well as the dorsal surface of the middle facet. It is important to debride the medial aspect of the joint, including the middle facet; otherwise, a gap will be present, which may not close, or the heel will tilt into valgus as the posterior and lateral aspect of the joint is compressed. Once I have removed all of the cartilage and chondral fragments, the joint is aggressively punctured or “fish-scaled” using an 8-mm curved osteotome and then perforated with a 2-mm drill bit.
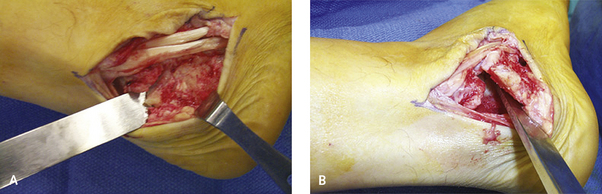
The bone graft harvested earlier from the lateral wall of the calcaneus is used to augment the arthrodesis (Figure 35-6). The graft is now inserted into the sinus tarsi and the recesses in the subtalar joint and packed into place with a bone tamp. It is essential to ensure that no graft spills into the soft tissues, particularly under the peroneal recess laterally and then more posteriorly into the retrocalcaneal space. Over the past few years I have been routinely adding a spun-down concentrate from an iliac crest aspirate to the cancellous bone graft. In patients who are considered to be at higher risk for nonunion, I include use of bone morphogenic protein or an implantable bone stimulator in addition to the arthrodesis.

Figure 35-6 Bone graft cancellous chips were harvested from the cuts for the lateral wall ostectomy.
FIXATION
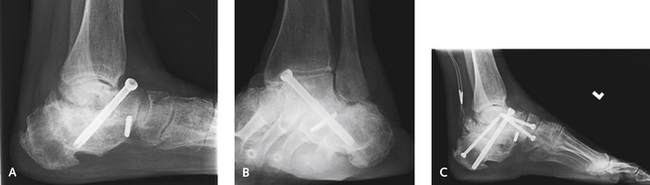
I find it useful to secure the arthrodesis under fluoroscopic imaging using cannulated 7.0-mm screws. In the past, I inserted the first screw from the heel directed dorsally into the talus, trying to avoid inserting the screw into the heel pad. The heel pad often is damaged with the impact of the hindfoot fracture, and further compromise is unwarranted with insertion of a screw too inferiorly on the heel. More recently, I have found that it is far easier to perform this maneuver using a cannulated screw (Orthohelix, Akron, Ohio), starting from the anterior aspect of the ankle in the center of the talus, immediately anterior to the ankle joint (Figure 35-7). The guide pin is inserted with the foot in plantar flexion so that the pin goes directly through the posterior facet of the subtalar joint, and is directed out the posterior heel, thereby avoiding the heel pad. This is easier than trying to aim for the center of the body of the talus from the inferior heel.
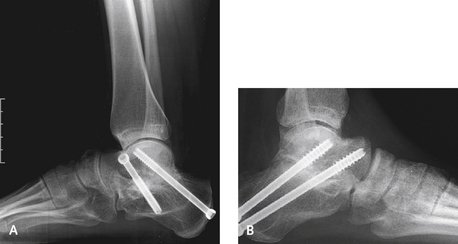
Are two screws necessary? The second screw adds to rotational stability and also may increase compression. In various biomechanical studies the addition of a second screw has been shown to be relevant, and I continue to use a second screw inserted from the neck of the talus inferiorly into the body of the calcaneus. Although a second screw can be inserted from the heel up into the neck of the talus, guiding its correct passage along this route is a little more difficult. This screw must not cause any impingement against the neck of the talus with the foot in maximum dorsiflexion. The position of the screws and the alignment of the hindfoot with respect to the forefoot are checked fluoroscopically before skin closure. It is of utmost importance to obtain an anteroposterior view of the ankle, to ensure that the screw(s) are actually in the talar body.
MANAGEMENT OF SUBTALAR FUSION NONUNION
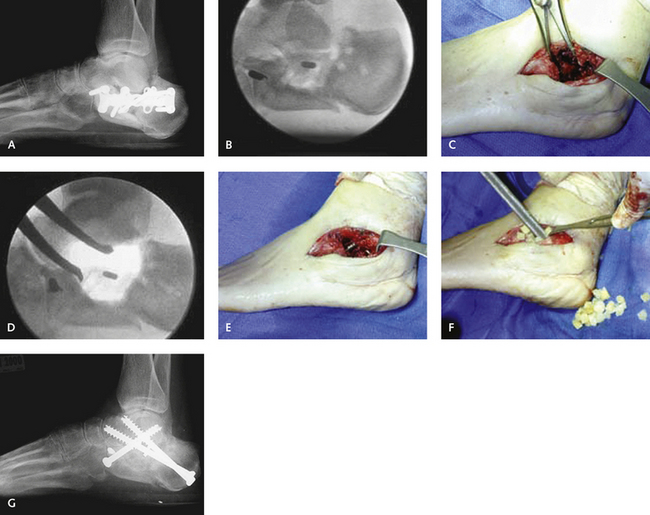
Subtalar fusion nonunion is a frustratingly difficult problem that occurs in approximately 10% of the cases, depending on the underlying premorbid problems. Patients at high risk for this condition include those who smoke, those in whom calcaneus fractures have resulted in hard avascular bone in the region of the subtalar joint, and those in whom any areas of segmental avascular necrosis are present in the subtalar joint (Figure 35-8). If a nonunion in one of these high-risk categories is the surgical problem, bone graft augmentation with supplementation with bone graft substitutes or an implantable bone stimulator is recommended. The workup for a patient who has pain after a subtalar arthrodesis should include plain radiographs and a computed tomography (CT) scan. I have not found plain radiographs to be very helpful in determining the cause of discomfort, unless an obvious deformity or nonunion is present (Figure 35-9). Sometimes the arthrodesis is solid, but the pain is due to subfibular impingement by an osteophyte on the inferior aspect of the fibula projecting off the arthrodesis either into the peroneal tendons or under the fibula. In such cases, the osteophyte is easily visible on a CT scan.
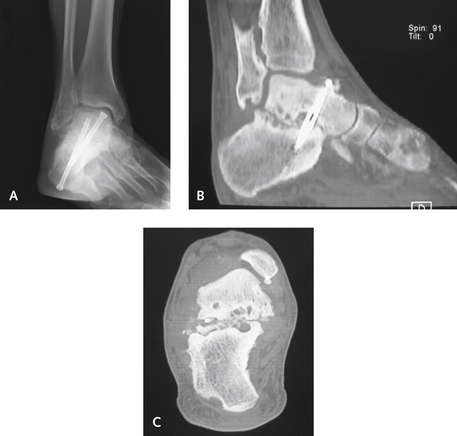
An inherent problem with treatment of a nonunion is that preparation of the joint requires further debridement, which frequently creates a larger hole or defect necessitating further bone graft supplementation (Figure 35-10). Grafting can be done with either autograft or allograft; usually cancellous bone allograft chips are used and can be mixed with a concentrate of an iliac crest aspirate (Figure 35-11). A nonunion that recurs is very frustrating and may be best treated with a triple arthrodesis to increase the likelihood of obtaining a solid union (Figure 35-12). After this procedure, patients should be kept non–weight bearing for a prolonged period of time, up to 3 months, until bone healing is evident radiographically. More important, these patients should demonstrate minimal swelling and no warmth in the hindfoot on palpation before initiating weight bearing.