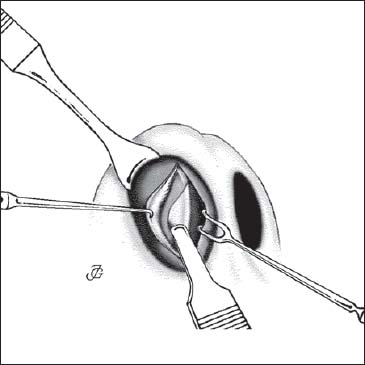
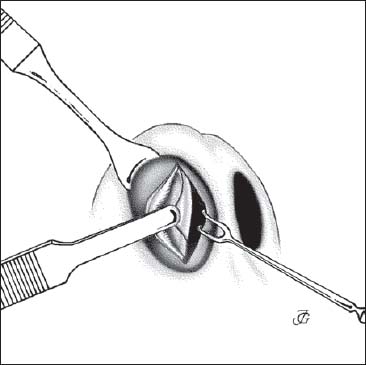
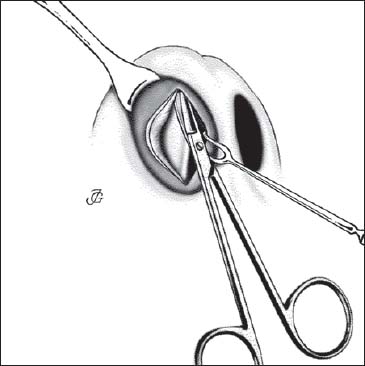
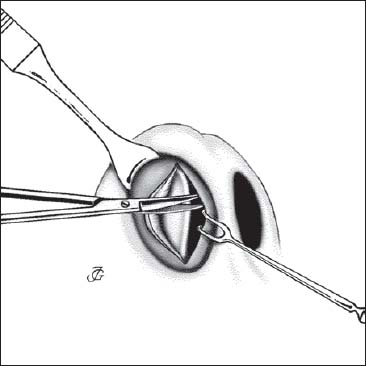
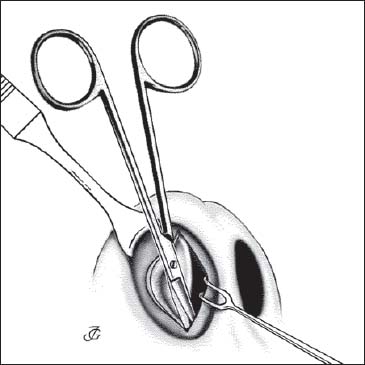
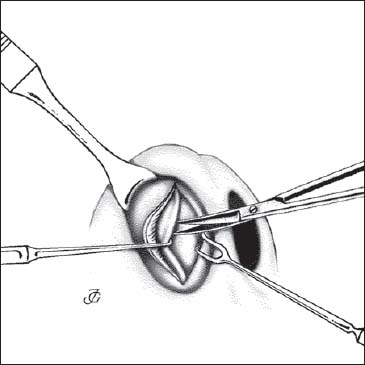
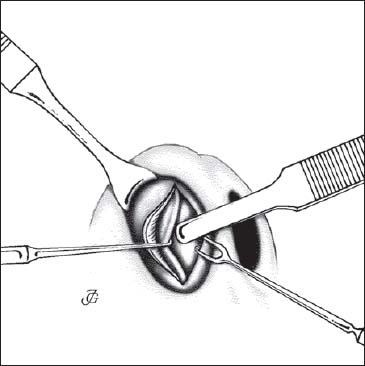
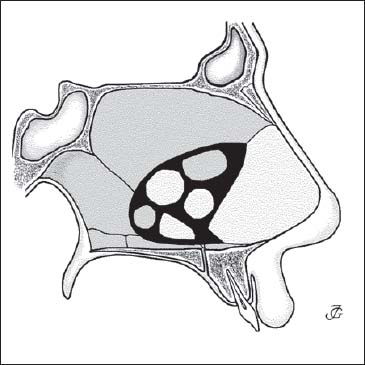
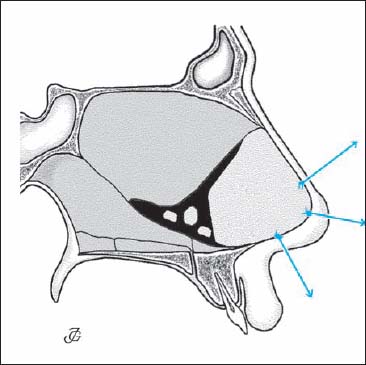
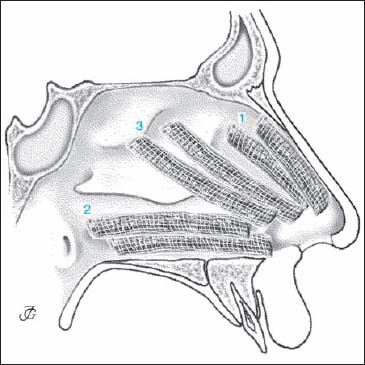
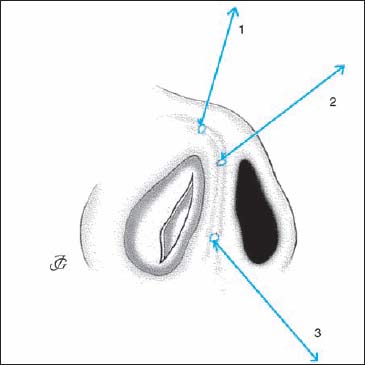
5 Septal Surgery Septal pathology contributes to almost all nasal deformities. In a high percentage of all patients seen in a rhinological practice, septal deformities are the main cause of functional complaints. In many cases, they are also at the root of aesthetic complaints. A deviated pyramid, saddle nose, narrow prominent pyramid, and most humps, are usually associated with some kind of septal pathology. This applies in particular to deviations of the bony and/or cartilaginous pyramid. In this regard, we may quote Cottle, who said: “as the septum goes, so goes the nose.” Consequently, correction of the septal deformity is one of the basic procedures in functional reconstructive nasal surgery. Repositioning of the bony and the cartilaginous pyramid is impossible without mobilization and repositioning of the septum, especially the anterior cartilaginous septum. In a sense, the septum is the “soul” of the human nose. The sequence of surgical steps in functional reconstructive nasal surgery depends primarily on the pathology, the history of the patient, and the surgical goals. A secondary determining factor is whether the surgery is performed by the endonasal or by the external approach. “As the septum goes, so goes the nose.” Cottle In most cases, the endonasal approach is preferred. For a discussion of the advantages, disadvantages, and indications of both methods, see Chapter 3 (p. 114, 115). Steps When the external approach is used, the sequence of surgical steps will be different. Steps In functional reconstructive septal surgery, six phases may be distinguished: The septum is approached through a caudal septal incision (CSI) on the right side (Fig. 5.1). This approach provides access to all parts of the septum including the anterior nasal spine, premaxilla, and nasal floor as well as the nasal dorsum and tip. As the incision is made just cranial and parallel to the caudal septal margin, a wide approach is obtained at the same time. A right-handed surgeon will make this incision on the right side. There is almost no exception to this rule. Even in patients with a luxation of the caudal septal end into the left vestibule, the approach from the right side is to be strongly preferred. For a detailed discussion of the technique of the CSI, see section on incisions (p. 125) The caudal septal end is subperichondrially dissected over its full length, from its ventrocaudal corner to the anterior nasal spine, by means of a sharp knife (Cottle) and sharp, slightly curved scissors. The caudal septal end must be fully exposed to gain full access to the nasal dorsum, anterior nasal spine, premaxilla, nasal floor, and columella. Complete dissection of the caudal end is also essential for correcting a deviated caudal septal end, septal reconstruction, shortening of the nose, and rotation of the tip. Fig. 5.1 CSI on the right side. Steps The last perichondrial fibers are scraped aside using a No.15 knife (Fig. 5.2). A scratching sound will be heard, indicating that the cartilage is reached. Care is taken not to cut into the cartilage, as this may lead to bending towards the opposite side in the healing phase. Fig. 5.3 The caudal septal cartilage is exposed by elevating the mucoperichondrium on the right side in a cranial direction. Fig. 5.4 The ventrocaudal corner of the cartilaginous septum is dissected. Fig. 5.5 The caudal margin of the cartilaginous septum is exposed and a (limited) columellar pocket created with sharp, slightly curved scissors. Fig. 5.6 The anterior nasal spine and the chondrospinal junction are exposed. How to be sure that you are working subperichondrially The fable of hydrodissection of the septal mucosa Some old textbooks proclaim that injecting a local anesthetic-vasoconstrictive solution in the proper mucoperichondrial plane will “hydrodissect”the mucoperichondrium from the septal cartilage. This is very unlikely, as the perichondrium consists of several layers of parallel-running fibers (see p. 30 Fig. 1.66). Injecting fluid just under the lowest layer by a needle that is thicker than the whole perichondrium itself is virtually impossible. The next step is to expose and mobilize the cartilaginous and bony septum. This phase consists of: Fig. 5.7 Beginning of an anterosuperior tunnel on the left side. Fig. 5.8 The deepest mucoperichondrial fibers are scraped away on the left side. Fig. 5.9 The four septal regions. Four different tunnels are distinguished. Their use depends on the pathology and surgical aims. We divide the septum into four regions (Fig. 5.9): Based on this septal geography, we distinguish the following tunnels: submucoperichondrial tunnels on the cartilaginous septum; submucoperiosteal tunnels caudal to the cartilaginous bony junction; submucoperiosteal tunnels posterior to the chondroperpendicular junction; and subperiosteal tunnels on the vomer. The border between a superior and an inferior tunnel is more or less arbitrary as the junction between the perpendicular plate and the vomer is very smooth. The combination of tunnels to be made in an individual case will depend on the deformities that we find as well as on our surgical aims. The following approaches are the most common: Fig. 5.10 Two-tunnel approach (Bilateral superior tunnels; Fig. 5.10). Indication Moderate septal pathology. The two-tunnel approach is the most common and the traditional approach to the cartilaginous and bony septum insepto(rhino)plasty. It gives access to the entire cartilaginous and bony septum as well as to the various chondro-osseous junctions. This approach suffices in cartilaginous and bony deviations, fractures, crests, and spurs. If undertunneling appears hazardous, a two-tunnel approach can easily be extended to a three-tunnel or four-tunnel approach. Steps Fig. 5.11 Three-tunnel approach (Bilateral superior tunnels combined with a unilateral inferior tunnel on the left or right; Fig. 5.11.) Indication Severe pathology of the premaxillary area. An anteroinferior tunnel on the right or left side is joined with bilateral anterosuperior tunnels. This is the classical MP approach as described by Cottle et al. (1958). It is used in patients with more severe pathology of the septal base, for example deformities of the premaxilla, a pronounced basal crest, or scar tissue. When special problems are encountered, the three-tunnel approach may be extended to a four-tunnel approach. Steps (Bilateral superior and bilateral inferior tunnels; Fig. 5.12). Fig. 5.12 Four-tunnel approach Indication Steps (Unilateral anterior and bilateral posterior tunnels; Fig. 5.13). Indication Whether the left or the right anterior tunnel is made first depends on the pathology. When a (vertical or horizontal) fracture is present, it is advisable to start elevating on the side of the deviation, to then cut through the fracture line, and from there continue with bilateral undertunneling. Steps In severe pathology (scar tissue, missing septal cartilage), we will usually decide not to continue elevating the anterior tunnels up to the bony septum. Instead, we first make bilateral inferior tunnels to facilitate dissection of the pathology and separation of the mucosal blades. Steps Fig. 5.14 The mucoperichondrium is elevated in a sweeping movement with the blunt end of the elevator. Steps Inferior tunnels may be elevated a) from above, or b) from the anterior by the MP approach (Fig. 5.15). The first method implies that the chondropremaxillary area is approached from the posterior, where as in the latter technique the premaxilla is approached from the anterior. In patients with limited and moderate pathology, we usually choose the approach from the posterior, as it is less traumatic and generally provides sufficient access. In severe pathology, however, the anterior approach to the premaxilla is the best option. Steps Steps Fig. 5.16 The lobular base is undermined. Fig. 5.18 Beginning of an inferior tunnel by elevating the mucoperiosteum with a curved elevator. Fig. 5.19 Connecting an inferior with a superior tunnel. a Cutting through the pathology from below. b The lateral part of the basal crest is temporarily left attached to the mucosa and resected at a later stage. Note When elevating the mucoperiosteum of the nasal floor in making an inferior tunnel, the incisive nerve and vessels will be cut. This may cause temporary loss of sensitivity in a small triangular area of the palatal mucosa just behind the incisor teeth (see also p. 25, 26 Fig. 1.59). Steps The cartilaginous septum may be cut in a vertical, horizontal, or oblique direction tomobilize and resect parts of the cartilage and to allow its repositioning. Fig. 5.21 Vertical chondrotomy with a Cottle elevator. Fig. 5.22 Vertical chondrotomy at a fracture line. The cartilaginous septum is disconnected posteriorly by a vertical incision at the chondroperpendicular junction (Fig. 5.20). This is usually followed by dissecting the septum from its base to create a “swinging door.” Steps The cartilaginous septum is cut at, or just in front of, a vertical fracture to allow mobilization, resection, and repositioning of deviated and fractured parts (Fig. 5.22). Steps The deformity may be such that separating the septum from one or both triangular cartilages is necessary to straighten the cartilaginous pyramid and the septum. The septal plate will then become detached from all other structures. It will thus have to be fixed in its new position by sutures (and splints) in the reconstruction and fixation phase. Sometimes two vertical chondrotomies behind each other (double vertical chondrotomy) are required for repositioning. This technique may be applied for correcting a double vertical fracture (“harmonica septum”) or a convexity (Fig. 5.23). Fig. 5.23 Double vertical chondrotomy. Fig. 5.24 Chondrotomy at a horizontal fracture line. Fig. 5.25 Horizontal chondrotomy using the sharp end of a Cottle elevator. Fig. 5.26 The cartilaginous septum is dissected from its base: a “swinging door” is created. Steps The cartilage is cut in a horizontal direction (Figs. 5.24, 5.25). This may be required at a horizontal fracture (see p. 164ff) or just above a crest to allow mobilization, resections, and repositioning. In general, we try to refrain from making horizontal cuts in the cartilaginous septum, as they deprive the cartilaginous pyramid of its support. Horizontal chondrotomies are particularly risky if they are followed by resection of a horizontal strip or crest, leaving a horizontal defect. This may lead to sagging of the cartilaginous dorsum, unless the anterior septum still rests on the anterior nasal spine. After disconnecting the cartilaginous septum from the bony septum by one or more vertical chondrotomies, its base will have to be dissected and dislocated from the premaxilla and anterior nasal spine to create a “swinging door” and provide wide access to the posterior septum. Steps Fig. 5.28 Resection of a triangular vertical strip of cartilage at the chondroperpendicular junction to mobilize the cartilaginous septum. Resection of parts of the cartilaginous and bony septum will only be carried out where necessary for repositioning, and when they are irreversibly deformed. Vertical Strip at the Chondro-osseous Junction A narrow, triangular, vertical strip may be resected at the chondroperpendicular junction to facilitate mobilization of the cartilaginous septum. Care is taken to keep the upper 1–1.5 cm of the cartilage attached to the nasal pyramid to avoid endorotation of the septum with subsequent sagging of the dorsum and retraction of the columella (Fig. 5.28). Vertical Strip at a Vertical Fracture A triangular or parallel strip may be resected at a vertical fracture line or a bend to remove superfluous cartilage and to enable repositioning of the dislocated parts into the midline (Fig. 5.29). See also the discussion on vertical fractures (p. 162ff). Fig. 5.29 Resection of a vertical strip at a vertical fracture line. Vertical Strip at the Caudal Septal End A vertical strip may be resected at the caudal end of the septum to shorten the septum (Fig. 5.30). This strip may be rectangular or triangular, depending on the surgical goals (for details, see p. 158, 159 Fig. 5.48). Horizontal Basal Strip A horizontal basal strip may be resected to obtain greater mobility of the septal plate, facilitate its repositioning, and obtain wide access to the bony septum. The resected strip should be narrow (2–3 mm) and triangular in shape to avoid loss of support and endorotation of the septum, resulting in sagging of the dorsum and retraction of the columella (Fig. 5.31). See also Chapter 9, page 330. Horizontal Strip at Horizontal Fracture A horizontal strip will usually have to be resected at the level of a horizontal fracture to allow repositioning of the deviated parts. This too is done in a conservative way to avoid creating a gap that may lead to loss of support of the dorsum. (For further details, see p. 164ff and Figs. 5.57a–f). A bony and cartilaginous (basal) crest has usually to be removed. In most cases, this can be done from above. A horizontal chondrotomy is made just above the crest, allowing the cartilaginous part of the crest to be dissected and removed. Its bony part is then cut off with an osteotome, while still attached to the mucosa, and carefully freed from the mucoperiosteum and resected (Fig. 5.32). In severe pathology, however, a three-tunnel approach is the method of choice. The technique is presented in detail on page 160 and in Figures 5.53a–e. Fig. 5.30 Resection of a vertical strip at the caudal septal end. A bony and cartilaginous deviation is either resected or factured into the midline with a strong forceps (Craig type). Resection is carried out by means of a forceps, bone scissors, or osteotome, depending on the deformity and the thickness of the bone. The resected area is later reconstructed by reimplanting plates of removed bone or cartilage. The procedure is described in detail on page 160, 161 and in Figures 5.54a–f. A posterior bony spur can only be corrected by resection. A spur is dissected and mobilized using an elevator and an osteotome and removed with a forceps. The technique is described in detail on page 161, 162 and in Figures 5.55a–e. If the septum has been mobilized by adequate undertunneling, chondrotomies, and resections, it should be easy to reposition the remaining parts. If certain parts still tend to deviate, the mucoperichondrium and mucoperiosteum may have to be further elevated. A resistant cartilaginous deviation may require an additional vertical or horizontal chondrotomy or resection of a somewhat larger or an extra strip. Sometimes, the cartilaginous septum can only be straightened by separating it from the triangular cartilages. It is temporarily removed, modified outside the nose, and reimplanted and fixed (see Fig. 5.62). A residual bony deviation requires additional fracturing or resectioning. If the pyramid is deviated, separating the perpendicular plate from the bony pyramid by osteotomies may also be necessary to straighten a persisting high bony deviation (Fig. 5.33). For details, see Figures 5.54a–f. One should never rely on “repositioning” the septum by using pressure of some kind of endonasal tamponade. Reconstruction of the septum is an essential element of septal surgery. All defective parts of the septal skeleton are repaired by inserting plates of bone or cartilage. Rebuilding the septum serves various purposes: “If you meet a problem, divide it into two” (Cottle). Then solve the easiest problem first. Fig. 5.32 Resection of a bony and cartilaginous crest from above. Fig. 5.33 Persistent high bony deviation with “tenting” effect. The bony septum does not have a supporting function. Inserting small plates of bone and cartilage, made by cutting or slightly crushing resected parts, therefore suffices. Reconstruction of the posterior septum is the penultimate phase of septal surgery (Fig. 5.34). Steps The anterior septum is a supporting structure of the cartilaginous pyramid and lobule. When defective it must therefore be reconstructed by one or more large plates of cartilage or bone. The surgical technique is described on page 158ff, 167ff. Fixation of the septum and of the reimplanted (or transplanted) bony or cartilaginous plates is the last phase of septal surgery. Proper fixation of the various parts is of utmost importance. It is a precondition of a good functional and aesthetic result and can prevent complications such as postoperative bleeding, hematomas, ecchymosis, and edema. Various methods may be used, such as internal dressings, special sutures, or internal and external splinting. The choice depends upon the type of surgery performed and the personal preference of the surgeon. Fig. 5.35 Repositioning of the anterior septum by transdorsal, interdomal, and transcolumellar (intercrural) guide sutures. Internal dressings are an effective method to keep the reconstructed septum in the midline and prevent a septal hematoma. They may also be applied to support the nasal bones and cartilaginous pyramid in their new position. Various materials may be used: 2-cm gauze soaked in isotonic saline or ointment, foam, Merocel, etc. Experience has shown that it is not the material that counts but the care with which these internal dressings are applied. Steps Guide Sutures Guide sutures are used to maneuver the cartilaginous and bony plates into position. Slowly resorbable 3–0 sutures are fixed to the plate(s) and guided transdorsally, interdomally, and/or through the columella (Fig. 5.37). After the plates have been fixed in place and the operation is over, these guide sutures may be cut off flush to the skin, attached to the skin by tape (Fig. 5.38), or fixed to a Hexalite splint according to Hellmich’s method. Septospinal Suture If the septal base has the tendency to slip off the anterior nasal spine and premaxilla, the septal plate may be held in place by a septospinal suture. A slowly resorbable 3–0 suture is passed through the septal base, downward through the connective tissue and mucosa to the left of the anterior nasal spine and the frenulum, back through the mucosa and the connective tissue on the right side, and then closed intraseptally (Fig. 5.39). Just before closing, a small cut is made into the frenulum to bury the suture deep to the mucosa. Septopremaxillary 8 Suture Another way to attach the septal base in the midline to its pedestal is to apply a septopremaxillary 8 suture. A slowly resorbable 3–0 or 4–0 suture is brought: Fig. 5.37 Positioning of the anterior septum with transdorsal and transcolumellar guide sutures. Fig. 5.38 Fixation of a transdorsal guide suture by tapes. In reconstructing the septum, transseptal fixation sutures and septal splints may be of great help. Cartilaginous plates are transseptally fixated by applying two or three catgut or slowly resorbable sutures with or without the help of bilateral intranasal splints (made from silastic or simple plastic sheets) (Fig. 5.41). The splints should not touch the mucosa of the floor and the roof of the nasal cavity. Any contrast may lead to pain, granulations, and bleeding. Generally, splints are removed after some days. In special cases, they are left in place for a longer period of time, for example to prevent recurrence of synechiae. Fig. 5.39 Septospinal suture: fixation of the septal base around the nasal spine. Fig. 5.40 Septopremaxillary 8 suture. Fig. 5.41 The reconstructed septum is fixated by transseptal sutures without (a) or with (b) silastic splints. Fig. 5.42 The cartilaginous septum is temporarily fixated into the desired position with a straight needle. Septocolumellar (SC) sutures are applied to stabilize the anterior septum in the midline. At the same time, they serve to close the caudal septal incision. Steps 1) from right to left: mucosa–cartilage–mucosa; 2) from left to right: skin–columellar connective tissue (or medial crura)–skin.
Septal Surgery—An Essential Element of Functional Reconstructive Nasal Surgery
 Sequence of Surgical Steps in Functional Reconstructive Nasal Surgery
1. Endonasal Approach
2. External Approach
Basics of Septal Surgery—The Six Phases of Septal Surgery
 Phase 1: Approach
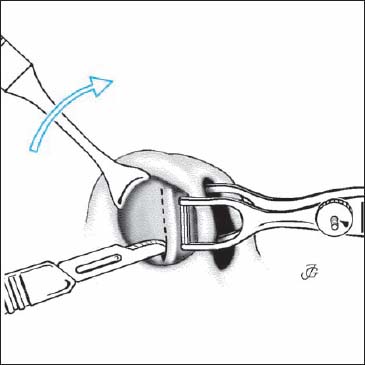
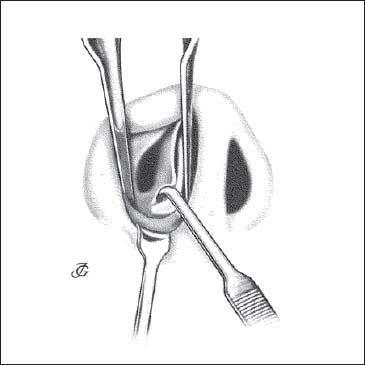
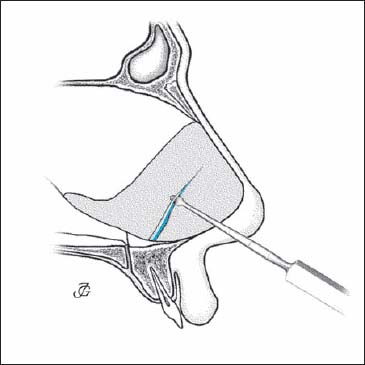
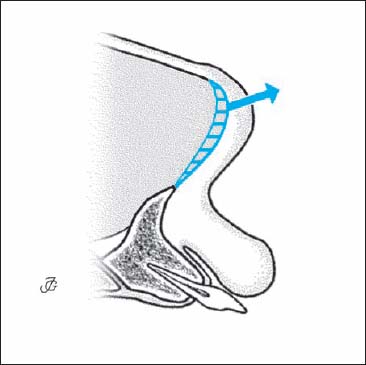
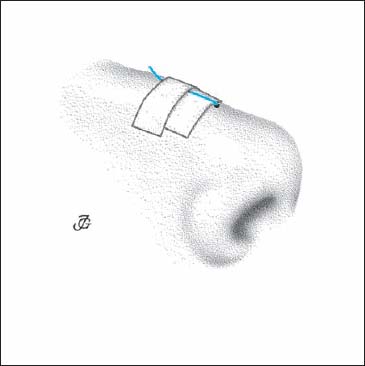
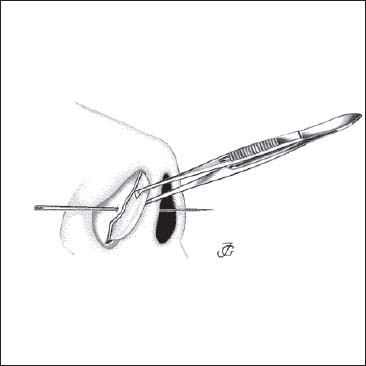
Caudal Septal Incision (Hemitransfixion)
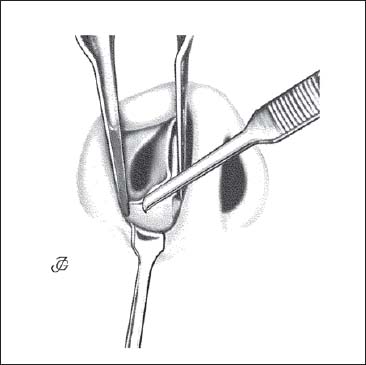
Exposure of the Caudal Septal End
 Phase 2: Mobilization
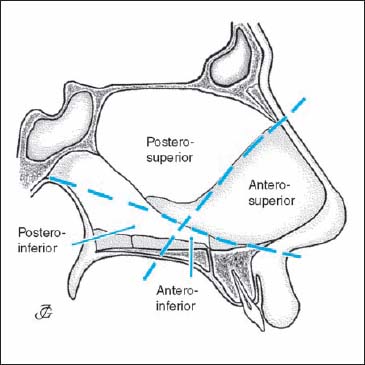
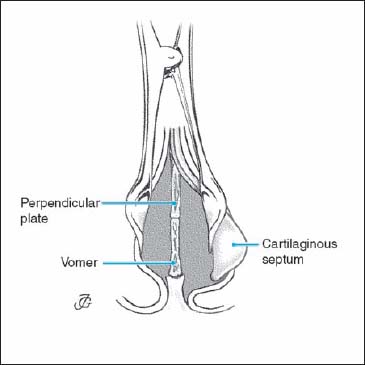
The Four Septal Tunnels
The Different Methods
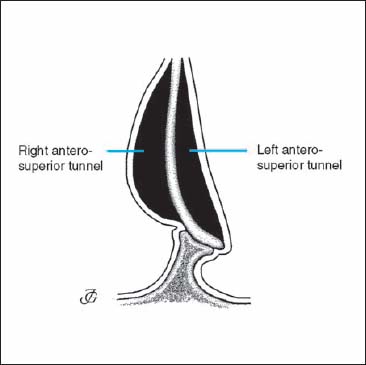
1. Two-Tunnel Approach
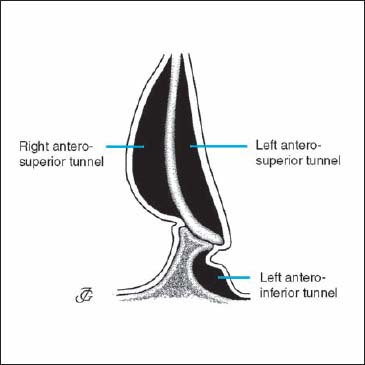
2. Three-Tunnel Approach
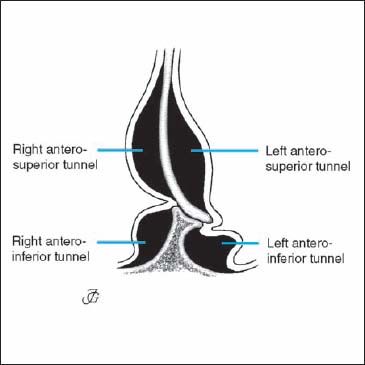
Four-Tunnel Approach
4. One-Tunnel Approach
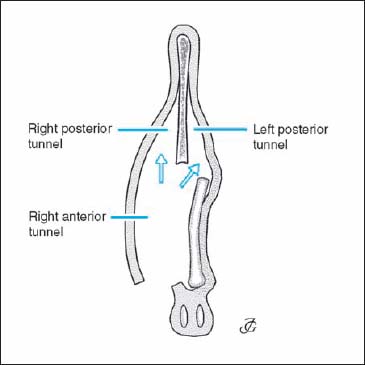
How to Create the Different Tunnels
Anterosuperior Tunnel
Posterior Tunnel
Inferior tunnel
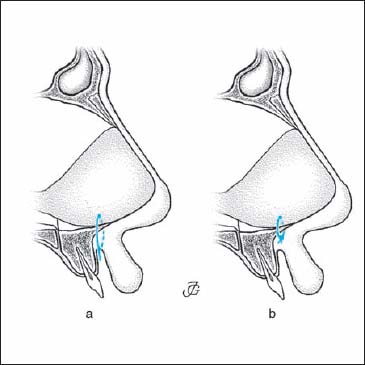
Inferior Tunnel from Above; Cranioposterior Approach
Inferior Tunnel from Anterior; MP Approach
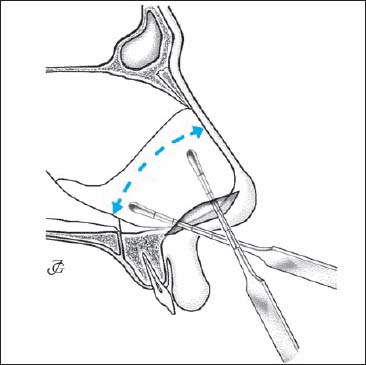
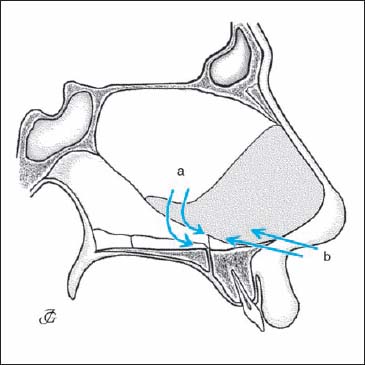
Connecting an Inferior with a Superior Tunnel
Chondrotomies
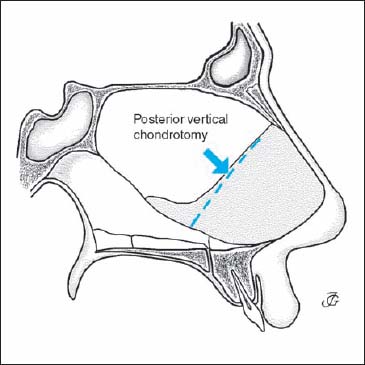

Posterior Vertical Chondrotomy
Vertical Chondrotomy at a Fracture Line
Double Vertical Chondrotomy
Horizontal Chondrotomy
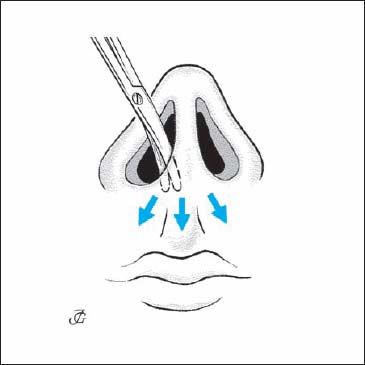
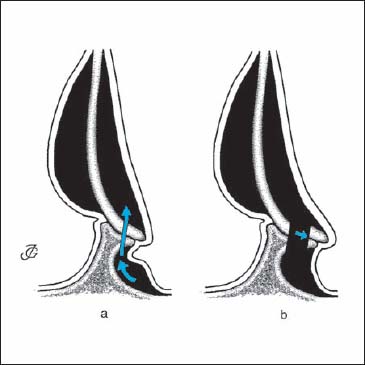
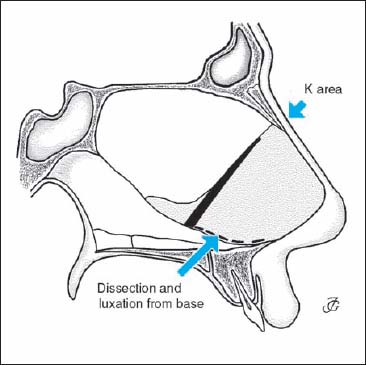
Dissecting the Cartilaginous Septum from its Base (“Swinging Door” Technique)
 Phase 3: Resection
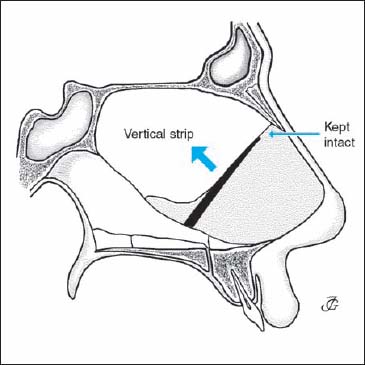
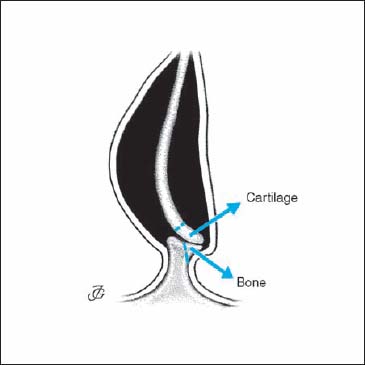
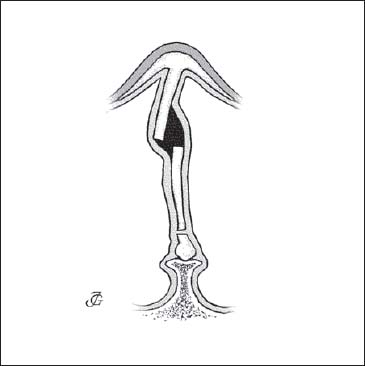
Vertical Strips
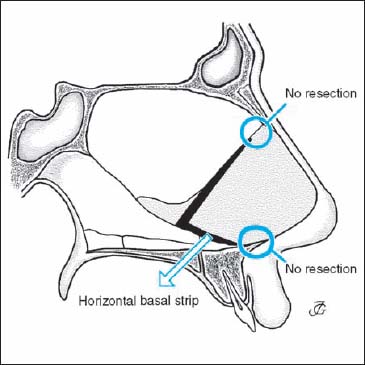
Horizontal strips
Bony and Cartilaginous Crest
Bony and Cartilaginous Deviation
Bony Spur
 Phase 4: Repositioning
 Phase 5: Reconstruction
Reconstruction of the Posterior Septum
Reconstruction of the Anterior Septum
 Phase 6: Fixation
Internal Dressings
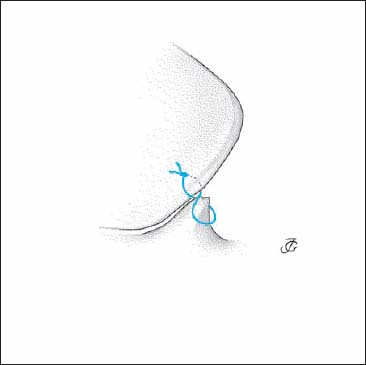
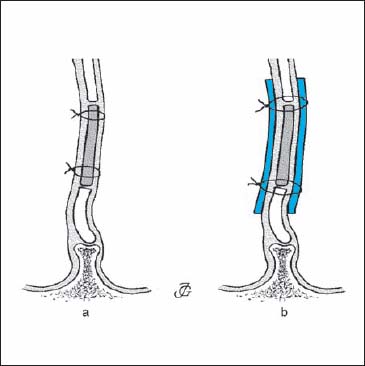
Sutures and Splints
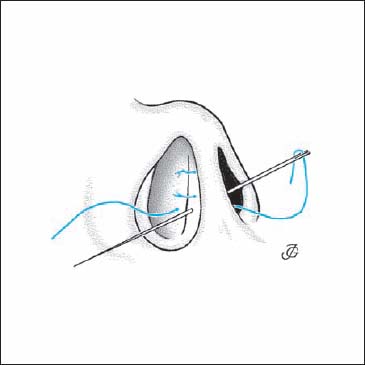
Septocolumellar Sutures
Related posts:

Stay updated, free articles. Join our Telegram channel

Full access? Get Clinical Tree


