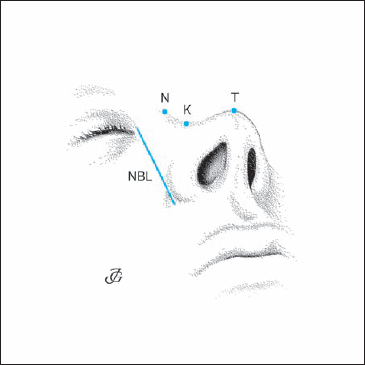
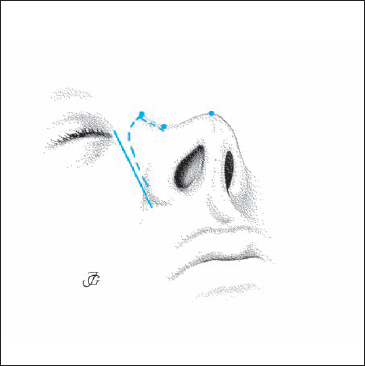
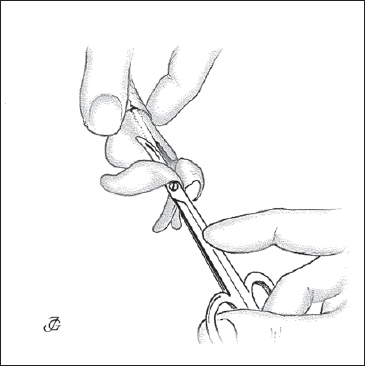
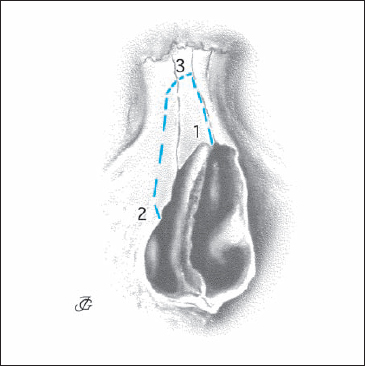
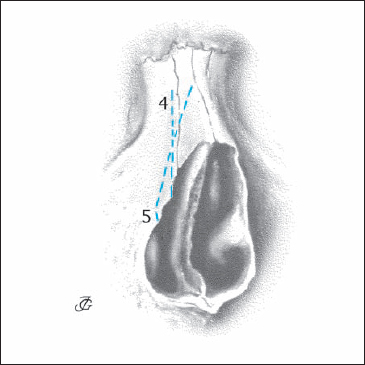
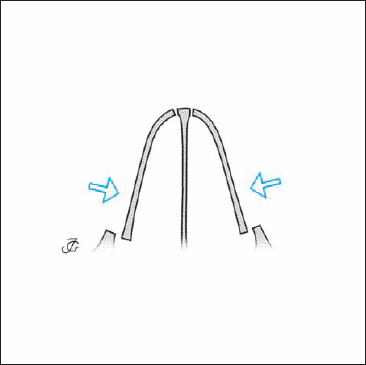
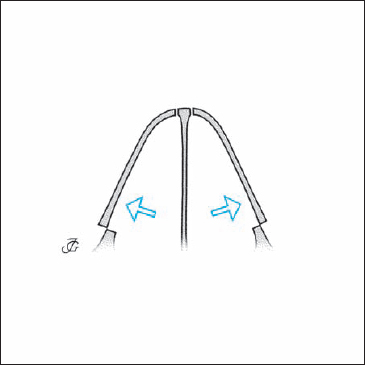
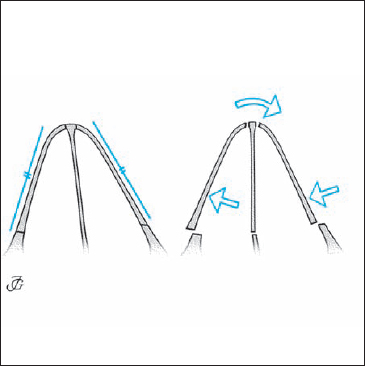
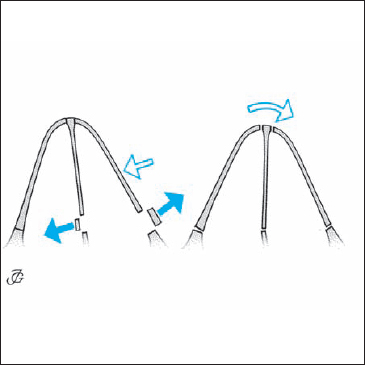
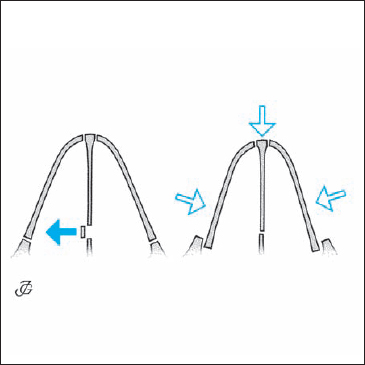
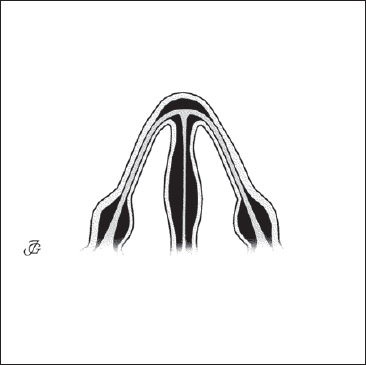
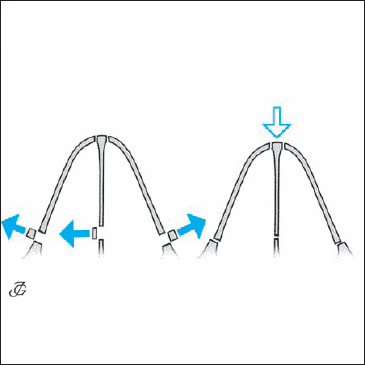
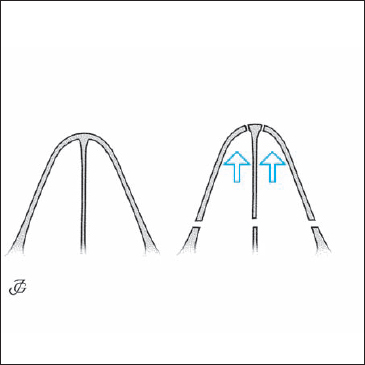
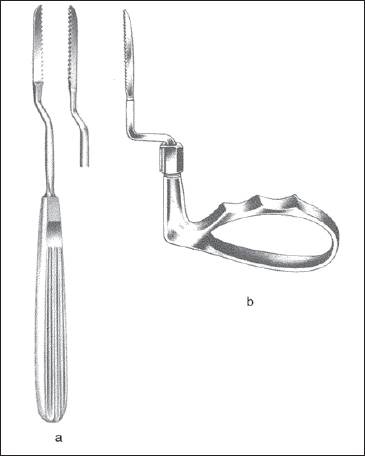
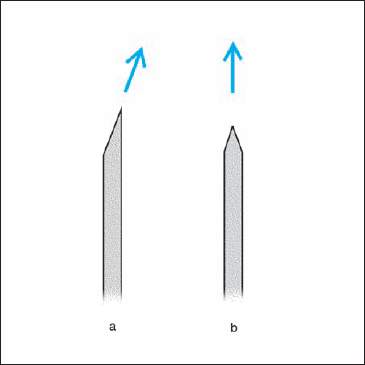
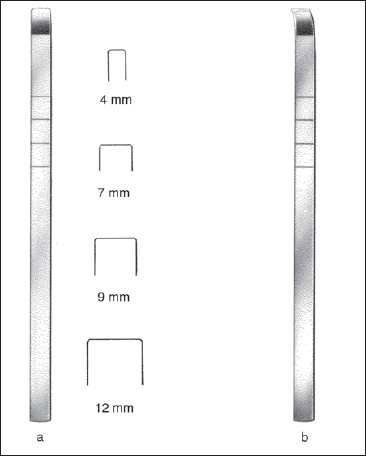
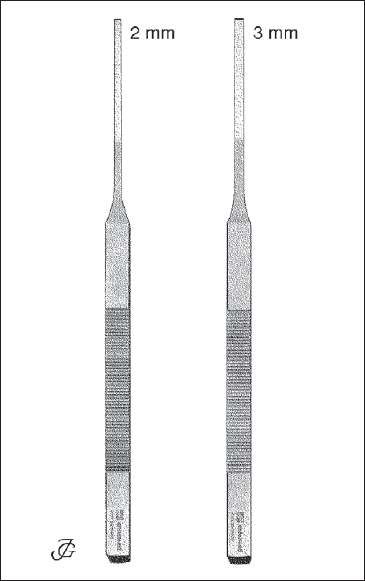
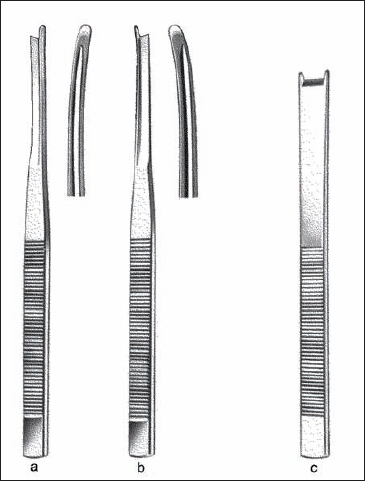
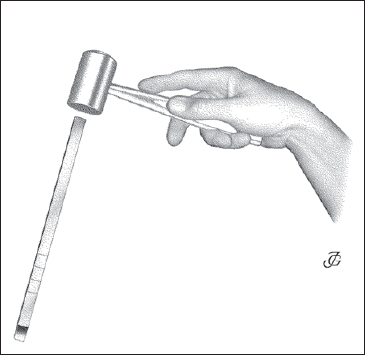
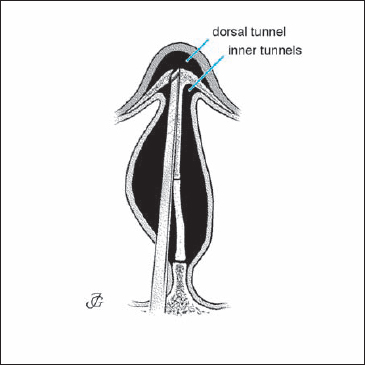
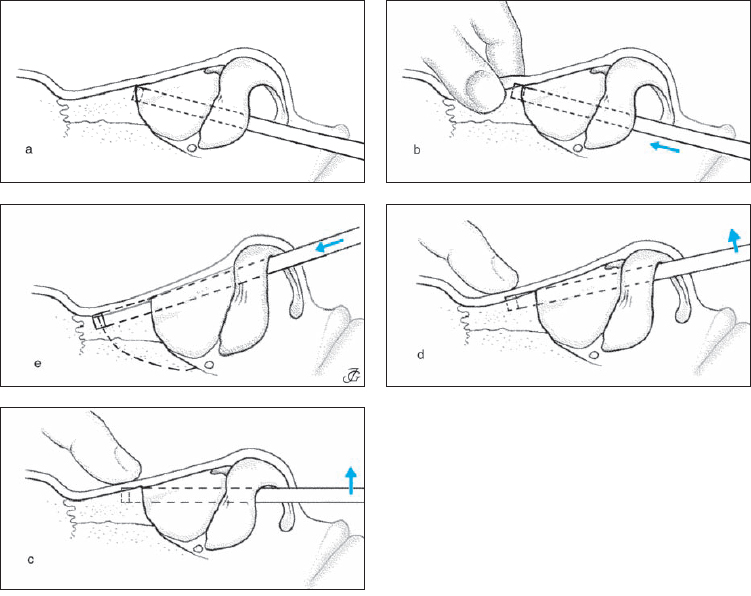
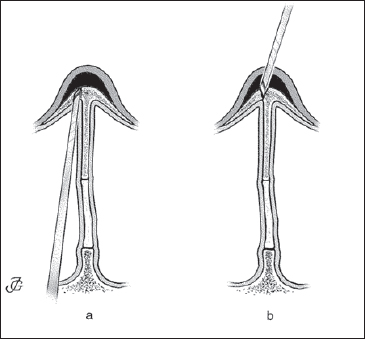
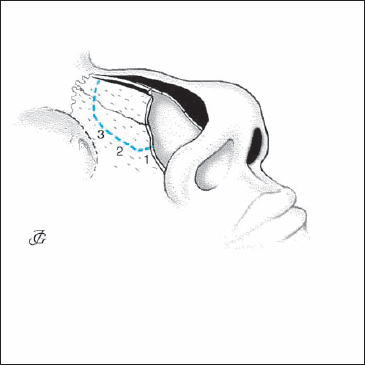
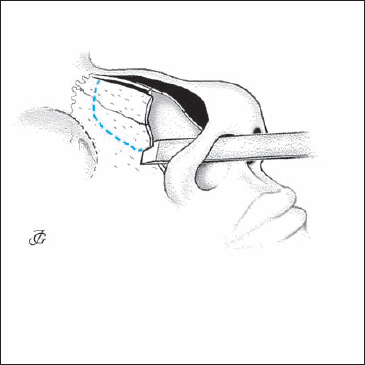
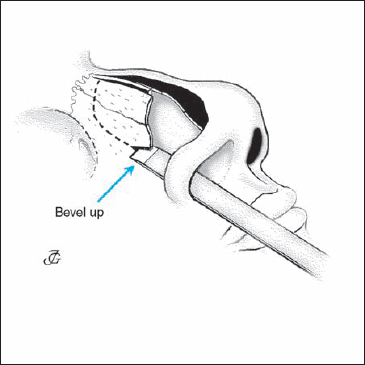
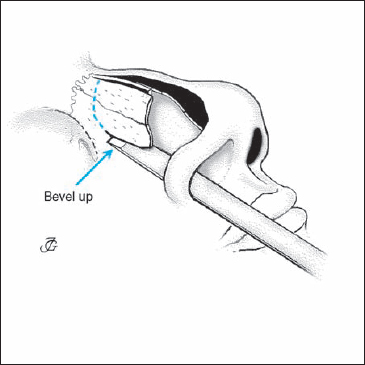
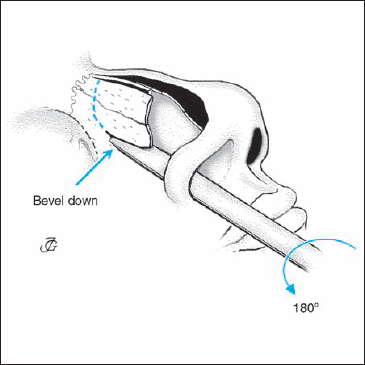
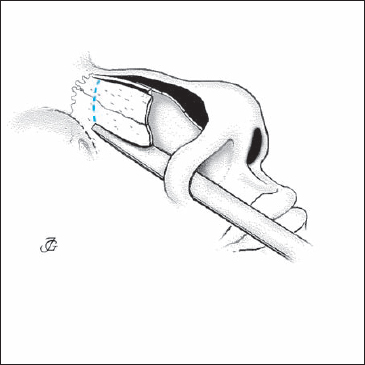
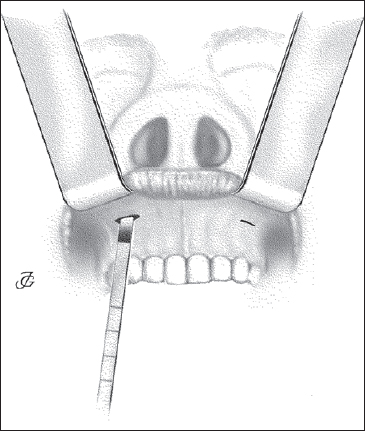
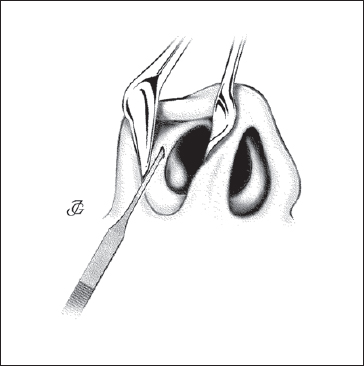
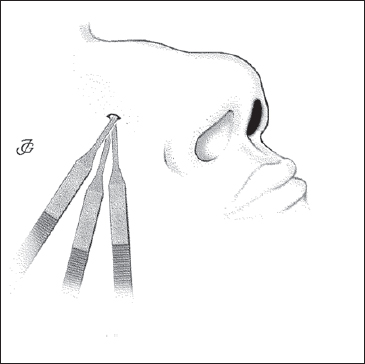
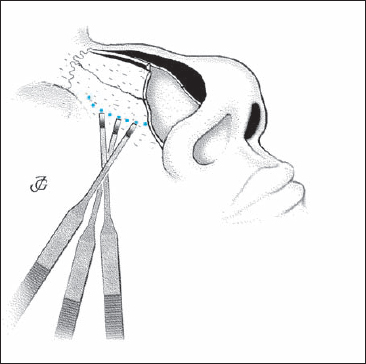
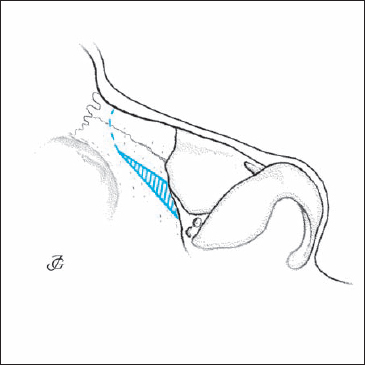
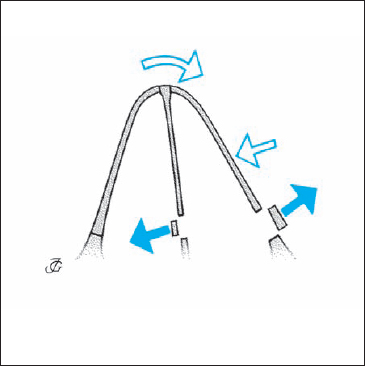
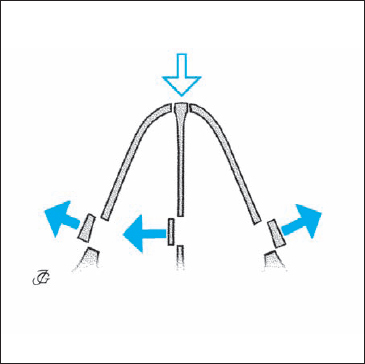
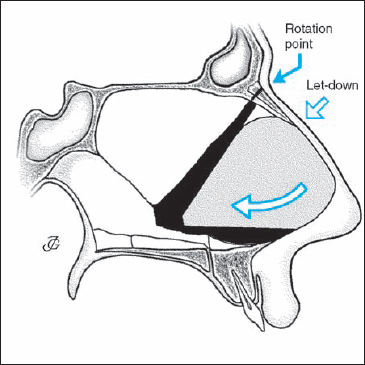
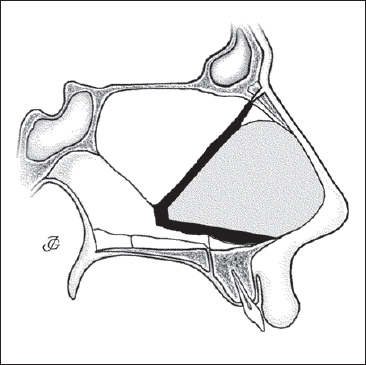
6 Pyramid Surgery Modifying the bony pyramid is one of the basic procedures in functional reconstructive nasal surgery. It may involve repositioning, reduction, or augmentation. Repositioning requires complete mobilization of the bony pyramid. To allow repositioning of the pyramid, the bony pyramid pyramid is detached by osteotomies from the frontal bone and the maxillary bones. This is accomplished through a combination of interconnecting osteotomies. Usually, bilateral paramedian, lateral, and transverse osteotomies are performed. Generally, mobilization and repositioning of the pyramid also require mobilization and correction of the septum. There may be exceptions to this standard procedure, depending upon the pathology and the surgical goals. For example, in aesthetic surgery, a limited amount of narrowing of the pyramid may be sufficient. Two oblique osteotomies instead of lateral and transverse osteotomies may then suffice. In a severely deformed and broad pyramid, on the other hand, extra osteotomies may be required. Instead of the standard osteotomies, one or two intermediate osteotomies may be added. The sequence of steps for mobilizing the bony pyramid is described is the following: Steps The bony pyramid is remodeled and repositioned as required. As the next step, the cartilaginous pyramid and the septum are adjusted to the new bony pyramid. As the last step, septum and pyramid are fixed in their new position. Mobilizing and repositioning of the pyramid requires complete mobilization of the septum (see Chapter 5, p. 141ff) and of the bony pyramid by a series of osteotomies. The following types of osteotomy may be distinguished (Figs. 6.3, 6.4): Fig. 6.1 b The planned osteotomies are marked on the skin. Fig. 6.2 Undermining the skin of the pyramid (dorsal tunnel) by bilateral IC incisions. Fig. 6.3 Paramedian (1), lateral (2), and transverse (3) osteotomy. The choice of osteotomies to be applied in a certain case depends on the pathology and the goals of the operation. The most common procedure is to combine two (intraseptal) paramedian osteotomies with two (endonasal) lateral osteotomies and transverse osteotomies. Fig. 6.4 Intermediate (4) and oblique (5) osteotomy. After the bony pyramid and the septum have been mobilized, the bony pyramid is repositioned. The following maneuvers may be carried out (Figs. 6.5–6.12): Both lateral walls of the bony pyramid are moved inward (medially). The pyramid is thereby narrowed (Fig. 6.5). Since the triangular cartilages are firmly attached to the nasal bones, the cartilaginous pyramid, and with it the valve area, will be narrowed as well. Bilateral infracture requires paramedian, lateral (or oblique), and transverse osteotomies on both sides. The level of the lateral osteotomies is very important. They are generally performed about 1–2 mm above the NBL. In patients with a broad and low pyramid, they are usually somewhat lower. When a lateral osteotomy is done too high (too ventral), a visible and palpable “step” in the lateral bony wall may result. When much infracture is required, the mucoperichondrium on the inside of the bony pyramid may be elevated (inner tunnel) to allow more inward displacement of the bone (see Fig. 6.10). Fig. 6.5 Bilateral infracture The external stent is applied with some pressure to keep the nasal bones in their new position. Endonasally, a limited amount of internal dressing is applied to avoid outward movement of the infractured bones by postoperative swelling. The lateral walls of the bony pyramid are moved outward (laterally), thus widening the pyramid and the valve area (Fig. 6.6). Bilateral outfracturing requires complete paramedian, lateral, and transverse osteotomies on both sides. It may be performed to widen a narrow pyramid. Generally, however, the let-down procedure (see text following) is to be preferred in these cases. As previously noted, the lateral osteotomy should be done low to avoid a postoperative “step.” The bony pyramid is carefully stabilized in its new position by internal dressings. The external stent is applied without pressure. The bony wall is infractured on one side and outfractured on the opposite side (Fig. 6.7). The bony pyramid is thereby rotated. This can only be accomplished successfully when the pyramid is fully mobilized by performing bilateral paramedian, lateral, and transverse osteotomies and mobilizing the septum. The pyramid is rotated in cases with an asymmetrically deviated pyramid. The long, shallow side is infractured, whereas the short, steep side is moved outward. The lateral osteotomy on the longer side is performed somewhat higher than on the short side. The distance between both osteotomies and the dorsum should be symmetrical so that the new lateral walls are equally high. To preserve the result, it is crucial to fix the bony walls and the septum in their new position. Fig. 6.6 Bilateral outfracture Following mobilization of the bony pyramid and the septum, a wedge of bone is resected at the base of the long side of the bony pyramid. The pyramid is then rotated towards this side (Fig. 6.8). This method is used in patients with a severely deviated bony pyramid. It was already described as early as 1907 by Joseph. The technique of wedge resection is discussed on page 206ff and illustrated in Figures 6.33a–f and 6.34. To stabilize the bony pyramid and the septum in their new position, the internal dressings, external taping, and splinting are applied with special care. The bony pyramid is pushed down and bilaterally infractured. The projection of the nasal dorsum is reduced, and the pyramid is narrowed (Fig. 6.9). The technique requires resection of a basal horizontal and a posterior vertical strip from the septum in combination with bilateral paramedian, lateral, and transverse osteotomies. We recommend elevating the mucoperiosteum on the inner side of the nasal bones (internal tunnel) to accommodate the infractured and pushed-down nasal bones (Fig. 6.10). This method, introduced by Cottle (1954), may be used in patients with a prominent pyramid and a slight bony hump. Although elegant and conservative in comparison with other methods of hump removal, the technique has two disadvantages. First, it leads to narrowing of the pyramid and the valve area. In patients with a prominent pyramid, this is usually contraindicated as their external nose and valve area are already narrow. Second, the ultimate effect of a push-down is usually less than expected. In patients with a prominent narrow nasal pyramid and hump, bilateral wedge resection followed by a let-down of the pyramid is usually the best choice. Fig. 6.7 Rotation by unilateral infracture and outfracture on the opposite side. The lateral osteotomy on the long, shallow side of the bony pyramid is made somewhat higher than the one on the short, steep side. Fig. 6.8 Rotation following osteotomies and resection of a bony wedge at the base of the long side of the pyramid. Fig. 6.9 Push-down with bilateral infracture. The bony pyramid is let down after performing osteotomies and bilateral resection of a wedge at its base (Fig. 6.11). The let-down technique requires resection of both a basal horizontal and a posterior vertical strip from the septum. For a detailed description of the technique, see page 207ff. This method allows lowering of the bony pyramid without concomitant narrowing. It is therefore the technique of choice in patients with a narrow and prominent nasal pyramid with or without a bony and/or cartilaginous hump. The method was described by us in 1975. In patients with a low pyramid or saddle nose, a pushup of the bony pyramid may be attempted (Fig. 6.12). However, it is difficult to bring the nasal bones upward and keep them in a more ventral position. External fixation is the only effective means to preserve a pushup of the pyramid. Fig. 6.10 Septal tunnels for intraseptal paramedian osteotomies; external and internal subperiosteal tunnels for wedge resections; undermining of the skin over the dorsum to allow repositioning. Over the last century, diverse instruments have been developed to perform osteotomies. At first, a saw was used, followed by various types of chisels and osteotomes. Nowadays, most surgeons prefer to use chisels. There is no consensus on which type of chisel is the best; choice is based largely on personal preference. In the early era of nasal surgery, lateral osteotomies were performed with a saw. For many decades the Joseph saw was the usual instrument (Fig. 6.13a). It has two rows of teeth running in opposite directions allowing sawing in a to-and-fro motion. Consequently, the saw cut is rather wide and a considerable amount of bone dust is produced. These drawbacks led to the development of narrower saw blades. One example is the Cottle saw, consisting of a hand grip and a changeable band saw (Fig. 6.13b). There are several disadvantages to using a saw. The main ones are laceration of the endonasal mucoperiosteum and production of bone dust. Some surgeons therefore used the saw only to make a furrow in the bone as a guide for the chisel. Over the last decades, the saw has generally been abandoned in favor of the chisel. Fig. 6.11 Let-down following osteotomies and bilateral wedge resection. An osteotome has two identically sloping sides. It therefore proceeds forward in a straight line (Fig. 6.14b). For this reason, an osteotome may be preferred for certain purposes. A chisel-osteotome combines the features of both the chisel and the osteotome. The chisel is nowadays the preferred instrument for performing osteotomies. It is a reliable and precise tool that can be used for all types of bone cuts. Another advantage is that a chisel can easily be sharpened. It is used in septal surgery as well as for osteotomies of the bony pyramid. A chisel has a sloping side (the bevel) and a flat side. Accordingly, the two sides meet a different amount of resistance while proceeding. A chisel will therefore deviate slightly towards the side of the bevel (Fig. 6.14a). Consequently, all types of straight and curved bone cuts can be made. When the bevel is facing up, the bone cut will be convex, when the bevel is facing down, it will be convex. Various types of chisel have been developed. They vary in width, curvature, and thickness. Some have sharp edges, while others have rounded or protected edges. Nowadays, Cottle chisels and Tardy micro-osteotomes are the most popular. For beginners, the guided chisel, as advocated by Masing, may be a good alternative for performing lateral osteotomies. Fig. 6.12 Push-up of the bony pyramid. Fig. 6.13 Saws according to Joseph (a) and Cottle (b). Cottle chisels are available as 4-mm, 7-mm, 9-mm, and 12-mm straight chisels and as a 7-mm curved chisel (Fig. 6.15). We have a preference for these chisels, as they are universal and can be used both intraseptally as well as for osteotomies and hump resection. The 4-mm and the 7-mm chisel are used for resecting crests and spurs, as well as for making cuts into the vomer and the perpendicular plate. The curved 6-mm chisel is used to make a vertical cut into the perpendicular plate to resect a bony plate for transplantation. The 7-mm straight chisel is the instrument of choice for paramedian and lateral osteotomies as well as for wedge resections. By choosing between “bevel up” and “bevel down,” the bone cut can be made along the required course. The curved 6-mm chisel is used for transverse osteotomies, while the 9-mm and 12-mm chisels are taken for hump resection. It is advisable to sharpen the chisels from time to time on a whetstone. A disadvantage of Cottle chisels is that beginners may find them somewhat difficult to guide. Their sharp edges may be another drawback for the beginner. Micro-osteotomes as introduced by Tardy (1984) are excellent instruments for performing external lateral and transverse osteotomies (Fig. 6.16). They are heavier than other chisels. In experienced hands, they are safe and effective for performing endonasal and external lateral osteotomies and external transverse osteotomies. It has been claimed that micro-osteotomes produce less trauma to the soft tissues. Indeed, compared with the wider Cottle chisels, they require a smaller incision or, according to some, no incision at all. However, they cut through the periosteum as no subperiosteal tunnels are made. Moreover, when used externally, they leave a small visible scar. Fig. 6.15 Chisels acoording to Cottle: 4-mm, 7-mm, 9-mm, and 12-mm straight chisels (a) and 6-mm curved chisel (b). Curved (guided) protected chisels can only be used for lateral osteotomies. One is needed for the left side and one for the right side (Figs. 6.17a, b). These chisels are not our choice as they produce a “programmed” bone cut. Double-protected osteotomes have been advocated for hump removal. Supposedly, they are less risky to the dorsal skin than chisels with sharp edges, such as the Cottle chisels (see Fig. 6.17c). However, since the skin over the dorsum is widely undermined, there is, in our opnion, no need for a special osteotome. Fig. 6.16 Micro-osteotomes according to Tardy. The important role that the type of mallet and the tapping technique play in performing osteotomies is often ignored. The mallet should be heavy and flat. We suggest using a Cottle-type mallet with a flat and a rounded side. The flat end is used for performing bone cuts, the rounded end to crush bone and cartilage in a crusher. The impetus of the tap should not come from the hand or forearm of the assistant but the weight of the mallet. Ideally, the impact is made by a movement of the wrist (Fig. 6.18). The back end of the chisel should be struck at a perpendicular angle. A Teflon coating on the flat end of the mallet may help prevent slipping. A double-tap technique is used in an osteotomy. First, a light tap is made for listening. The sound tells whether the end of the chisel is in thick or thin bone or in soft tissue. The second tap is somewhat heavier and is intended for “working.” The assistant should wait for an okay from the surgeon before delivering the next sequence of two taps. Fig. 6.17 Guided, unilaterally protected chisels for a left (a) and a right (b) lateral osteotomy. Double-protected osteotome for hump removal (c). Fig. 6.18 The back of the chisel is hit at a perpendicular angle with a loose wrist using the double-tap technique. Paramedian (or “medial”) osteotomies separate the nasal bones from each other as well as from the septum. Usually two paramedian osteotomies are made, one on each side of the septum. These two cuts are thus not exactly in the midline but somewhat paramedian, hence the name. In daily practice, however, the term “medial osteotomy” is more common. The nasal bones are separated at the internasal suture. In a sense, paramedian osteotomies are therefore fibrotomies rather than osteotomies. Steps In special cases, the paramedian osteotomies may be made using a different approach: endonasally–transmucosally or from above through an IC incision. These techniques are suitable when no surgery of the septum is performed. This may be the case when the septum is normal or when reopening the septum is hazardous. The paramedian osteotomies may then be performed endonasally through the mucosa of the roof of the nasal cavity (Fig. 6.21 a). Another option is to separate the nasal bones from above through an IC incision (Fig. 6.21 b). In both techniques, the inner mucoperiosteal lining of the nasal pyramid is cut through. A lateral osteotomy separates the lateral bony walls of the pyramid from the nasal process of the maxilla. A cut is made into the bone above and more or less parallel to the NBL. The level of the osteotomy above the NBL depends upon the pathology and the surgical goals. Lateral osteotomies are almost always carried out bilaterally. An exception may be made in patients with an impression of one bony wall due to a recent injury. A unilateral lateral osteotomy may then suffice. There are several ways to perform a lateral osteotomy. The most commonly used techniques are the endonasal–subperiosteal, transoral, endonasal (transcutaneous)–transperiosteal, and the external method. We prefer the endonasal–subperiosteal approach, as it avoids periosteal (and mucosal) damage and allows wedge resection under direct view. Fig. 6.20 Paramedian (= “medial”) osteotomy; intraseptal approach. a. The upper edge of a 7-mm straight Cottle chisel is positioned intraseptally underneath the lower margin of the nasal bones, while its end is pressed against the upper lip. The flat side of the chisel is directed towards the septum; its bevel is directed laterally. b.When the mallet hits the chisel, the skin of the dorsum is lifted by the thumb and index finger of the left hand. c.As soon as the edge of the chisel has gone through the bone and can be palpated through the skin, the handle is moved upward. d.The osteotomy is then continued, with the chisel parallel to the bony dorsum. Care is taken to keep about 2 mm of the chisel outside the bony pyramid. e.The osteotomy is continued just beyond the marks for the transverse osteotomies. Steps Fig. 6.21 Paramedian osteotomy—alternative approaches. a Endonasal–transmucosal route. b From above through an intercartilaginous incision. Fig. 6.23 a Lateral osteotomy. The beginning of the bone cut is directed downward. The bevel of the chisel is up. Sublabial approach. The bony pyramid is approached by the sublabial route through a 1-cm labiogingival incision (Fig. 6.24). (see also Chapter 4, p. 131). The periosteum is elevated, and the osteotomy is performed as already described. We take this approach when the lateral osteotomies have to be made very low, for example in patients with a very broad and low pyramid. The method may also be used when there is risk of too much scarring and stenosis of the vestibule. Endonasal–transperiosteal technique. The osteotomy is performed endonasally with a micro-osteotome (Fig. 6.25). A 2-mm (or stab) incision is made in the vestibular skin at the caudal margin of the bony pyramid. There is no need to spread the soft tissues. The periosteum is not elevated. The bone is cut together with the periosteum. External technique. The osteotomy is made through the skin and the periosteum with a micro-osteotome through a small (stab) incision (Figs. 6.26a, b). Several “punctures” are made in the bone. This technique is only applicable in patients with thin nasal bones. Fig. 6.23 c Fig. 6.23 d The last part of the lateral osteotomy is directed somewhat upward. The bevel of the chisel is down. Fig. 6.23 e The lateral osteotomy is completed. Fig. 6.24 Lateral (and transverse) osteotomy through the sublabial approach. Fig. 6.25 Endonasal transperiosteal lateral osteotomy. Fig. 6.26 a External transperiosteal lateral osteotomy using a micro-osteotome. Fig. 6.26 b Multiple bone punctures are made transcutaneously. Fig. 6.27 a Transverse osteotomy using a curved 6-mm chisel. Fig. 6.27 b The chisel is moved as far laterally as possible to cut from below and laterally. Fig. 6.27 c The thumb of the left hand keeps the chisel in position. A transverse osteotomy separates the bony pyramid from the frontal bone and the nasal spine of the frontal bone. This osteotomy is usually made at a level just below the nasion (depth of nasofrontal angle). It is technically the most difficult of the three main osteotomies, as the massive frontal nasal spine has to be completely cut through to obtain full mobilization of the bony pyramid. Two different methods are used: the endonasal–subperiosteal and the external technique. Steps Fig. 6.28 External transperiosteal transverse osteotomy from above with a 2-mm micro-osteotome. Steps Subperiosteal or transperiosteal osteotomies There are two schools of thought with regard to how to perform lateral and transverse osteotomies. The “subperiosteal school” chooses to not damage the periosteum. Its exponents claim that a subperiosteal osteotomy causes less bleeding, less chance of postoperative neuralgia, and less callus formation and new growth of bone. The “transperiosteal school,” on the other hand, argues that a transperiosteal bone cut implies less trauma to the adjacent soft tissues as it is carried out with a micro-osteotome. This technique does not require a “wide” incision, spreading of soft tissues, and subperiosteal undertunneling. In this way, bleeding and postoperative swelling will be less. We find it difficult to take an explicit stand in this matter. We regard it as a matter of personal preference, since both methods yield excellent results when carried out with care. It might be argued, however, that the transperiosteal technique is to be preferred for modeling the pyramid in patients with minimal deformities and those requiring cosmetic surgery. The transperiosteal technique, on the other hand, might be the best choice in cases with more severe deformities. Resecting a unilateral or bilateral wedge of bone at the base of the bony pyramid is one of the basic procedures in modifying the nasal pyramid. Unilateral wedge resection at the base of the long side of a deviated pyramid allows rotation of the pyramid (Figs. 6.29, 6.30). Bilateral wedge resection is an effective method to lower or “let down” a prominent nasal pyramid (Fig. 6.31). Both modifying procedures require complete osteotomies at the same time. They will also only be effective after complete mobilization of the septum with resection of a vertical and a horizontal septal strip (Figs. 6.30, 6.31). Unilateral wedge resection may be performed to correct a severely deviated pyramid. The resection is carried out at the long, shallow side of the pyramid and is combined with a lateral osteotomy on the other side, bilateral paramedian and transverse osteotomies, and resection of strips from the septum. This allows a rotation and medianization of a severely deviated pyramid. The method was described by Joseph as early as 1907. In spite of its logic, is was not often practiced. Reports have been scarce (e.g., Lautenschläger 1929, Fomon 1936, Huffmann and Lierle 1954, Sulsenti 1972). Nowadays, however, the technique is accepted as an effective means to address severe asymmetry of the bony pyramid (Figs. 6.29, 6.30). Fig. 6.30 Unilateral wedge resection and resection of septal strips to rotate the pyramid in cases with a severe deviation. Bilateral wedge resection was introduced in the 1970s as a nontraumatic method to reduce a prominent, narrow pyramid with a bony and cartilaginous hump (Huizing 1975). Bilateral resection of a wedge at the base of the pyramid together with resection of a vertical and a horizontal strip from the septum and paramedian and transverse osteotomies allows let-down of the bony and cartilaginous dorsum (Figs. 6.31, 6.32 a, b). This idea had already been put forward by Lothrop in 1914, but was rarely practiced. Today, the bilateral wedge resection technique is generally adopted as the method of choice to lower and broaden a prominent, narrow bony pyramid (Fig. 6.37 a–d). Results also in the lang term are satisfying and complications are rare (Pirsig and Königs 1988). Mobilization of the septum and resection of vertical and horizontal strips is an essential part of the technique of rotation and let-down of the pyramid by wedge resection. The septum must be fully mobilized. A vertical strip is taken from the anterior part of the perpendicular plate and a horizontal strip is resected from the base of the cartilaginous and bony septum to allow the necessary rotation and lowering of the dorsum (Figs. 6.32 a, b). The sequence of steps in unilateral and bilateral wedge resection is as follows: Fig. 6.31 Bilateral wedge resection and resection of septal strips to lower or let down the pyramid in cases with a bony and cartilaginous hump or a prominent, narrow pyramid. Fig. 6.32b The pyramid is let down. The dorsum is lowered and the hump is reduced. Steps
Osteotomies—Mobilizing and Repositioning the Bony Pyramid
 Mobilizing the Bony Pyramid
 Repositioning and Fixation of the Bony Pyramid
 Types of Osteotomy
 Repositioning the Bony Pyramid
Bilateral Infracture
Bilateral Outfracture
Rotation by Unilateral Infracture and Outfracture on the Opposite Side
Rotation by Unilateral Wedge Resection
Push-Down with Bilateral Infracture
Let-Down Following Bilateral Wedge Resection
Push-Up
 Instruments Used for Osteotomies
Saw
Osteotome
Chisel-Osteotome
Chisel
Mallet—The Technique of Tapping
 Techniques of Osteotomy
Paramedian (“Medial”) Osteotomy
Alternative Approaches
Lateral Osteotomy
Endonasal–Subperiosteal Technique
Alternative Techniques
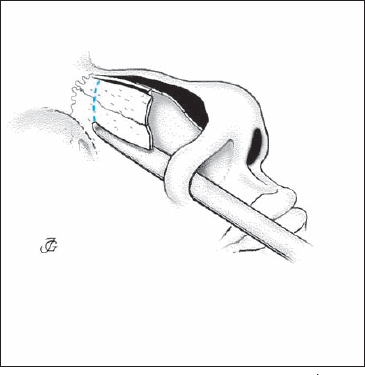
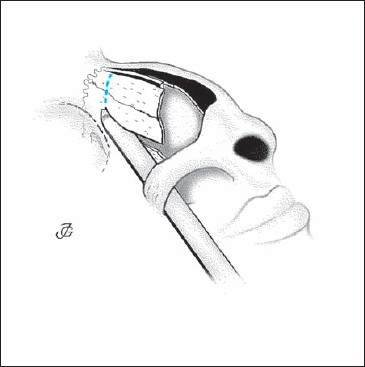
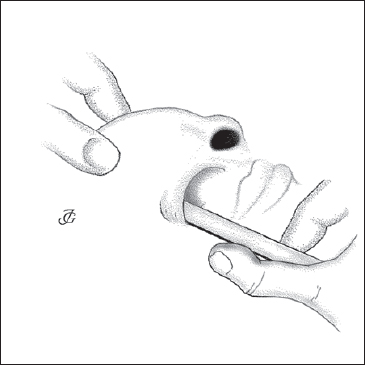
Transverse Osteotomy
Endonasal–Subperiosteal Method
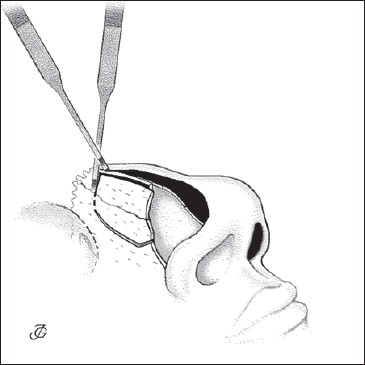
External Technique
Wedge Resection
 Principles
 Surgical Technique
Stay updated, free articles. Join our Telegram channel

Full access? Get Clinical Tree


