Fig. 16.1
Computerized pressure mapping of an individual sitting on a Jay 2 cushion. The dark blue indicates area of low pressure <10 mmHg. The red indicates areas of high pressure >100 mmHg
The seating assessment identifies any bony deformities that may affect the patients’ sitting position. Is there a pelvic obliquity, scoliosis, or rotation of the hips or pelvis? Is there adequate contact of the thighs in the cushion? Is there neutral alignment of the spine? Do they have a posterior pelvic tilt? Are these fixed or flexible deformities? The computerized pressure mapping system is performed on the patients’ everyday cushion and on standard 2” foam. The system captures pressure over the seating area in mmHg. This should be used with palpation skills to identify which bony areas are having higher pressures.
The information gathered from the pre-op evaluation is presented to the surgeon and other team members in presurgery conference. In this arena any potential barriers to healing (such as incontinence, lifestyle issues, smoking) are discussed as well as the surgical plan [6]. A printout of the pressure mapping is given to the surgeon and correlated with X-rays; with this he/she determines the best surgical approach. The team sets up a plan of care to address the factors that may increase the patients’ risk for recurrence.
16.3 Post Myocutaneous Flap Surgery Protocol
The patient is generally admitted one day prior to surgery. At this time it is important to discuss any equipment issues that will be addressed as the patient is on bed rest. This frequently entails ordering new parts such as tires and upholstery or even sending the entire wheelchair to a vendor to be evaluated for repairs. It is important that this happen as soon as possible as repairs often take several weeks to get approved and delivered.
The majority of myocutaneous flap patients follow a post-surgery protocol (Table 16.1).
Table 16.1
Post myocutaneous flap surgery protocol
1–4 weeks | Strict bed rest on Clinitron bed |
3 weeks | Stitches removed |
Electrical stimulation if necessary | |
4 weeks | Change bed to air mattress |
Evaluate PROM of LE | |
Cleared for prone gurney | |
Cleared for weight training on gurney | |
6 weeks | Initiate sitting program |
8 weeks | Discharge from unit |
The first 3 weeks are strict bed rest. During this time the physical therapist is primarily working on equipment issues; however, the therapist is still following the patient and monitoring the patients’ progress through rounds and team conferences. After 3 weeks the surgeon removes the sutures, at this time the therapist becomes more active in the patients’ daily program. At 3 weeks we begin a strengthening program in bed using elastic bands. This program focuses mainly on the muscles needed for transfers: the pectoralis muscle group, the latissimus dorsi, the triceps, and shoulder stabilizers. In addition, if the suture line has any openings, the therapist may initiate electrical stimulation to the wound to help accelerate healing. Baker et al. [7] found that electrical stimulation applied to the wound can accelerate healing time of wound by more than 25 %. The protocol used for electrical stimulation follows the guidelines from this study (Table 16.2).
Table 16.2
Protocol for electrical stimulation for wound healing
TENS | |
|---|---|
Mode | Normal mode |
Intensity | Below palpable muscle contraction |
Rate | 50 pps |
Wave form | Asymmetrical biphasic |
Phase width | 100–225 |
Electrode placement | Around wound within 1 cm or in wound |
Electrode type | Disposable |
Treatment | 1 h per day 5–7 days per week |
Timer | Set with unit on continuous and then set 60 min |
Electrical stimulation is generally applied until the wound is completely healed. Wound measurements are taken weekly to show progress (Figs. 16.2 and 16.3).
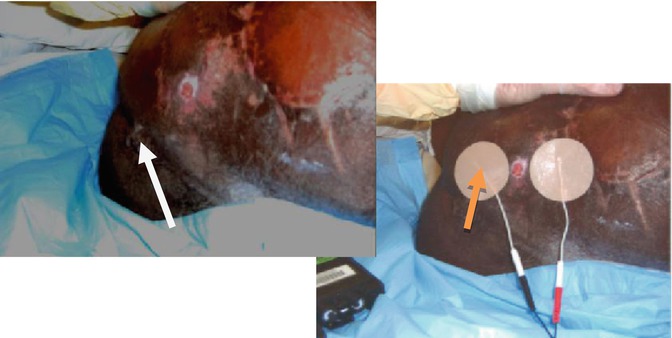
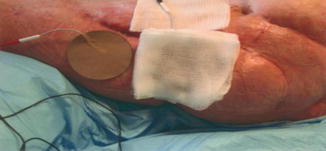

Fig. 16.2
Example of electrodes placed around the wound. Arrows indicate location of wound

Fig. 16.3
Example of a wound with the electrode placed over a gauze soaked with saline. The second electrode is placed distal to the wound
At 4 weeks post-surgery, if the surgical wound is stable, the patients are generally cleared for range of motion evaluation. At this time the patient’s lower extremities are assessed to determine if they have enough passive range of motion to sit. During the evaluation the therapist is looking not only for hip joint range of motion but also skin tautness. The observation of the skin is very important as often the skin becomes taut prior to feeling an end-feel in the joint. This is especially true for individuals with low tone who have been independently dressing themselves prior to surgery. The patient needs a minimum of 70° of flexion to sit in a reclining wheelchair and would need to do recline or tilt pressure relief. At least 90° of hip flexion is necessary to sit in an upright wheelchair. If the patient does not have adequate range of motion or is at risk for losing his/her passive range of motion, then he/she is put on a passive range of motion program 3–5 days a week. At this time the patient is usually cleared to begin getting on a prone gurney. The gurney allows them to spend time off of their surgical areas, get out of their rooms, and begin weight training to improve their strength (Fig. 16.4).
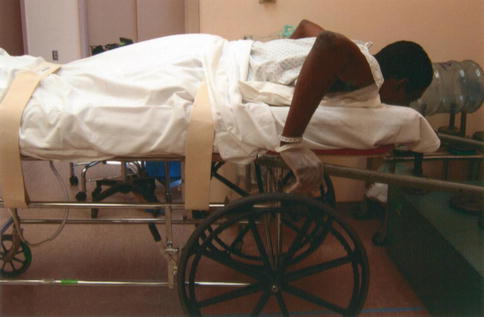

Fig. 16.4
Individual on a prone gurney doing the Rickshaw machine. He presses down on the arm bars to raise weight. This is one exercise performed in the weight training class
The weight training program has two components, a power program to address the muscle used mainly during transfers and an endurance program for the muscles involved in wheelchair propulsion. The weight training class is held five times per week. The weight training program is supervised by a physical therapist or physical therapy assistant to ensure that proper lifting technique is being practiced.
16.4 Initial Sit
At 6 weeks the patient is generally cleared to initiate a sitting program, if the surgical site is stable and he/she is cleared by the surgeon. The sitting program begins with a half hour of sitting. On a regular program this increases a half of an hour every day until the patient reaches 6 h (generally 12 days after the start of the sitting program). See Table 16.3. If the patient is placed on a slow program, he/she would increase one-half hour every other day. Prior to sitting the therapist should inspect the patient’s skin and after sitting repeat the inspection to ensure that no openings occurred as a result of sitting. The therapist should note any area of increased redness and modify the patients’ cushion or seating system to reduce this pressure. Once the patient reaches 6 h of safe sitting, he/she can be discharged home and will remain on the 6 h/day sitting limitation for at least 30 days until he/she is reevaluated by the surgeon in the outpatient clinic.
Table 16.3
Sitting program
Day 1 | ½ h |
Day 2 | 1 h |
Day 3 | 1½ h |
Day 4 | 2 h |
Day 5 | 2½ h |
Day 6 | 3 h |
Day 7 | 3½ h |
Day 8 | 4 h |
Day 9 | 4½ h |
Day 10 | 5 h |
Day 11 | 5½ h |
Day 12 | 6 h discharged |
Prior to the initial sitting, the therapist should determine based on range of motion evaluation which chair the patient can safely sit in. The therapist should select a cushion (if on preoperative evaluation the patients’ cushion was found to have low sitting pressures, this cushion can be used) that will reduce shear and peak sitting pressures. In addition, the therapist should determine what form of pressure relief and what type of transfer is safest for the patient. Typically, patients who have lower-level injuries (T8 and below) with good strength and more than 100° of hip flexion are allowed to perform assisted depression transfers. Individuals that do not meet the above criteria are generally transferred using a mechanical lift. If it was suspected during the pre-op evaluation that transfers were a cause of the sore, then a mechanical lift may be the best option for the initial sit.
16.5 Pressure Relief
Pressure relief should be practiced every 15 min and must be maintained for at least 15 s [8]. There are a variety of pressure relief options; again it is important to take into account the patients’ hip range of motion. Forward lean pressure relief requires more than 110° of flexion. If teaching the forward lean pressure relief method, it is necessary to palpate the ischial tuberosities and ensure they are lifting off of the sitting surface. Depression and side lean pressure relief are other options; again the therapist should palpate the ischial tuberosities and educate the patient that those bones must be completely unweighted to ensure proper blood flow. During a depression pressure relief, it is important that the patient control the lift and descent. Landing on the cushion after a pressure relief can cause damage to the surgical site. If teaching the side lean pressure relief, the patient must be instructed on the need to do pressure relief on both sides. Individuals with power wheelchairs may use tilt in space or recline functions for pressure relief. A patient using a tilt in space must be able to tilt more than 50° for effective pressure relief; this may vary depending on patients’ position and type of cushion [8]. Research completed by Coggrave and Rose [8] suggested that 65° of tilt was necessary for the TcPO2 to return to prior preload levels. It is standard practice to perform a pressure mapping of the patient in the tilted position to ensure that he/she is getting adequate pressure relief from his/her tilt in space seating system. Recliners must be reclined fully for adequate pressure relief. It is important to note any potential shear affects with recline pressure relief and to identify if the patient is sitting appropriately in cushion and has not shifted after recline. The use of power recliner and power tilt in space seating systems is most often utilized by individuals with tetraplegia. However, the spinal cord injury population is aging and developing more symptoms of overuse syndromes and weight gain. There are an increasing number of individuals with paraplegia needing power chairs and even power seating systems (Fig. 16.5).
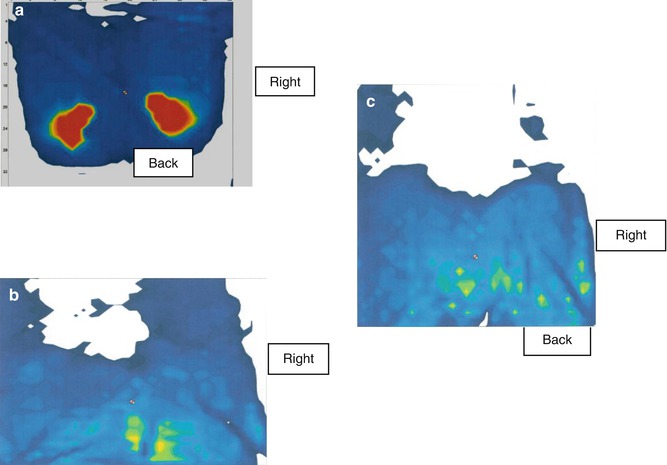

Fig. 16.5
(a) The sitting pressures of an individual in upright position. (b) A pressure mapping of the same individual at 45° and (c) the same individual at full recline. The red again indicates high sitting pressures, and the dark blue and green indicate lower sitting pressures. The figure shows higher pressures over the ischial area at full upright position and over the coccyx area with 45° of recline only. The pressures during the fully reclined position are lower and will allow for pressure relief in this position
Pressure relief is of utmost importance, and the therapist needs to identify if the patient can perform pressure relief adequately and what equipment he/she needs to do so. There have been some dynamic seat cushions that use a form of alternating air to increase and decrease pressure providing a form of pressure relief [9]. These cushions are often expensive, are bulky, and have not mapped well. The low pressure is comparable to some cushions but peak pressures were significantly higher. These cushions may be an alternative to adding a power seating component, but thorough evaluation and trials need to be performed prior to ordering this cushion for a patient post-reconstructive surgery. Education on the importance of pressure relief cannot be reviewed enough with the patients, as the lack of effective pressure relief is a primary cause of pressure sores. The therapists have discovered that auditory cues are helpful in reminding patients to perform pressure relief. We have issued watches with countdown timers set to go off every 15 min to patients and found that the watches increased the frequency with which the patients remembered to do their pressure relief.
On the first few days of a sitting program, the therapist will continue to make small modifications to the cushion or wheelchair to manage any area of redness that may occur. The focus during the first few days is patient education on pressure relief and skin inspection. The patients are trained to inspect their own skin before and after sitting, and long-handled mirrors are given to assist with this task. If a patient is not able to perform skin inspection, education on how to instruct a caregiver is provided. In addition, the patients are educated what to do should an opening or redness occur. Bed positioning to reduce pressure over different areas is demonstrated, and the patients are encouraged to continue prone positioning when in bed.
16.6 Functional Evaluation
When the patient reaches 3 h of sitting, they are generally cleared to begin transfer training and functional evaluation. Transfers to and from the mat are assessed first to ensure that the patient can safely transfer. If a patient uses a transfer board, they will begin practicing this task. The patient should be educated on lifting his/her body and moving it across to other surface. The patient should be discouraged from sliding across a board. If they are unable to lift and clear buttocks during a depression transfer, assistance will need to be provided until the patient has regained the strength and balance to return to independent depression transfers. A transfer board may be recommended at this time to reduce the distance and allow for small controlled lifts. It is important that the patient control the descent of his/her transfer as to not land hard. Landing with excessive force can damage the new flap site. When the patient can safely perform transfer to and from the bed, more advanced transfers should be performed such as wheelchair to commode, to car, and to tub bench. Evaluation of these transfers not only allows the therapist to assess the transfer but also gathers more information about the patient’s life and activities outside of the hospital. Can the patient access his/her toilet? How much time does he/she sit on his/her toilet for bowel care? Does he/she have a padded toilet seat? Does he/she do pressure relief during his/her bowel program? Where does he/she spend majority of his/her time? Is he/she driving? Does he/she use his/her cushion in his/her car seat when driving? One patient that had come through the pressure ulcer management unit seemed to be doing everything correctly. His transfers were good, his wheelchair was in good shape and fit him appropriately, and his cushion provided good pressure distribution with very low peak pressures. Although he had a scoliosis and pelvic obliquity, his seating system seemed to be accommodating for this. Upon practicing transfers, the therapist discovered that the patient had to transfer forward into his van seat and that on average the patient was spending approximately 4 h per day driving in his van. When the patient transfers were evaluated in his personal setting, it was found that he had to transfer forward out of his wheelchair and slide across onto his seat as the swivel portion of his van seat was not working. This caused a great deal of shearing over the surgical site. In addition, when his car seat was pressure mapped with him sitting in it, it was found to have very high peak pressures over surgical area. The therapist added a low-profile air cushion and reduced the pressure significantly (Fig. 16.6a).
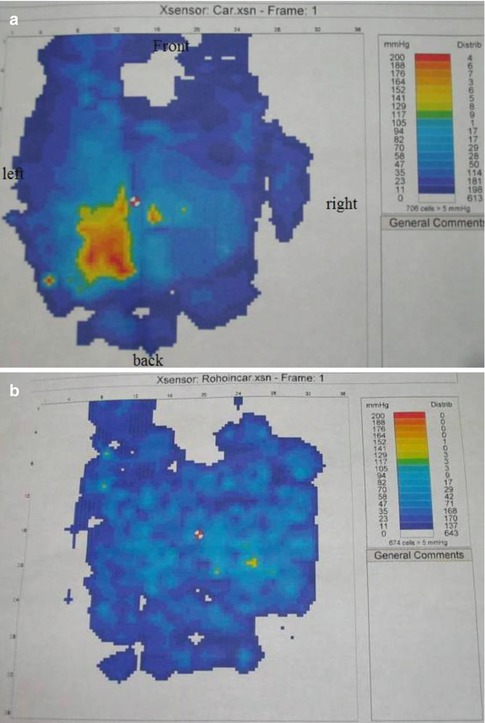

Fig. 16.6
(a) Pressure map of an individual sitting in his car. He has higher pressures over his left ischial areas. (b) Pressure mapping of the same individual in his car after adding a 2 in. Roho cushion. The pressures over his left ischial area have been greatly reduced
The patient was able to see using the pressure mapping system how much pressure he was getting from sitting in his van, and he was able to verbalize the need for pressure relief when driving.
Many times evaluating a patient in his/her environment can give the therapist a great deal more insight into the problems and risks they face when discharged from the hospital. Home evaluations are good source of information, although it is not possible or necessary to perform evaluations on all patients when the patient has identified a barrier or the situation seems precarious; it can be helpful to evaluate the home. One patient that had returned just 3 months after his first flap surgery warranted an evaluation. During this evaluation we were able to look at the setup of his home. In talking with the patient, he had said that he had a padded toilet seat and he was able to transfer to it. During practice transfers onto the hospital commode, his transfers were good, without shearing or trauma to surgery site. However, with the home evaluation, the occupational and physical therapist found that the patient had to get on the floor and scoot across his bedroom, the hallway, and bathroom floors to the toilet on his bottom, as his wheelchair would not fit in the bathroom. From there he raised himself up to the toilet or the bath bench. This is a very high-risk activity post reconstructive surgery, and paired with the patient’s incontinence, it was probably the activity that led to the pressure sore or at the very least the reoccurrence.
Stay updated, free articles. Join our Telegram channel

Full access? Get Clinical Tree


