Chapter 9 Periumbilical Perforator Sparing Components Separation 
1 Clinical Anatomy
1 Rationale for Sparing the Periumbilical Perforators
 Components separation for ventral hernia repair requires release of the external oblique muscle lateral to the linea semilunaris and separation of the avascular plane deep to the external oblique. This allows midline advancement of the rectus abdominis in continuity with the internal oblique and transversus abdominis muscles. As originally described, components separation requires wide undermining of the skin and subcutaneous layer to adequately expose the external oblique muscles for subsequent division. Consequently, perfusion of the undermined skin flaps can be compromised, which increases the risk of skin flap necrosis, infection, and dehiscence. In addition, extensive elevation of abdominal skin flaps creates a large wound surface predisposing to postoperative hematomas and seromas.
 To address this major shortcoming of conventional components separation, a modified technique of elevating partial subcutaneous flaps with preservation of the periumbilical perforating vessels arising from the inferior epigastric vessels can be performed. The rationale for using the technique of periumbilical perforator sparing (PUPS) components separation is to maximize skin blood supply. The preservation of blood flow to the midline abdominal wall should minimize complications, especially skin flap ischemia and infection. In addition, by avoiding wide undermining, subcutaneous dead space is minimized, which may reduce the incidence of seromas or hematomas. Furthermore, preservation of blood supply to the abdominal wall in ventral hernia repair allows expanded applications for patients with obesity, diabetes mellitus, a recent smoking history, and for those with stomas as well as those who require concomitant panniculectomy.
2 Innervation and Blood Supply to the Abdominal Wall Muscles
 In performing all techniques of components separation abdominal wall reconstruction, it is important to understand the musculofascial anatomy, innervation, and blood supply of the anterior abdominal wall. The anterior and posterior releases in components separation allow preservation of the blood supply and innervation of the abdominal wall muscles.


3 Blood Supply to the Abdominal Wall Skin
 The blood supply to the abdominal wall skin is based on direct cutaneous vessels in addition to numerous branches of deep vessels that are known as musculocutaneous perforators. Whenever abdominal wall skin is undermined, as in components separation, defining the source of vascularity to the remaining skin in critical.
 The concept of vascular territories called angiosomes further elucidates our understanding of the blood supply to the abdominal wall skin. From a clinical perspective, preservation of the primary angiosome to an anatomic territory of skin maximizes blood flow to that territory. The primary central anterior abdominal wall angiosome is supplied by multiple cutaneous perforator branches of the deep epigastric artery system. Microdissection analysis of the vascular anatomy of the anterior abdominal wall skin and subcutaneous tissue has confirmed that perforator branches of the deep inferior epigastric vessels provide the main blood supply to this region. More specifically, the periumbilical region, mostly just inferior and lateral to the umbilicus is the region with the highest concentration of these perforator vessel branches (Fig. 9-1). The PUPS components separation technique focuses on maintaining this rich vascular network, thereby maximizing blood supply without compromising the degree of muscle flap advancement possible.
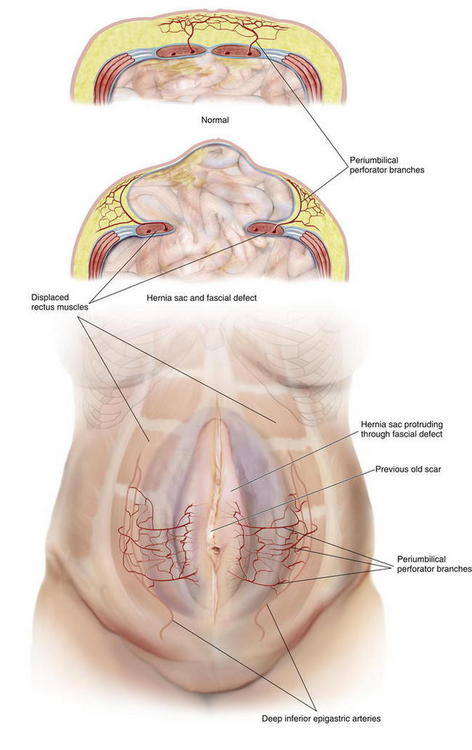
2 Preoperative Considerations
1 Optimization of Comorbidities
 The primary goal in the management of the ventral hernia patient is to repair the hernia while minimizing the incidence of postoperative complications, including recurrence. As with any surgical procedure, preoperative patient optimization is vital to reducing the risk of postoperative complications. This includes smoking cessation, control of diabetes mellitus, weight loss, maximization of nutritional status, establishing an exercise routine, preoperative Staphylococcus aureus screening, and optimization of pulmonary and cardiac status.
2 Defining the Defect and Patient Anatomy
 Preoperative Physical Examination
 A focused preoperative physical examination is very important in planning the operative approach in abdominal wall reconstruction and helps identify the appropriate candidate for PUPS components separation. Components separation procedures are useful for midline and paramedian hernias in which the fascia cannot be approximated without flap release and advancement. In general, components separation can allow fascial approximation for most midline defects smaller than 20 cm at the waistline.

 Preoperative Abdominal CT Scan
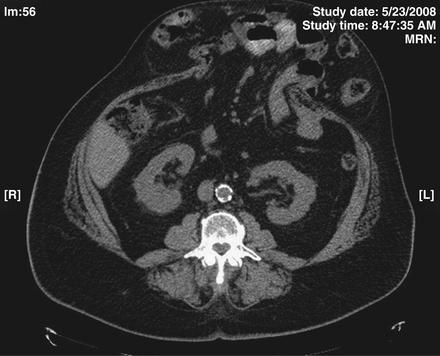
 Preoperative imaging studies also are useful in planning the operative procedure. A preoperative computed tomography (CT) scan provides an accurate measurement of the size of the ventral hernia defect and can demonstrate the size and contents of the hernia sac (Fig. 9- 2). This information can help predict the need for a components separation procedure. A CT scan also may reveal the presence of any other hernia defects or other pathology otherwise not appreciated on physical examination. Other hernia defects potentially identified on a CT scan can then be addressed at the time of abdominal wall reconstruction.
3 Choosing the Type of Components Separation
 The technique of PUPS can be performed in essentially any patient thought to be a candidate for components separation.
 The conventional components separation (as described in Chapter 8) requires significant skin undermining and division of the periumbilical perforators and should be performed only if extensive subcutaneous skin flap elevation is necessary (i.e., as done during removal of an infected onlay synthetic mesh). Otherwise a periumbilical perforator sparing technique, performed open or laparoscopic should be attempted in all cases requiring components separation.
 Procedures that preserve the periumbilical perforators include the open PUPS components separation and the laparoscopic components separation procedures.
 If dissection and removal of the hernia sac results in partial subcutaneous flap creation then one should continue that dissection around the periumbilical perforators and perform an open PUPS components separation. If there is no skin flap creation during removal of the hernia sac then a laparoscopic components separation can be performed (as described in Chapter 11).
4 Choosing the Type of Mesh
 Mesh placement is strongly advised once the PUPS components separation procedure is completed in order to minimize post operative hernia recurrence.
 In the patient with multiple comorbidities, who is at higher risk for developing a postoperative surgical site infection, the implantation of a biologic matrix to reinforce fascial closure after components separation may be more appropriate than a synthetic mesh. Similarly, if the patient has a clean-contaminated or contaminated wound, then a biologic matrix should be implanted. A patient with minimal or no comorbidities and a clean operative wound class can have a synthetic mesh implanted for fascial reinforcement. If the wound is too contaminated or dirty, then mesh implantation should be avoided and a staged repair with mesh implantation at a later date should be considered.
3 Operative Steps

2 Preoperative Markings (Fig. 9-4)
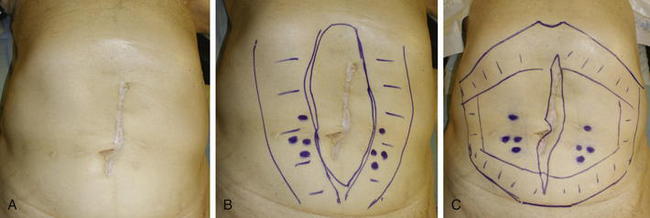
 Before surgery, the patient’s abdominal wall is marked. The hernia defect is outlined, and the locations of the periumbilical perforators are marked in reference to the rectus abdominis muscles (Fig. 9-4, B). The perforators are usually located within a 6 cm radius of the umbilicus but can be more laterally positioned in the presence of a large hernia sac.


