SURGERY OF THE TEAR SAC
Francois Codere, Russell Gonnering, John L. Wobig, and Roger A. Dailey
Dacryocystorhinostomy (DCR) is fundamental to the cure of most patients with epiphora due to lacrimal excretory obstruction. When conservative methods fail, it is indicated:
1. As the initial procedure in lacerations of the common canaliculus
2. In acute and chronic dacryocystitis
3. In complete obstructions of the tear sac or nasolacrimal duct (exclusive of the newborn)
4. In flaccid lacrimal passages with negative primary and secondary dye test
5. When foreign bodies in the tear sac cannot be removed by massage, probing, or irrigation with pressure
6. As a procedure preliminary to restoring drainage form the conjunctival sac by the insertion of Pyrex glass or other tubing
The following technique is essentially that which Ohm first described in 1920. He split the medial wall of the tear sac as well as the nasal mucosae parallel and adjacent to it and sutured both posterior flaps together. The anterior flaps were sutured next. Although not the fastest method, it has had as high or higher percentages of cures than any other method.
DACRYOCYSTORHINOSTOMY
Because good hemostasis is an important factor-in DCR, every adult patient is urged to have a local anesthetic with monitored anesthesia care (MAC). The local consists of a vasoconstrictor combined with hyaluronidase and an infiltrative anesthetic. MAC is administered by an anesthesiologist or certified registered nurse anesthetist and consists of oxygen as necessary, monitoring, and intravenous sedation using medications chosen by the anesthesia staff. Its maximum effect should be present when the local anesthetic is administered.
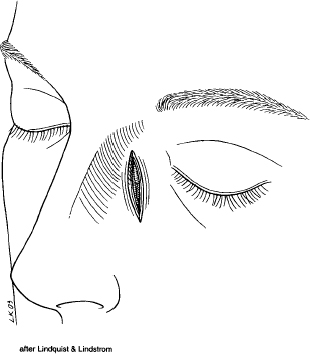
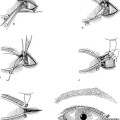
The eye on the operative side is topically anesthetized with proparacaine hydrochloride. Infiltrate subcutaneously with lidocaine 2% with epinephrine (1:100,000) in the operative area below the medial canthus and in the region of the infratrochlear nerve above the medial canthal tendon (Fig. 13-1). Packing gauze, 0.5 in. wide and 6 to 8 in. long, saturated with equal parts of cocaine hydrochloride 10% and epinephrine hydrochloride (1:1,000) or NeoSynephrine hydrochloride 2% is packed into the nose in the region of the attachment of the anterior tip of the middle turbinate. When a general anesthetic is used, the same infiltration and nasal packing are employed.
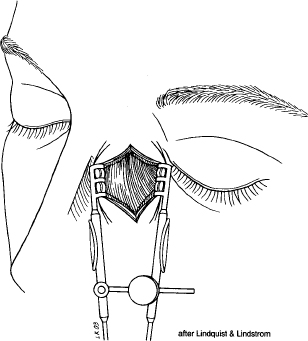
The skin incision is made 11 mm medial to the medial commissure, starting just superior to the medial canthal tendon insertion and extending inferiorly and slightly laterally for ~ 20 mm (Fig. 13-2). The knife should not cut deeper than the subcutaneous fascia. After cutting through the remaining subcutaneous tissue with a sharp Stevens scissors, insert a self-retaining, spring-type retractor such as the Agricola (Fig. 13-3). Hemostasis is obtained using a handheld battery cautery unit. This facilitates initial orbicularis fiber separation as well.
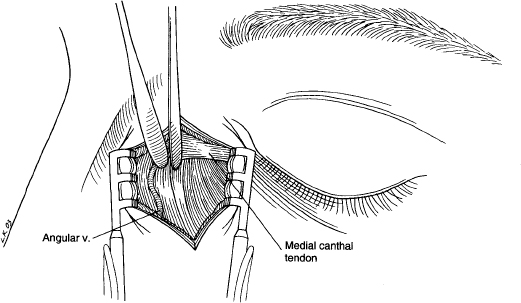
With two Freer elevators, locate the angular vein as it crosses the medial canthal tendon (Fig. 13-4). Press the vein to the medial side (as in this case) or lateral side with one elevator while the other elevator begins the separation of muscle and periosteum exactly beneath the point where the medial canthal tendon attaches to the bone. With pressure against the bone, direct the tip of the elevator inferiorly and outward until the region below the spine of the anterior lacrimal crest is reached. The periosteal division will be ~ 3 to 5 mm medial to and will extend inferior to the margin of the anterior lacrimal crest. Now elevate the periosteum on both sides of this incision and over the anterior lacrimal crest, then posteriorly beneath the tendon to the posterior lacrimal crest. Next, free the nasolacrimal duct from the bone inferiorly as far as possible in the nasolacrimal canal.

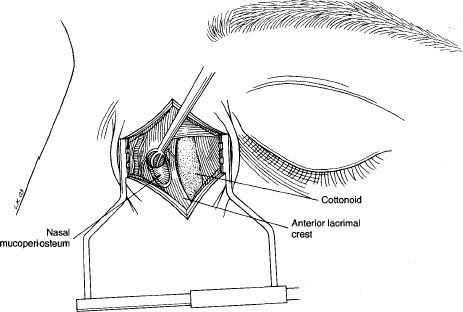
The lacrimal sac is now infiltrated with local anesthetic and a 0.5 in. square cottonoid is then inserted between the soft-tissue lacrimal sac and bony lacrimal fossa (Fig. 13-5). The cottonoid should previously have been dipped into a mixture of epinephrine hydrochloride (1:1,000) followed by cocaine hydrochloride 10%. The cottonoid then serves three purposes: hemostasis, anesthesia, and protection of the sac during bone removal.
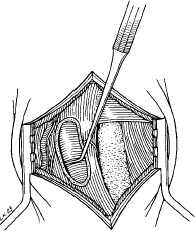
At this time, exchange the spring retractor for one with longer teeth, such as a Goldstein, which will reach the periosteum and give better deep exposure. Remove the nasal packing in preparation for bone removal. Using the Hall drill or similar substitute with a dental burr, an oblong area of bone anterior to the lacrimal crest is removed taking care not to injure the nasal mucoperiosteum (Fig. 13-6). Use irrigation to prevent excessive heat buildup and facilitate visualization. Separate the nasal mucoperiosteum from the underside of the bone using a dental burnisher or Clevdent No. 1 (Fig. 13-7). Remove the cottonoid and inject the nasal mucoperiosteum with the local anesthetic.
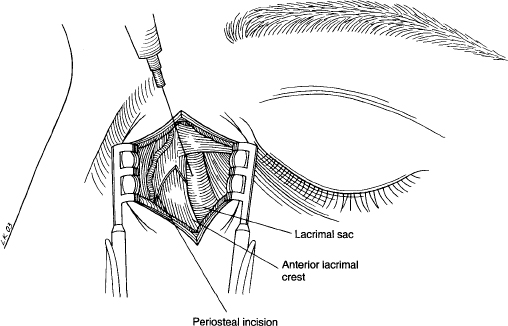
FIGURE 13-5 The lacrimal sac is infiltrated with local anesthetic.
A 45-degree Kerrison punch is then used to enlarge the vertical dimensions of the bony opening (Fig. 13-8). The most important area to remove is just in front of the posterior lacrimal crest and under the medial canthal tendon. Never cut the tendon because it is a most important guide to adequate removal of the bone beneath its insertion.
The bony bridge of the anterior lacrimal crest that remains is then removed using a rongeur (Fig. 13-9). This occasionally will lead the surgeon into the anterior ethmoid air cells. This typically poses no problem, and we suggest a conservative “deskeletonization” of these cells.
The last portion of bone to be removed is the medial half of the nasolacrimal canal. First separate the nasal mucoperiosteum from the canal down to the inferior turbinate. A rongeur can then be used to remove this bone. The Kerrison is helpful to smooth the rough edges of the hannulus where the anterior and posterior lacrimal crests meet inferiorly. A good rule in all tear sac surgery is never to have a bony margin closer than 5 mm to the common canaliculus.
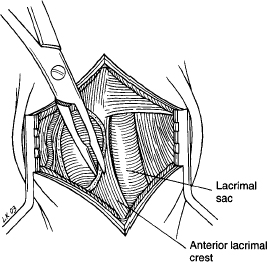
FIGURE 13-9 The remaining bony bridge of anterior lacrimal crest is removed using a rongeur.
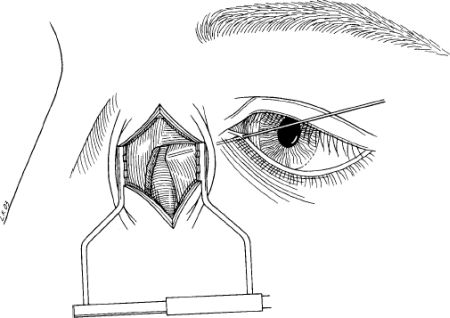
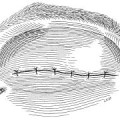
Attention is now focused on the tear sac. The Goldstein retractor is loosened and a zero probe inserted through either canaliculus to “tent” the medial wall toward the nasal mucoperiosteum (Fig. 13-10). A No. 11 Bard-Parker blade is used to cut through both the periosteal and the mucosal layers of the medial wall of the sac slightly lateral to the tip of the probe. When the wall has been perforated, remove the scalpel and insert one blade of a sharp curved Stevens or iris scissors into the sac. Extend the incision to the top of the fundus and to the bottom of the nasolacrimal duct. Make a similar incision in the nasal mucoperiosteum adjacent to and parallel with the one in the tear sac. Remove the posterior flap of the tear sac and nasal mucoperiosteum with a forceps and scissors. There is no need to sew these flaps together.
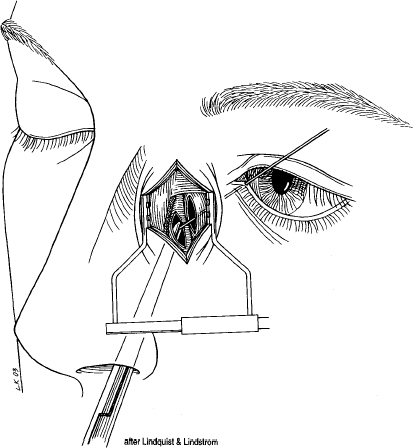
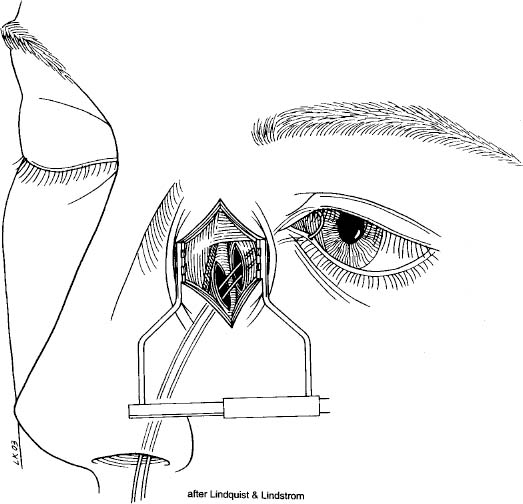
At this point, a Quickert probe with a piece of silicone tubing glued on the sharp end can be inserted in either canaliculus and directed into the open sac, where it can be grasped, under direct visualization through the wound, using a straight hemostat placed up the nose (Fig. 13-11). Another Quickert probe attached to the opposite end of the silicone tube can then be passed through the opposite canaliculus in the same fashion. The silicone is tied with a square knot. Ensure that there is no tension on the puncta (Fig. 13-12). If bleeding is a problem at this point, 0.5-inch petroleum jelly gauze packing can be placed up the nose or an adequate amount of Instat 0ohnson & Johnson) can be placed beneath the flaps anterior to the tip of the middle turbinate.
It is not always necessary to place silicone tubing. It is suggested for pediatric cases, canalicular stenosis, and reoperations. The alternative is to place a Metamyd ointment-soaked strip of 0.25-in. packing gauze in place behind the anterior nasal and sac flaps. It is removed through the nose in approximately 2 weeks. This can be impossible to do in the pediatric population and in adult patients who are uncooperative unless a general anesthetic is used.
The anterior flap of the tear sac is now approximated with the anterior-based flap of nasal mucosa using two interrupted 5-0 polyglactin 910 sutures on a P-2 needle. Remove the retractor. The periosteum and orbicularis muscle are now closed as a single layer using running or interrupted 6-0 polyglactin 910 sutures. The 6-0 polyglactin 910 subcuticular suture is used to close the skin, and this is reinforced with a 6-0 silk running horizontal mattress suture.
An antibiotic steroid ointment is then placed on the wound and mildly pressure-patched for 1 day. If petroleum jelly gauze was used for hemostasis, it is removed through the nose the following day. If Instat is used, it can remain. The sutures are removed in 7 days and the silicone tubing usually remains in for 6 weeks. It can be removed through the nose after being cut in the medial canthus, or cut and then pulled through the upper canaliculus.
CONJUNCTIVODACRYOCYSTORHINOSTOMY (CDCR)
The following procedure is the simplest and most successful treatment in all cases in which both canaliculi on the same side are absent or obliterated, or when the medial 3 mm or more of the canaliculi are closed. It is also used in patients in which patent, flaccid canaliculi do not function and in those with paralysis of the lacrimal pump.
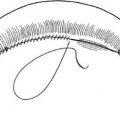
A DCR is performed as described, stopping before closure of the anterior flaps. No silicone or nasal packing should be in at this point. Dissect away the medial half or all of the caruncle, taking care to remove as little conjunctiva as possible with it. If the caruncle is flat, it is not resected. Insert a sharp Stevens scissors into the lacus lacrimalis 2.5 mm posterior to the cutaneous margin of the commissure (Fig. 13-13). Using blunt and sharp dissection, gently manipulate the scissors into the opened tear sac, being sure they are anterior to the body of the middle turbinate. If the anterior tip of the turbinate interferes, it should be resected.
With the blades of the scissors in place and held slightly open, pass a zero probe with the appropriate Pyrex tube in place, just above or anterior to the scissors, between the opened blades, and into the opened sac (Fig. 13-14). Now remove the scissors and simultaneously push the Jones Pyrex tube down the course of the probe into position. The interior of the nose must be observed with a headlight, to be certain that the inner end does not touch the septum. This can sometimes be visualized through the wound with standard lighting. If the tube does touch the septum, a shorter one must be used. A 5 0 polyglactin 910 suture is then wrapped around the collar of the tube and tied and then sutured in place in the medial canthus. A 4 mm collar is usually used to start and can be exchanged for a smaller one later. Close the anterior flaps and remainder of the wound as described for a DCR.
Many of our patients have had previous DCRs that have failed. In those that cannot be repaired by a second DCR, such as phimotic canalicular or patent ducts in which the postoperative dye test is constantly negative, the Pyrex tube can be inserted by combined external and intranasal approach.
The nose is packed with gauze or cotton saturated with equal parts of cocaine hydrochloride (10%) with adrenaline chloride (1:2,000). Externally, the medial canthal area is injected with Xylocaine (2%) with epinephrine (1:100,000). After 15 minutes the nasal packing is removed and the technique just described is repeated, with the operators inspecting the nose. The guide needle or Stevens scissor must emerge anterior to the middle turbinate and slant downward a few degrees. It usually is not necessary to tie the tube in with sutures (silk 6-0), if the patient does not “blow his nose.”
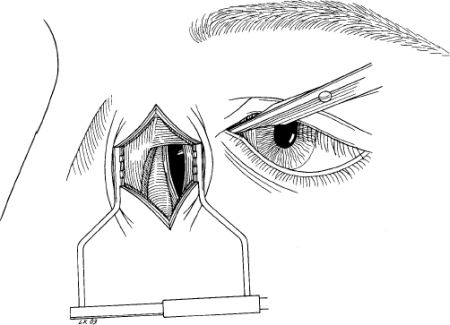
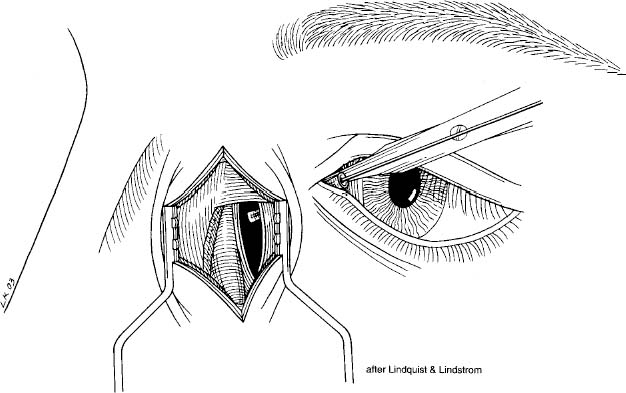
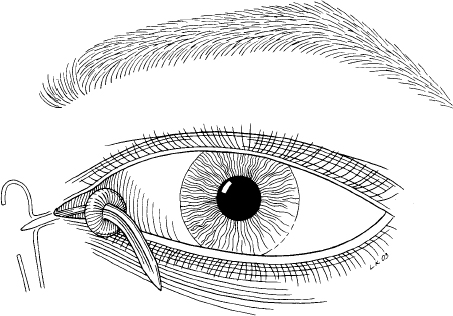
FIGURE 13-15 Gold dilator in place after Pyrex tube removed for cleaning.
POSTOPERATIVE CARE OF CDCR
In many ways, the postoperative care is the most important part of this procedure. Before operating, one should obtain a set of Pyrex tubes and lacrimal dilators. The patient is taught to “sniff” and not to “blow his nose.” If he must blow his nose or sneeze, he should first close his eyelids tightly or hold his finger over the end of the tube. If the tube becomes obstructed, he or one of his family should be taught to run a small wire (size Bowman 00) or a plastic “leader” the same size through it. Sniffing vigorously or squirting a little saline solution with a medicine dropper into the medial corner of the eyelids will usually reopen the tube. When there is a mild discharge in the nose, a saline solution douche and vigorous treatment of the nasal condition are required to keep the mucopus from plugging up the nasal end of the tube.
The patient is told that, if the tube comes out, he should seek advice as soon as possible. If seen within the first 24 hours, initial insertion of the small end of the lacrimal dilator can be followed by insertion of the larger end, and next by insertion of the small end of the larger dilator (Fig. 13-15). Then the tube, which is threaded collar first over a No. 1 or No. 2 Bowman probe, is reinserted. If the insertion encounters any difficulty, the larger end of the larger dilator is inserted. Now the Pyrex tube will pass in easily. Ophthaine solution is dropped externally, and cocaine hydrochloride (10%) with adrenaline chloride (1:1,000) applied on a cotton-tipped applicator to the nasal mucosae internally usually provides sufficient anesthesia.
Related posts:

Stay updated, free articles. Join our Telegram channel

Full access? Get Clinical Tree


