7
Midfacial Rejuvenation
Stephen P. Smith Jr. and Edwin F. Williams III
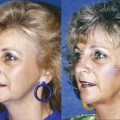
It is well established that the process of midface aging is characterized by three components that are progressive in nature: (1) laxity of skin/soft tissues, (2) inferomedial descent of the malar fat pad, and (3) loss of facial volume. Comparison of mother/daughter photographs demonstrates the classic findings of the aging midface (Fig. 7.1). These are lengthening of the lower eyelid complex with pseudoherniation of orbital fat, a hollowed appearance of the lowest part of the lower eyelids and upper midcheek resulting in a skeletonized infraorbital rim, a prominent nasojugal fold, and a deepened nasolabial fold.1–4 The aforementioned changes represent our surgical indications, and critical evaluation of the individual components of midface aging is essential for an effective approach to midfacial rejuvenation.
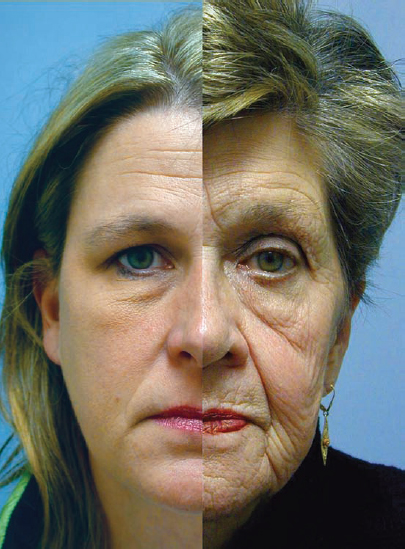
Fig. 7.1 (A) Daughter and (B) mother photograph representing nearly 30 years of facial aging.
The senior author (E.F.W.) has a vast experience with midfacial rejuvenation and has long believed that the brow and midface are intimately linked. Midfacial elevation via the temporal brow lift incision has long been the authors’ preferred approach, having performed more than 850 procedures over the past 11 years.5–7 Alternatively, other techniques are employed in the senior author’s practice. Whereas other surgeons have attempted to address the midface via a rhytidectomy incision,8–10 the authors discourage this approach, as the favored vector of lift is superolateral, which cannot be easily achieved with a laterally based incision. Additionally, we do not prefer the vertical (superior) suspension alone, but with certain indications we may suspend the midface through an extended lower blepharoplasty incision.11,12 Percutaneous techniques have also been employed,13–16 and in the form of barbed suture suspension by the senior author, but the technique has its limitations that will be enumerated later in this chapter. Over the past several years, our approach to midfacial rejuvenation now also routinely employs lipotransfer as an adjuvant or in isolation and represents the evolution of the senior author’s approach.17–21 This chapter will comprehensively detail the techniques currently employed in our practice for surgical rejuvenation of the midface.
♦ Anatomy
Knowledge of midface anatomy provides the facial plastic surgeon the ability to safely employ a multitude of techniques, which may require different planes of dissection. The midface is classically described as the triangular volume of tissue overlying the malar eminence. Its boundaries are the lateral canthus, oral commissure, and a line extending along the nasolabial fold to the medial canthus. The ligamentous attachments of the lower eyelid and lateral canthus have been well described, and laxity of these ligaments, particularly the subcutaneous position of the orbitmalar ligament, contributes to midface ptosis.22
The triangular malar fat pad is a subcutaneous structure located between the skin and the superficial musculoaponeurotic system (SMAS) with its base at the nasolabial fold and apex at the malar eminence. It is loosely adherent to the SMAS but densely adherent to the skin. In youth, the malar fat pad is seated over the malar eminence and overlies the orbital portion of the orbicularis oculi muscle (Fig. 7.2). With aging, the fat pad descends over the SMAS in an inferomedial direction. Hence, rejuvenation of this area involves resuspension of the malar fat pad in a superolateral direction.23,24

Fig. 7.2 The normal anatomy and descent of soft tissue volume is depicted. (From Krishna S, Williams EF. Lipocontouring in conjunction with the minimal incision brow and subperiosteal midface lift: the next dimension in midface rejuvenation. Facial Plast Surg Clin North Am 2006;14:221–228. Reprinted with permission.)
♦ Techniques
At present in our practice, four main surgical techniques are considered for rejuvenation of the aging midface. The techniques may be used alone or in combination based on each individual patient’s specific aging characteristics and goals, as identified in consultation. Although each of our techniques has merit, we will admit to a preferred approach. We will discuss our preference after the technical descriptions of our surgical approaches.
Brow-Midface
This surgical procedure and complications have been well described in the literature but will be comprehensively reviewed here.5,6,25 Initially, this procedure was performed via intravenous sedation and monitored anesthesia care, but general anesthesia is now the preferred route of anesthetic delivery. Unlike in rhytidectomy, the ventilating tube does not readily interfere with surgical access.
After appropriate anesthesia is initiated, the patient’s hair is secured with brown paper tape (Micropore; 3M, St. Paul, MN) to expose the planned surgical-incision sites. Patients are instructed to cleanse the hair and scalp with an antibacterial shampoo the morning of the procedure; no additional sterile preparatory solution is applied before the commencement of the procedure. Five standard endoscopic brow lift incisions are marked out with a surgical marking pen with one situated in the midline; two located lateral to the midline in the paramedian position (approximately at the lateral canthus) just posterior to the hairline; and two longer incisions located more temporally also camouflaged by the hairline and extending over a 4-cm distance above the helical crus and over the temporalis muscle and fascia. These incisions are typically placed ˜1 cm posterior to the hairline.
One percent lidocaine with 1:100,000 epinephrine is then infiltrated into the above-described incision sites and along the entire orbital rim, zygomatic arch, and midface bilaterally. The forehead region, lying between the orbital rim and the incision sites, is spared local anesthesia, as hemostasis can be achieved by dissection in the appropriate avascular plane. Ten minutes are allowed to transpire prior to the first incision to ensure adequate hemostasis. As part of the surgical draping of the patient, a moistened laparotomy sponge is draped over the patient’s head behind the incision sites and secured with an overlying surgical towel and clip. A moistened pad significantly absorbs any bleeding and prevents blood from trickling back into the remaining occipital hair.
If a transconjunctival lower lid blepharoplasty is planned, the procedure should be undertaken prior to midfacial suspension. After midfacial elevation, the lower lid may become excessively taut restricting ease of a transconjunctival entry to the lid. Conversely, an planned upper lid blepharoplasty should be deferred until the brow and midface are appropriately elevated so that an accurate assessment of residual cutaneous redundancy can be made.
Initially, the patient is inclined ˜60 degrees in a semisitting position, which facilitates ease of bone tunneling. Proper patient positioning cannot be overemphasized as it also allows visualization of the midface using the headlight and retractor. The right paramedian incision (vertically situated in the hairline approximately above the lateral can-thus) is made with a no.15 Bard-Parker blade down through the periosteum. Monopolar electrocautery achieves hemostasis along the cut edges of the wound, being careful not to apply excessive cautery to the exposed hair follicles. The cautery device is also used to ensure that the periosteum is completely incised. A small, sharp, flat periosteal elevator is used to dissect subperiosteally for a distance of a few centimeters circumferentially around the incision site. Little additional dissection is performed posterior to the incision site beyond the initial few centimeters toward the vertex, as extensive dissection toward the occiput provides limited benefit in transposition of the brow upward. With proper wound retraction using wide-double pronged hooks, a Stryker (Stryker Leibinger, Kalamazoo, MI) hand drill outfitted with a 1.5-mm-wide × 6-mm-long drill bit is used to enter the outer calvarial table at 30 degrees (to the horizontal) and joined with an opposing entry of the drill to form a bone tunnel through which the brow-fixating suture may be passed at the end of the case. The drill should be initially aimed perpendicular with the skull to engage the drill for the first 1 to 2 mm before angling the instrument forward in the prescribed 30-degree angle. In addition, the bone tunnel should be made in the posterior aspect of the incision, as suspension of the brow upward will cover the bone tunnel if the tunnel is created too anteriorly relative to the incision. An expanded polytetrafluoroethylene (ePTFE, or Gore-Tex; W.L. Gore and Associates, Inc., Flagstaff, AZ) CV-3 needle is passed through the tunnel to ensure easy passage of the needle at the end of the case. The authors have found that a 6-mm-long recessed drill bit permits ease of bone-tunnel creation while minimizing inadvertent entry through the full thickness of the skull if the drill bit is angled ˜30 degrees to the skull contour. Similarly, a 1.5-mm-wide bit will accommodate the desired caliber of needle.
A larger, sharp, flat periosteal elevator, which reduces the risk of periosteal shearing, is then introduced into the same paramedian incision where the bone tunnel was just made to elevate the remaining periosteum toward the arcus marginalis stopping short before actually breaking the arcus. All dissection is conducted with tactile feedback (the so-called smart-hand technique) or under direct vision with a headlight and Converse retractor. The authors have found that reliance on endoscopic equipment is both an unnecessary and time-consuming endeavor. Tactile feedback is used to elevate the central pocket (i.e., the three central incisions); whereas direct vision is needed to elevate the lateral, temporal pocket and the contiguous extension of the midface. When approaching the arcus, the smaller, sharp periosteal elevator is again used to release the arcus more definitively than can be achieved with the larger, flat periosteal elevator. When the elevator tip approaches a 1- to 2-cm distance above the supraorbital notch, the elevator is handled only in an upward, lifting motion to avoid any paresthesias or neurapraxias that may ensue from violating the supraorbital neurovascular bundle.
The midline incision is then performed to access the medial-brow complex. The principal objective is release of the periosteum at the arcus to achieve unrestricted brow elevation; and aggressive dissection of the musculature has been abandoned, as return of muscle function has been often observed despite the most meticulous removal of the procerus-corrugator complex. In addition, significant morbidity may arise from aggressive muscular resection, including contour irregularity, asymmetric brow depression, and the most dreaded outcome, frank cutaneous necrosis. Botulinum toxin type A has been the preferred method to address the medial depressor complex. The midline incision is closed with surgical clips before continuing to the left side. The left paramedian incision is then made, and the same method of bone-tunnel creation and periosteal release is performed as previously described for the contralateral, paramedian incision.
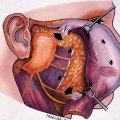
With complete dissection of the central pocket (medial to the conjoined tendons of the temporalis muscle), the longer, lateral temporoparietal incisions are performed. Dissection is carried down through the TPF so that a proper tissue plane may be achieved between the TPF and the true temporalis fascia to avoid injury to the frontal branch of the facial nerve. The incision should be situated ˜1 cm behind the hairline to lie over the temporalis muscle and not more posteriorly to avoid transection of the superficial temporal artery and to minimize the long trajectory of dissection needed to reach the midface (Fig. 7.3). Initial dissection is performed with a large, blunt elevator over the true temporalis fascia, and then the larger, flat periosteal elevator is used to break the conjoined tendon of the temporalis muscle that divides the central and lateral pockets. Directing elevation toward the right paramedian incision and passing the instrument through that incision will ensure that complete release of the tendon has been accomplished. Three periosteal elevators are used for the entire case (the small, sharp, flat elevator; the large, sharp, flat elevator; and the large, rounded, blunt elevator). Further, we preferred elevators coated with an ebonized finish to minimize unwanted, reflective glare off the surface.
Under direct vision with a headlight and Converse retractor, dissection is taken down to the orbital rim with the small, sharp periosteal elevator, carefully looking for the presence of the sentinel vein. If the vein lies in the direct path between the upper and midface, then it may be skeletonized and cauterized with a bipolar device and transected with scissors to permit entry into the midface. Injudicious cautery of the cephalic vessel, especially if the bipolar cautery tips are aimed superficially, may jeopardize the frontal branch of the facial nerve. The arcus marginalis is then released from the superolateral orbital rim near the lateral canthus with the periosteal elevator. The assistant places a finger along the lateral margin of the orbital rim to limit the surgeon’s dissection and to avoid excessive release of periosteum from the lateral canthus, which may otherwise contribute to undesirable, lateral-canthal elevation.
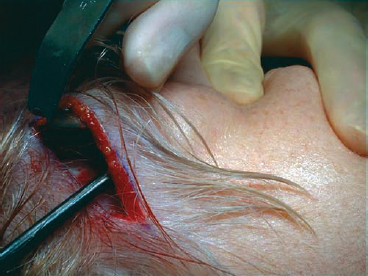
Fig. 7.3 Lateral incision approach to the midface ˜1 cm behind the temporal hairline.
With direct headlight-assisted visualization, the large, sharp periosteal elevator is guided downward to enter the temporal fat pad and then to release the periosteal attachments overlying the zygomatic arch itself. This approach provides direct access to the midfacial structures. Next, the periosteal elevator is continued inferiorly over the malar eminence to release the zygomaticus major and minor muscular attachments and malar fat pad from the underlying malar bone. Although minimal, medial dissection limits both lateral-canthal distortion and potential facial-nerve injury, the dissection is continued until the midfacial structures are adequately released. Once the zygomatic muscular attachments have been severed, the surgeon should be wary of further inferior dissection and unintended masseteric elevation that may result in trismus. A CV-3 Gore-Tex suture is passed through the temporalis fascia and muscle just anteroinferior to the temporoparietal incision and then passed through the malar fat pad with a long needle driver. This maneuver is technically difficult to perform and requires a learning curve to be proficient. Pulling the suture superiorly confirms sufficient release of the midfacial tissues has been achieved. If not, then further dissection medially and inferiorly is performed until appropriate release of the midface is observed. Before the suture is fastened superiorly to the temporalis muscle, the paramedian suture on the same side is tied down first. The paramedian suture is fixated first to relieve any tension on the suture that elevates the midface and to permit better brow positioning by suspending the most superior suture first. The CV-3 Gore-Tex suture is used to secure the overlying frontalis muscle through the bone tunnel in the paramedian incision. A technical consideration that should be observed is a generous bite of frontalis muscle needs to be grasped with the suture needle to achieve a secure and adequate suspension. The suture is secured using a square knot tied in the air, which is then fastened down. Gore-Tex permits sliding a square knot down into place. After the paramedian suspension has been completed and the incision closed, the surgeon should return to the lateral temporal incision to suspend the already distally placed suture through the malar fat pad to the proximal temporalis muscle and fascia at the incision site. The vector of suspension should be vertically oriented, and the suture through the malar fat pad should be situated more laterally over the malar prominence—both of which will minimize untoward distortion of the lateral canthus.
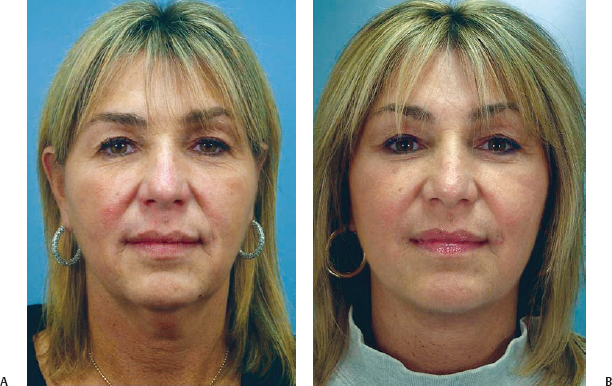
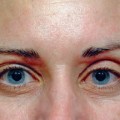
Fig. 7.4 Brow-midface technique: (A) preoperative frontal view; (B) postoperative frontal view.
Next, the TPF just anterior to the temporoparietal incision is sutured to the temporalis muscle and fascia more superiorly with the CV-3 Gore-Tex suture to pull the overlying brow and soft tissue superolaterally. This suture placement is undertaken twice. All incisions are then closed with surgical clips. Suturing in the hair-bearing scalp is both unnecessarily laborious in placement and removal, and the senior author has achieved a very favorable cosmetic result with surgical-clip closure. Antibiotic ointment is applied to the external incisions, and a pressure dressing is fashioned into place. We believe this stepwise approach to the brow and midface will ensure consistent, reproducible results (Figs. 7.4 and 7.5).
Complications
Asymmetry
Related posts:

Stay updated, free articles. Join our Telegram channel

Full access? Get Clinical Tree


