CHAPTER 15 Cavus Foot Correction
OVERVIEW
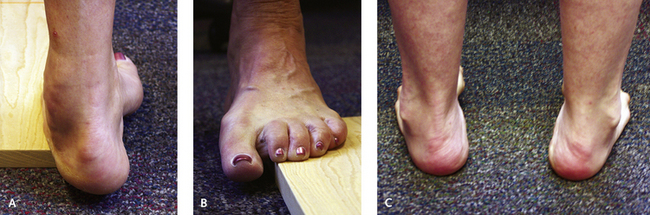
Correction of the cavus foot can be daunting. With adherence to some basic principles, however, the deformity usually can be well corrected and the foot dynamically balanced, with maintenance of as much motion as possible. The presurgical evaluation should ascertain the following: Where is the apex of the deformity? Is this a midfoot or a forefoot cavus? Is the forefoot in equinus? If so, is this a global equinus, or does it involve only the first or perhaps the middle metatarsal? How mobile is the first metatarsal? Is the foot rigid, or is the deformity passively correctable? Surgeons rely on the Coleman block test to determine flexibility of the hindfoot and forefoot (Figure 15-1). This test is certainly acceptable, but I also recommend manipulating the heel to see the effects of the hindfoot on the forefoot. If the heel can be reduced into heel valgus, then perhaps less correction will need to be done in the hindfoot and more in the forefoot. Finally, the most important component of the evaluation is to identify additional deforming forces on the foot. Invariably, the peroneus longus muscle is stronger than the anterior tibial muscle, and the posterior tibial muscle is stronger than the peroneus brevis muscle, with a variable degree of contracture of the gastrocnemius and soleus muscles present.
DECISION MAKING
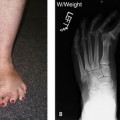
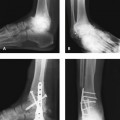
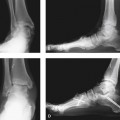
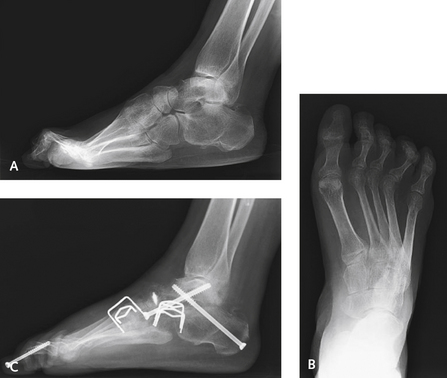
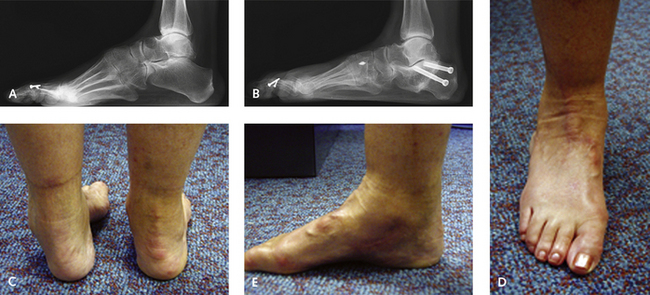
What are the indications for arthrodesis? At times a specific indication is obvious—for example, the presence of severe ankle arthritis will necessitate an arthrodesis for correction. A varus deformity associated with ankle arthritis and global foot cavus deformity is not ideally treated with a joint replacement (Figure 15-2). A triple arthrodesis is a good procedure, provided that the foot is correctly balanced with additional osteotomy and tendon transfer. The triple arthrodesis gained a poor reputation for correction of the cavus foot, particularly that associated with Charcot-Marie-Tooth disease, correctly named hereditary sensorimotor neuropathy. These arthrodesis procedures were performed in isolation, and as might be expected, the deformity recurred. The posterior tibial tendon inserts distal to the talonavicular joint, and unless the tendon is transferred, the medial foot deformity will gradually recur, with onset of adductovarus. Therefore, if a triple arthrodesis is thought to be the procedure of choice, it should be performed with appropriate transfer of the posterior tibial tendon, as well as additional tendon transfers as required (Figure 15-3).
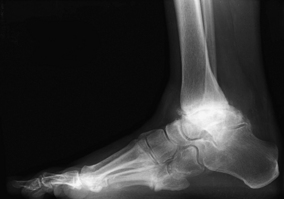
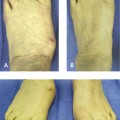
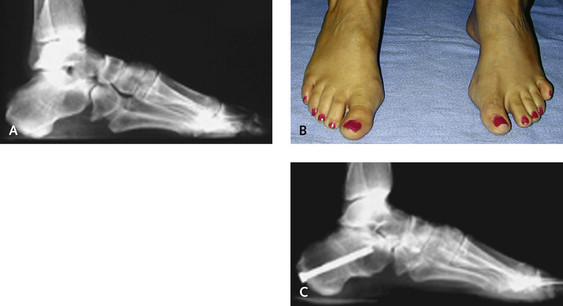
Generally, I perform a combination of a calcaneal osteotomy, a first metatarsal osteotomy, and a plantar fascia release. I then add whatever else is necessary to complete the correction, which may include a resection of the base of the fifth metatarsal, an ankle ligament reconstruction, or a midfoot osteotomy (Figure 15-4). The calcaneus osteotomy is a very utilitarian procedure to correct a cavus foot and, depending on the magnitude of the deformity, is always required in one form or another (Figure 15-5).
Although it is possible to perform an anatomic correction of the foot initially with a triple arthrodesis, these procedures are insufficient in the long term if muscular imbalance remains. Integral to the success of any of these procedures is a corrected foot posture, a plantigrade hindfoot relative to the forefoot, and muscle balance. Even with perfectly executed surgery, if the posterior tibial muscle is overactive relative to the evertors of the hindfoot, the foot will ultimately “fail,” with further adductovarus deformity. The posterior tibial muscle must therefore be transferred in many of these procedures. Frequently, a cavus deformity is associated with slight weakness of the anterior tibial muscle, and the posterior tibial tendon can be transferred as part of this corrective procedure. Usually, the transfer is to the dorsal aspect of the foot through the interosseous membrane. Occasionally, however, if the anterior tibial muscle is strong and the predominant deformity is adductovarus, then a split posterior tibial transfer can be performed, with the lateral limb being transferred into the peroneus brevis tendon. Not much of the split tendon is needed for the transfer; enough is transferred so that it can pass behind the tibia and fibula and hook into the peroneus brevis tendon with an effective suture tenodesis.
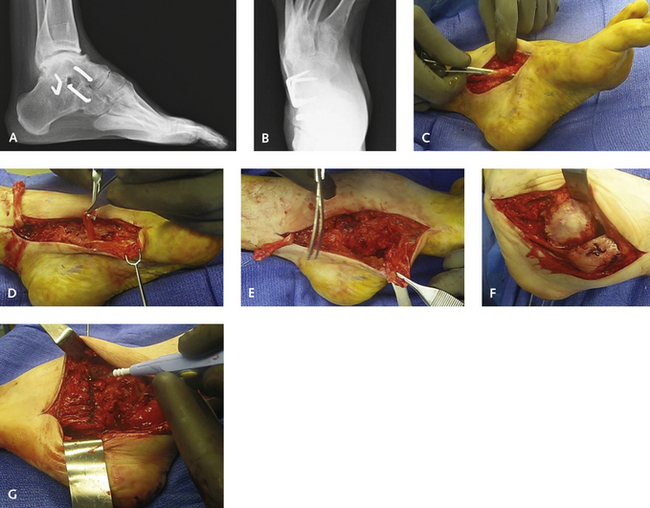
PLANTAR FASCIA RELEASE
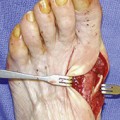
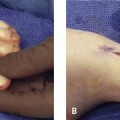
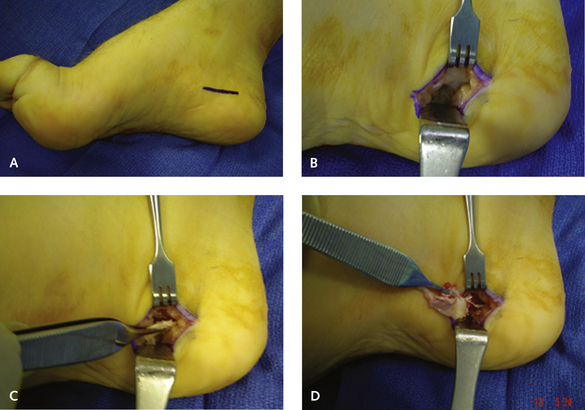
The easiest procedure for me is a complete fascia release through a medial longitudinal incision adjacent to the heel, which is made slightly more distally at the junction of the dorsal and plantar skin (Figure 15-6). Unfortunately, some patients may be left with a small patch of numbness on the medial aspect of the heel pad from this incision, and the potential for this outcome must be explained to patients preoperatively. The incision is made over a 2-cm length. With the incision kept longitudinally in the axis of the foot, no problems occur with wound healing during the lengthening and flattening of the medial column; problems would occur, however, if a vertical incision were made along the axis of the tarsal canal.
For severe deformity, in which cavo-adductovarus is present, the fascia of the abductor hallucis tendon also must be completely released. For some of these severe deformities, the intrinsic muscles must be stripped off the calcaneus completely, in addition to the fascia release. The stripping can be done using scissors or a broad periosteal elevator from within the same medial incision. This release must be very carefully planned, because multiple incisions cannot be used for the posterior tibial tendon transfer, the abductor fascia release, and the plantar fascia release (Figure 15-7).
CALCANEUS OSTEOTOMY
The incision is deepened through subcutaneous tissue in the plane between the peroneal tendon and the sural nerve. The nerve can be retracted either superiorly or inferiorly, depending on its position. The periosteum needs to be elevated over a broad area, because a wedge is going to be removed. I insert a retractor to separate the soft tissues and then place two small, curved retractors on either side of the calcaneus to expose the entire lateral tuberosity. A saw, not an osteotome, should be used to make the cut; a wide, fan-shaped saw blade should be selected. The cut is first initiated perpendicular to the axis of the calcaneus at a 45-degree angle to the tuberosity. I use a punching action with the saw blade so that I can feel the medial cortex as it is perforated. Once the first cut has been made, the second cut is made at an angle to this of approximately 20 degrees, but the appropriate angle depends on the size of the wedge. It is far easier to start out with a smaller wedge and then remove more bone if the correction is not sufficient (Figure 15-8).
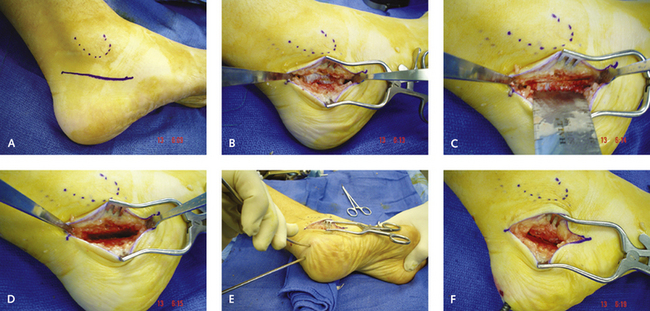
Once the wedge or bone has been removed, I then pull the heel into valgus. The osteotomy rarely closes down perfectly at this time, so additional perforation of the calcaneus typically is necessary to permit it to close down smoothly. This perforation to permit smooth reopposition of the cut surfaces can be accomplished by reinserting the saw blade while the osteotomy is partially closed. The cuts are then completed with multiple minor perforations (curfing). Depending on the deformity, the calcaneus is moved in two or three planes. The valgus closing wedge osteotomy constitutes the first plane. The tuberosity is then always shifted lateral to its axis under the subtalar joint, which improves the weight-bearing axis of the hindfoot. Movement in a third plane consists of a cephalic shift, which is added according to the pitch angle of the calcaneus. I try to flatten out the talocalcaneal angle, and the calcaneus–first metatarsal angle in particular flattens as the calcaneal tuberosity is moved cephalad.