CHAPTER 37 Ankle Arthrodesis
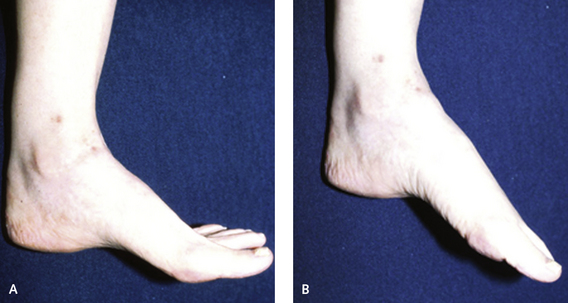
The desired position for ankle arthrodesis is with the foot in neutral with respect to the leg. There is rarely any reason to fuse the foot in equinus relative to the leg; this positioning will markedly increase the potential for complications, including subsequent arthritis of the peritalar joints as well as foot and knee pain. Much importance has been ascribed in the literature to the position of the foot and the need to translate the foot posteriorly under the tibia, which is not possible with either arthroscopic or mini-arthrotomy arthrodesis. The range of motion of the foot after arthrodesis depends on the preexisting deformity and, in particular, the motion of the remaining joints. The true sagittal motion of the tibiotalar joint accounts for approximately 70% of the sagittal plane motion. The sagittal motion after arthrodesis is in plantar flexion through the transverse tarsal joints (Figure 37-1). This motion may have a deleterious effect on both the talonavicular and the subtalar joints, as confirmed by an increase in arthritis in these joints in some patients.
INCISION AND JOINT EXPOSURE
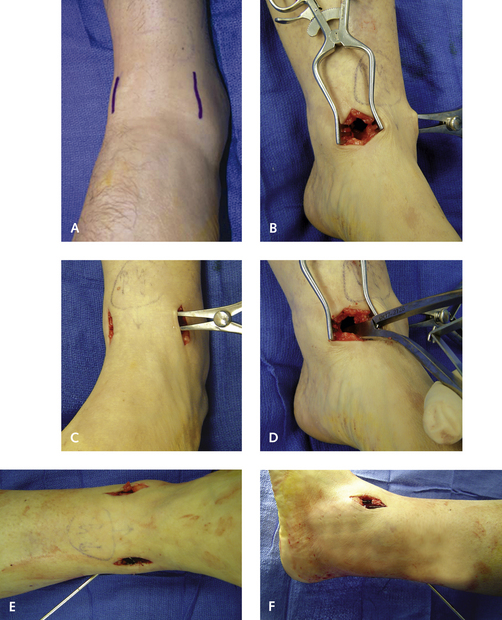
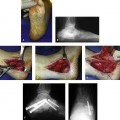
Two incisions are used for the surgical approach to the ankle. The first is a medial incision made between the notch of the malleolus and the anterior tibial tendon, over a 2.5-cm length. On the lateral aspect of the ankle, the interspace between the peroneus tertius tendon and the fibula is identified, lateral to the lateral cutaneous branch of the superficial peroneal nerve, which is retracted medially with the peroneus tertius tendon. On the medial aspect of the ankle the incision is deepened through subcutaneous tissue through the capsule, which is incised down to the periosteum, and a retractor is inserted. Stripping the anterior distal periosteum off the tibia is helpful; then the articular debris, osteophytes, and loose bodies should be removed. Both gutters should be debrided extensively, with a focus on the lateral gutter between the talus and the fibula. I pay a lot of attention to obtaining an arthrodesis between the medial and lateral aspects of the talus and the medial malleolus and the fibula. Either a rongeur or a smooth nontoothed laminar spreader is inserted in the medial incision, followed by insertion of a toothed laminar spreader laterally (Figure 37-2).
SCREW FIXATION
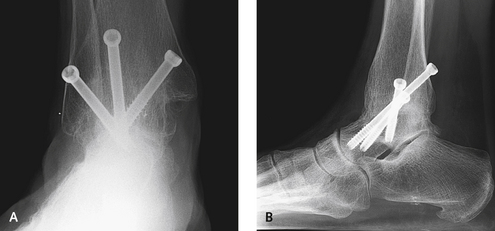
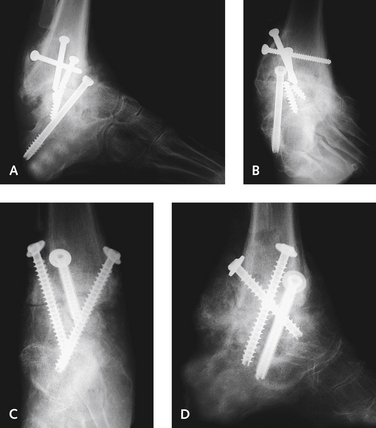
Crossing the plane of the screws is important. No screw construct should be created in which all of the screws are perpendicular to the axis of the joint. Parallel screw fixation should be avoided, because this technique is ineffective in controlling torsion and rotational forces. The fixation is performed with three screws placed over cannulated guide pins. The first guide pin is inserted from the medial malleolus to extend obliquely down toward the anterior aspect of the sinus tarsi. Why insertion in the medial malleolus first? I find that this is a more predictable placement that affords good compression of the joint. This screw is introduced from the medial aspect of the medial malleolus and extends down inferolaterally into the lateral body of the talus, directly above the lateral process of the talus. The screw must not enter the subtalar joint, and I rarely use a screw longer than 40 mm here. The foot can then be held in position while the second guide pin is introduced from the posterior leg adjacent to the Achilles tendon between the tendon and the sural nerve. The posterior axial screw is introduced next, from the posterior aspect of the tibia into the anteromedial neck of the talus; a 7.0-mm partially threaded screw, usually approximately 65 mm in length, is used.
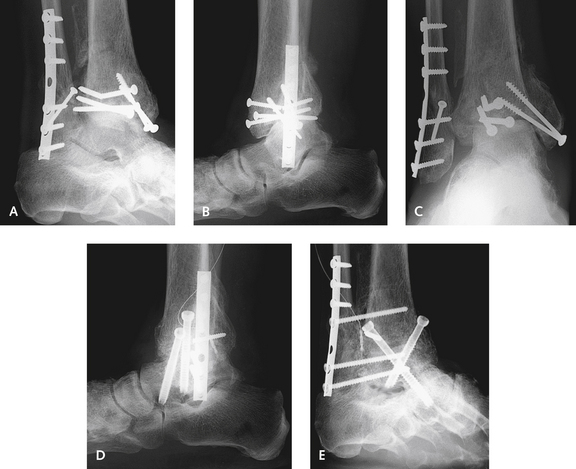
The insertion point for the third screw is variable and depends on the anterolateral bone shape. If a ridge is observed on the distal lateral tibia, then the third screw is inserted from the anterolateral tibia immediately adjacent to the fibula into the distal medial talus. If no shoulder is present on the distal tibia, then one or two smaller screws can be inserted from the fibula into the talus, but these screws are not my preference (Figure 37-3).
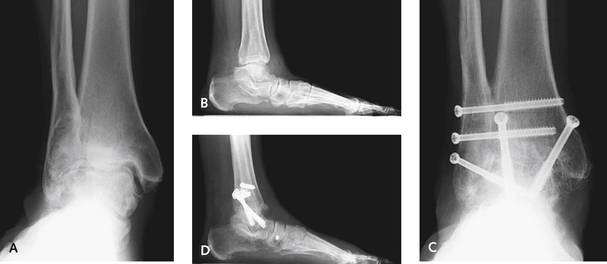
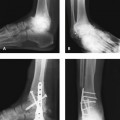
In complex cases and when the bone quality is poor, the arthrodesis can be extended up into the syndesmosis, with insertion of a few extra screws from the fibula into the tibia (Figures 37-4 and 37-5). Sometimes the second posterior-to-anterior screw does not go in smoothly and hits the first medial screw. In such instances, a more lateral starting point is preferable, with the guide pin inserted through the posterolateral tibia. The three screws ideally should go through the tibia into the talus, rather than through the fibula. If, however, placement through the fibula is necessary, it should be drilled through to allow the screw to compress the fibula against the tibia. I like to use compression here if at all possible. Clearly, the first medially inserted screw gives the most compression, with less afforded with each subsequent screw, despite the use of partially threaded screws. If the bone quality is very poor, I forego compression; after making sure that the joint surfaces are very well debrided, I then use fully threaded screws (Figure 37-6).
It is imperative to check for motion in the ankle after each
Stay updated, free articles. Join our Telegram channel

Full access? Get Clinical Tree


