Chapter 12 The Axillary Approach for Augmentation
The axillary incision approach to breast augmentation was published by Hoehler in 1973. As a plastic surgery resident in 1977, after reading published studies available at the time,1–5 the author performed a series of fresh cadaver dissections and operations to better define the pertinent surgical anatomy of the axillary approach.7 The author performed his first axillary augmentation as a plastic surgery resident in 1977, and in 1984 reported early clinical experience in 90 cases with up to 5 year followup7 in the journal Plastic and Reconstructive Surgery. From 1977 to 1993, all published reports of axillary augmentation used blunt, blind dissection techniques to create the implant pocket.1–8 In 1991, the availability of endoscopic instrumentation enabled the author to dissect the entire submammary or subpectoral pocket with direct vision, electrocautery dissection instead of the previous blunt dissection techniques. Other reports of endoscopically assisted methods for pocket dissection continued to use blunt dissection in various areas of the pocket, causing tissue trauma and bleeding that precluded optimal control and predictably rapid patient recovery.9,10 From 1992 to 2002, elimination of all blunt dissection, improved operative planning, improved instrumentation, and more precise and controlled surgical techniques enabled the author to predictably deliver 24 hour recovery and equivalent long-term outcomes via axillary subpectoral, dual plane, or submammary routes.13
A detailed knowledge of axillary and breast surgical anatomy is essential for surgeons to deliver predictably optimal outcomes with the axillary approach. Detailed knowledge of surgical anatomy enables surgeons to dissect adjacent to the axillary fat pad and enter the submammary or subpectoral space while minimizing risks of inadvertent injury to critical adjacent structures including intercostobrachial and medial brachial cutaneous nerves, the axillary artery and vein and their branches, and the brachial plexus.7,8
Surgical Anatomy and Evolution of Techniques
Early techniques of axillary augmentation accessed the implant pocket using scalpel and scissor dissection techniques.1,2 A significant number of surgeons continue to use blunt, blind dissection techniques in some areas of the pocket for both retromammary and retropectoral pocket dissection, despite the availability of endoscopic instrumentation that can eliminate blunt dissection.1–12 For the past 15 years, the author has completely eliminated all blunt dissection for submammary and subpectoral augmentations, significantly reducing bleeding and tissue trauma to improve patient recovery in axillary augmentation.
Surgical Anatomy for Axillary Augmentation
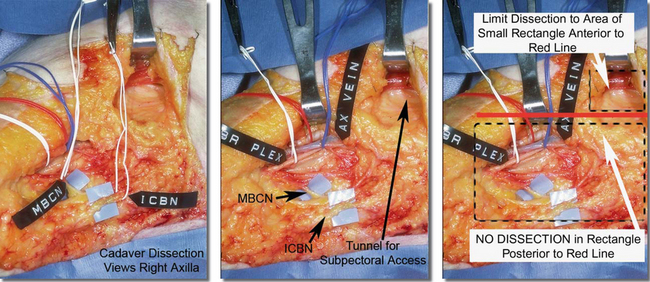
Figure 12-1, A, illustrates pertinent surgical anatomy of the axilla in a fresh cadaver dissection. Although the axillary artery, vein, and brachial plexus lie superior and deep to the access plane for axillary augmentation, suboptimal retractor positioning or inappropriate dissection into the fat of the axilla can damage any of these structures. More common sensory compromises in the axilla and upper arm occur when the surgeon dissects into the axillary fat, inadvertently damaging branches of the intercostobrachial or medial brachial cutaneous nerves (Figure 12-1 A, B), causing upper inner arm anesthesia or paresthesias.Chapter 4 presents additional, detailed descriptions and illustrations of surgical anatomy related to axillary augmentation.
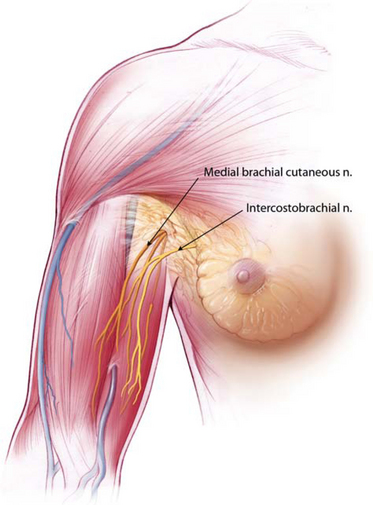
Figures 12-1B Locations of the medial brachial cutaneous nerve and intercostobrachial nerves that pass through the axillary fat pad.
Surgeons can completely avoid damage to neurovascular structures in the axilla by strictly adhering to specific landmarks and principles that are detailed later in the techniques section of this chapter. A key principle is to avoid any dissection whatever within the axillary fat pad, incising the lateral pectoral fascia or deep subcutaneous fascia directly over the lateral border of the pectoralis major, and entering a submammary, subfascial, or subpectoral pocket via a tunnel that is located anterior to all critical structures in the axilla (Figure 12-1A). During preoperative marking, surgeons can replicate the red line inFigure 12-1A on the skin, 1 cm posterior to and parallel to the lateral border of the pectoralis. Keeping all deep dissection anterior to this line avoids damaging the structures described previously. Superficial skin edge undermining for access and mobility, described later in more detail, does not risk damage to key structures.Figure 12-1B illustrates the relational anatomy of the medial brachial cutaneous nerve and intercostobrachial nerves to the breast and axillary fat pad.
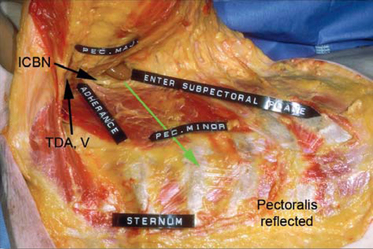
Figure 12-2 illustrates relational anatomy of the access tunnel to neurovasculature and musculature of the chest. In the tunnel for access, the dissection plane to enter the subpectoral space is immediately beneath the pectoralis muscle. Any dissection more posteriorly in the axillary fat risks damage to intercostobrachial nerve branches and branches of the lateral thoracic artery and vein that course in a superior–inferior direction in the fat on the floor of the tunnel. The optimal direction from the skin incision to enter the subpectoral pocket is in an inferomedial, not directly medial, direction to minimize risks of damage to branches of the thoracodorsal artery or vein.
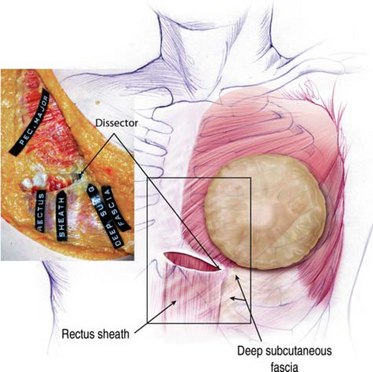
Figure 12-3 illustrates the musculofascial anatomy of the right chest with breast, skin, and subcutaneous tissue reflected. A blunt dissector beneath the pectoralis has been pushed inferiorly to demonstrate that subpectoral blunt dissection inferior to the pectoralis passes deep to the deep subcutaneous fascia lateral to the lateral border of the rectus sheath, detaching the deep subcutaneous fascia from its fusion with the lateral rectus sheath. Under direct endoscopic control, surgeons can divide origins of the pectoralis inferiorly to create a dual plane type 1 pocket, or leave the pectoralis origins intact for a partial retropectoral pocket. When relocating the inframammary fold inferiorly without dividing the pectoralis along the inframammary fold, dissection below the inframammary fold usually elevates the inferior-most origins of the pectoralis in continuity with deep subcutaneous fascia lateral to the rectus sheath.
Based on dissections after performing axillary augmentation in fresh cadavers,7,8 the author’s findings contradict findings of other surgeons who presented or reported that blunt dissection predictably divided the main medial origins of the pectoralis major muscle along the sternum and along the inframammary fold and that blunt dissection could predictably elevate the serratus muscle laterally.9 Instead, the author found it virtually impossible to divide the main body of pectoralis origins medially with blunt dissectors, that inferiorly along the inframammary fold the blunt dissector divided pectoralis origins off the fourth and fifth ribs and passed deep to the deep subcutaneous fascia below the inframammary fold, and predictable blunt blind elevation of the serratus muscle intact and in continuity with the pectoralis via the axillary approach is impossible. These findings were further confirmed when endoscopes became available by examining a bluntly dissected pocket with an endoscope.
Evolution of Pocket Dissection Techniques
Blunt dissection techniques, though successful, cause significant bleeding from vessels including the two large perforators in the inferior pocket of every subpectoral augmentation10 and sometimes the medial perforators along the sternum
Prior to endoscopically assisted, electrocautery dissection, techniques for pocket dissection used various blunt dissecting instruments to develop submammary and subpectoral pockets.1–8 Blunt dissection techniques, though successful, cause significant bleeding from vessels including the two large perforators in the inferior pocket of every subpectoral augmentation10 and sometimes the medial perforators along the sternum. Absent direct visualization, surgeons controlled bleeding almost entirely with pressure over the dissected area for extended periods. Blunt dissection causes substantial tissue trauma and trauma to rib periosteum and perichondrium, contributing to postoperative pain and immobility that incapacitated these patients for a minimum of 7–10 days and often longer, usually required narcotic strength pain medications, and encouraged the use of adjuncts such as intercostals blocks, local anesthetic instillation into the pocket, and pain pumps. Although bleeding is usually controlled by pressure and clots are removed by irrigation, significant amounts of blood soak into and remain in adjacent tissues, increasing inflammation, prolonging recovery and healing, and contributing to a significant rate of capsular contracture despite motion exercises, intraluminal steroids, and other measures. As a result, no published reports that use blunt dissection techniques can deliver as rapid recovery compared to published data on techniques that eliminate all blunt dissection.13
The development and refinement of endoscopic instrumentation and techniques10–13 enabled surgeons to dramatically improve the accuracy of axillary augmentation by providing direct visualization during pocket dissection, and providing control that allows more precise modification of pectoralis origins. Further refinements in techniques described later in this chapter have totally eliminated blunt dissection, dramatically reduced or eliminated bleeding, and enabled surgeons to deliver 24 hour return to normal activities following axillary augmentation without narcotic strength pain medications, and without drains, special bras, special straps or positioning devices, intercostal blocks, pain pumps, motion exercises, or any other adjuncts.13
Clinical Experience
Beginning in 1993, patients educated about all incision approaches could choose whatever incision approach they preferred according to staged, repetitive education and informed consent processes.14 Based on more extensive surgical experience and followup with axillary augmentation, the surgeon and staff more specifically informed patients of all potential nuisances, surgical control factors, and potential tradeoffs of the axillary approach beginning in 1995. A much smaller percentage of patients subsequently chose the axillary approach, with a substantial majority of patients (more than 70%) having augmentation between 1995 and 2005 selecting an inframammary approach.
Preoperative planning and implant selection after 1993 utilized dimensional and tissue based processes published in Plastic and Reconstructive Surgery.15,16 Beginning in 1997, all patients were encouraged to immediately resume full normal activities the evening of surgery. No drains, special bras or straps, intercostal blocks, pain pumps or narcotic strength pain medications were used in any patient after 1996.
Clinical Assessment, Operative Planning, and Implant Selection
Current preoperative clinical assessment and operative planning for axillary augmentation precisely follows the methods and processes of the High Five™ System15 and the previous TEPID™ System of quantitative tissue assessment and implant selection16 that is incorporated in the High Five™ System. Clinical assessment using this system prioritizes five critical decisions and uses five simple measurements that enable surgeons to complete all pertinent clinical assessment and operative planning decisions in 5 minutes or less. All decisions of pocket location, implant size, and inframammary fold position are based on defined, quantifiable tissue parameters individual to each patient.
Choice of implant pocket location determines soft tissue coverage for the patient’s lifetime, is the most important decision in every breast augmentation, and is based on quantitative measurements of soft tissue thickness. If soft tissue pinch thickness superior to the breast parenchyma (STPTUP) is >2 cm, submammary or subfascial pocket locations are options. If STPTUP is <2 cm, pocket location options to optimize long-term soft tissue coverage are limited to dual plane10 or traditional subpectoral pocket locations, in both cases preserving intact all medial origins of the pectoralis major along the sternum to the inframammary fold junction in every case. Measurement of soft tissue pinch thickness at the inframammary fold (STPTIMF) provides quantitative criteria on which to base a decision of whether to preserve all pectoralis origins intact along the inframammary fold to assure optimal coverage. If STPTIMF is <0.5 cm, surgeons should preserve the inferior origins of the pectoralis intact along the inframammary fold, and create a traditional retropectoral pocket. When STPTIMF is >0.5 cm at the IMF, coverage is adequate to allow surgeons to divide origins of pectoralis along the fold to create a dual plane pocket. These criteria and processes resulted in zero incidence of visible traction rippling or visible implant edges in 1664 reported cases with up to 7 year followup via axillary, inframammary, and periareolar approaches.10,12,17
If the patient requests the surgeon’s input in selecting an implant that is safest for the patient’s tissues long-term with the lowest risk of reoperation, implant selection is based on the High Five™ System15 that estimates an approximate implant volume based on quantitative measurements of individual patient tissue characteristics. This approximate implant volume is based on quantitated, measured, individual patient tissue characteristics, derived from the base width measurement of the patient’s existing breast parenchyma (BW), the stretch characteristics of the envelope (anterior pull skin stretch measurement or APSS), and assessment of the contribution of the patient’s existing breast parenchyma to stretched envelope fill (percent contribution to stretched envelope fill or PCSEF). If the patient has a specific implant size request based on a specific number of cc’s or grams, the patient must individually assume all responsibility for that decision in detailed, written, line-item informed consent documents,14 and the surgeon then considers whether that request is acceptable given the patient’s tissue characteristics and breast dimensions.
The fourth step in preoperative planning is defining desired nipple-to-inframammary fold distance (N : IMF) to create intraoperatively. The desired, new intraoperative position of the inframammary fold was determined subjectively by intraoperative visualization in cases prior to 1996 when the TEPID™ System16 provided a much more accurate, objective method of defining optimal fold position relative to the implant selected for augmentation. The TEPID™ System is integrated into the High Five™ System as the fourth critical decision in every breast augmentation. Specific methodology is detailed in the TEPID™ and High Five™ papers.15,16
Implant Types
Table 12-1 summarizes implant types and sizes in the series.
Table 12-1 Implant types and sizes
| 1977-1992 | 1992-2005 | |
|---|---|---|
| Implant types | ||
| Round, smooth shell, double lumen gel-saline (20 cc methylprednisolone in 20 cc saline in outer lumen) | 307 | 0 |
| Smooth, round gel | 24 | 0 |
| Round, textured saline | 0 | 6 |
| Round, smooth saline | 0 | 5 |
| McGhan/lnamed Style 468 full height textured saline | 348 | |
| Implant size range/faverage) | 180-400 cc/(273cc) | 195-400 cc/(286cc) |
Despite recent reports of inserting form stable, cohesive, anatomic gel implants (Inamed Style 410) via the axilla,17 no implants of this type were placed via the axilla by the author in the 410 premarket approval (PMA) study in the United States18 because the author feels that the axillary approach does not provide the most optimal control for insertion and consistent, predictable positioning of these devices, and adds additional risks of implant damage during insertion. Since 1992, the patient, not the surgeon, chooses implant type (except in complicated cases) using our previously described patient education and informed consent process.14
Preoperative Marking
Axillary incision location is critically important to minimize scar visibility. Optimal incision location is in the hairbearing skin of the deepest apical portion of the axillary hollow, with the anterior-most extent of the incision posterior to the lateral border of the pectoralis (Figure 12-4). Incision length can vary from 2 to 6 cm to accommodate varying instrumentation and implants. Axillary scar quality and minimizing damage to implants during insertion are far more important than incision length. Average ideal incision lengths of 4–5 cm minimize instrument trauma to skin edges and damage to implants from excessively short incisions. Although it is technically possible to insert inflatable implants through axillary incisions as short as 1.5 cm, incision lengths of 4–5 cm provide increased control and decreased skin edge trauma for surgeons who use state-of-the-art instrumentation and techniques. Scar visibility relates far more to scar quality compared to scar length, and an additional centimeter of incision length can dramatically improve control while minimizing trauma to skin edges and damage to the implant shell. Scar location (determined by incision placement) is the factor that most affects axillary scar visibility.
With the patient standing with her hands on her hips and flexing the pectoralis to define its superolateral border and deepen the axilla, the surgeon marks a line vertically over the middle of the lateral protruding border of the pectoralis (Figure 12-4, left), and places a dot in the apex of the hairbearing skin of the axillary hollow. Beginning at least 1 cm posterior to the lateral border of the pectoralis, the surgeon marks the incision line coursing superiorly and posteriorly through the dot in the apical hairbearing skin of the axilla. Paralleling skin creases in the axilla is not necessary, but it is important to keep the posterior part of the incision high in the axilla to minimize visibility. The objective is to create at least a 4 cm incision that begins posterior to the lateral border of the pectoralis and remains in the axillary apical hollow. Although shorter incisions are technically possible, they limit retractor width and visualization and encourage skin edge trauma that compromises scar quality.
Additional topographic markings can include the desired lateral border of the implant pocket, taking into account the desired base width of the implant selected, its base imprint over the curvature of the chest wall, the compliance of the patient’s soft tissue envelope, and the projection of the implant. All of these variables make defining a lateral pocket border nothing more than an estimate that should always be conservative in a medial direction to avoid overdissection of the lateral pocket.
Anesthesia and Local Anesthetic Instillation
Chapter 14 is devoted to preoperative care, anesthesia, and postoperative care. Optimal, state-of-the-art breast augmentation and optimal recovery require general anesthesia and muscle relaxants. General anesthesia can reduce the amount of intraoperative sedative and narcotic drugs a patient requires while enabling surgeons to perform a more accurate, controlled operation and dramatically reducing patient recovery times, enabling axillary augmentation patients who have had a general anesthetic to leave the surgical facility with an ASPAN score of 10 within 45 minutes of their transfer to recovery following the procedure.13 Instillation of a vasoconstrictive agent along the incision line may reduce dermal bleeding, but instillation of local anesthetic into any other area of the breast or pocket is unnecessary and has the following potential risks: (1) multiple small hematomas within the breast parenchyma, (2) increased electrical resistance in all infiltrated tissues that decrease the efficacy of electrocautery dissection, and (3) increased risks of pneumothorax with deeper infiltration or intercostal blocks. Intercostal blocks, instillation of local anesthetic agents into the pocket, and pain pumps are totally unnecessary for patient comfort postoperatively if surgeons apply proved processes that predictably deliver 24 hour recovery.1
Surgical Techniques and Surgical Scripts for the Axillary Approach
Specific details of surgical technique enable surgeons to predictably assure over 90% of patients that they can return to full, normal, non-aerobic activities within 24 hours following either axillary subpectoral or submammary augmentation for the first time in the history of breast augmentation.3 This rapid recovery is remarkable, because it completely redefines the patient experience in modern augmentation mammaplasty, and this level of recovery is predictable using inframammary, periareolar, and axillary incision approaches. Rapid recovery and return to normal activities within 24 hours is impossible without dramatically reducing tissue trauma and bleeding. The following techniques, combined with optimal anesthetic management, predictably allow surgeons to deliver their patients a completely redefined experience in breast augmentation.
Table 12-2 is a detailed script for inframammary augmentation derived from process engineering principles analysis1 that defines virtually every essential movement of every person in the operating room. Pilots, astronauts, and many business and industrial personnel routinely use defined processes and derived scripts or checklists for training and to optimize performance of numerous processes. Electronic files of this script are available in the Resources folder on the DVDs that accompany this book. After distributing this script to operating room personnel for review, surgeons can place these documents on a laptop computer in the operating room and have a designated person read steps of the operation in sequence. This simple process can dramatically reduce unnecessary and time wasting maneuvers, dramatically reducing operating times and patient recovery times.1 This script is also a valuable learning tool for plastic surgery residents.
Premedications and Anesthesia
The preanesthetic and anesthetic regimens and printed protocols that allow patients to be out to dinner the evening of surgery and resume full normal activities within 24 hours are available in a previous publication13 and in the Resources folder on the DVDs that accompany this book. All axillary augmentation patients follow exactly the same postoperative management regimen as inframammary and periareolar approach patients. Minimizing sedative and narcotic medications pre-, intra-, and postoperatively is critical to early return to full activities, and requires that the surgeon minimize surgical trauma and bleeding. Total narcotic doses intraoperatively average 2–4 cc of fentanyl. In recovery and stepdown, total narcotic doses are 25 mg of Demerol in two divided doses preceded by 6.25 mg of Phenergan administered 3–4 minutes prior to the Demerol. Using this regimen, nausea and vomiting have been virtually non-existent. Details of dosing and timing of doses are included in the previously referenced publication.13
Surgical Instrumentation
Endoscopic visualization and dissection substantially increase control and accuracy in axillary augmentation and render blind, blunt dissection techniques unnecessarily traumatic and obsolete. A variety of effective endoscopic instrumentation is available to surgeons. Instrumentation optimizes flexibility, accuracy, control, and efficiency when a minimum number of instruments and minimum number of instrument changes and moves provide maximum exposure and control. After using all instrumentation that was available in the 1990s, the author integrated available instrumentation that was most effective with new designs that better optimized flexibility, accuracy, and control.
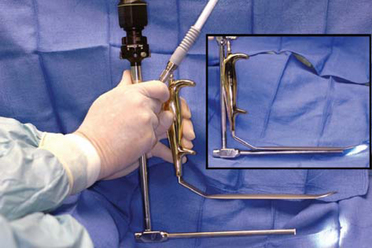
Most surgeons perform axillary endoscopic dissection through a single port. Conventional, straight endoscopes with a camera mounted in line with the endoscope partially obstruct optimal access for dissecting instrumentation that the surgeon introduces alongside the endoscope. The ROAM™ right angled endoscope–retractor system (Figure 12-5) was designed to (1) alleviate obstruction of the single axillary port by an in-line camera, and (2) allow rapid, omnidirectional endoscope movement independent of a retractor that provides exposure while allowing the surgeon to clamp the endoscope into the retractor when desired to free both hands for hemostatic control or delicate dissection. The ROAM™ right angled endoscope system is designed to function as surgeons are trained—establish exposure with appropriate retraction, then allow the eye (in this case, the endoscope) to roam the dissection field with a wider field of vision, constantly moving to visualize and anticipate anatomic details and neurovasculature for maximal control.
< div class='tao-gold-member'>
Stay updated, free articles. Join our Telegram channel

Full access? Get Clinical Tree


